# Moyasar Documentation
> Payment integration guides, REST API reference, and SDKs for accepting payments with Moyasar.
This file contains all documentation content in a single document following the llmstxt.org standard.
## 5-Minute Integration
# 5-Minute Integration
Use this guide to accept **mada**, **Visa**, **Mastercard**, **American Express**, and **UnionPay** in minutes using **Moyasar Form**.
## Before You Start
Before integration, prepare these requirements:
1. **Moyasar account and test mode**
- Create an account on the [dashboard](https://dashboard.moyasar.com/register/new).
- Start with **test mode** first so you can validate your flow safely before going live.
2. **API keys (important difference)**
- Copy your **publishable key** (`pk_test_...`) for frontend form initialization.
- Keep your **secret key** (`sk_test_...`) for backend verification only.
- Never expose `sk_*` in browser code, HTML, or mobile apps.
- Learn more here: [Get your API keys](../guides/dashboard/get-your-api-keys.md).
3. **Callback URL**
- Prepare a callback page on your website (for example: `https://example.com/payment-result`).
- This page receives the payment `id` in the query string after redirect.
- Your backend should use this `id` to fetch and verify payment details before confirming the order.
4. **Basic security checklist**
- Use HTTPS.
- Verify payment server-side (`status`, `amount`, `currency`) and do not trust redirect alone.
- Save payment IDs for reconciliation and support.
## Step 1: Add Moyasar Form Assets
Place the following tags in your page ``:
## Step 2: Add Payment Container
```html title="HTML"
```
## Step 3: Initialize the Form
```html title="HTML"
```
## Step 4: Verify Payment on Callback
After redirect, read the `id` query parameter from your callback URL, then fetch the payment from your backend and verify:
- `status` is `paid`
- `amount` matches your order amount
- `currency` matches your order currency
Use the payment API here: [Fetch payment](../api/payments/02-fetch-payment.api.mdx)
Example backend verification:
```javascript
const paymentId = req.query.id;
const response = await fetch(`https://api.moyasar.com/v1/payments/${paymentId}`, {
headers: {
Authorization: `Basic ${Buffer.from('sk_test_xxx:').toString('base64')}`,
},
});
const payment = await response.json();
if (payment.status === 'paid' && payment.amount === 1000 && payment.currency === 'SAR') {
// Mark order as paid
}
```
```python
payment_id = request.args.get("id")
response = requests.get(
f"https://api.moyasar.com/v1/payments/{payment_id}",
auth=("sk_test_xxx", ""),
)
payment = response.json()
if payment["status"] == "paid" and payment["amount"] == 1000 and payment["currency"] == "SAR":
# Mark order as paid
pass
```
```php
- Password: \
:::warning[Important]
The password must be kept empty
:::
## HTTPS
All API calls must be made over HTTPS; any API call made over HTTP will be rejected.
## Example
Here is an example of the [List Payments](../api/payments/03-list-payments.api.mdx) endpoint in different programming languages
```php
require 'vendor/autoload.php'; // Make sure Guzzle is installed via Composer
use GuzzleHttp\Client;
$client = new Client();
$response = $client->get('https://api.moyasar.com/v1/payments', [
'auth' => ['sk_test_123', ''],
]);
echo $response->getBody()->getContents();
```
```ruby
# frozen_string_literal: true
require 'http'
HTTP.basic_auth(user: 'sk_test_123', pass: '')
.get('https://api.moyasar.com/v1/payments')
```
```java
String url = "https://api.moyasar.com/v1/payments";
String username = "sk_test_123";
String password = "";
String credentials = username + ":" + password;
String encodedCredentials = java.util.Base64.getEncoder().encodeToString(credentials.getBytes());
HttpClient client = HttpClient.newHttpClient();
HttpRequest request = HttpRequest.newBuilder()
.uri(URI.create(url))
.header("Authorization", "Basic " + encodedCredentials)
.build();
HttpResponse response = client.send(request, HttpResponse.BodyHandlers.ofString());
System.out.println(response.body());
```
```python
url = 'https://api.moyasar.com/v1/payments'
response = requests.get(url, auth=('sk_test_123', ''))
print(response.text)
```
```js
const axios = require('axios');
let config = {
method: 'get',
url: 'https://api.moyasar.com/v1/payments',
auth: {
username: "sk_test_123",
password: ""
}
};
axios.request(config)
.then((response) => {
console.log(response.data);
})
.catch((error) => {
console.log(error);
});
```
```shell
curl https://api.moyasar.com/v1/payments -u sk_test_123:
```
```csharp
using (var client = new HttpClient())
{
string url = "https://api.moyasar.com/v1/payments";
string username = "sk_test_123";
string password = "";
var byteArray = Encoding.ASCII.GetBytes($"{username}:{password}");
client.DefaultRequestHeaders.Authorization = new System.Net.Http.Headers.AuthenticationHeaderValue("Basic", Convert.ToBase64String(byteArray));
var response = await client.GetStringAsync(url);
Console.WriteLine(response);
}
```
:::tip
You must replace `sk_test_123` with your API key.
:::
---
## Create Account and API Keys
# Get Your API Keys
Moyasar provides unique API keys to clients to authenticate API requests. Each account has two pairs of keys - one for testing and one for live transactions.
---
## API Keys

| Term | Description |
| :-------------- | :--------------------------------------------------------------------------------------------------------------------------------------------------------------------------------------------------------------------------------------------------------------------------------------- |
| publishable key | The publishable key allows for only one operation - creating a payment and thus can be attached to public web forms, such as an HTML hidden field. |
| secret key | The secret key provides access to all operations in the documentation. If you have not generated any of your secret keys previously, or if you lose a generated one, you have to **regenerate** it and store it in a safe spot; as you will not be able to view it again -- only its ID. |
:::tip
- Secret keys start with the prefix: `sk_`.
- Publishable keys start with the prefix: `pk_`.
:::
### 1. Test API Keys
Test API keys allow you to test your integration with Moyasar without risking the usage of real money.
### 2. Live API Keys
Live API keys are used to accept real payments. (these will appear once you activate your account)
:::tip
- Test API key start with the prefix: `pk_test_` or `sk_test_`.
- Live API keys start with the prefix: `pk_live_` or `sk_live_`.
:::
---
### Regenerate API Keys
You can regenerate your API keys by clicking on the `Regenerate Key` button next to the key that you want to regenerate
---
## Go-Live Checklist
Use this checklist before enabling real customer traffic.
## Keys and environment
- Switch to `pk_live_*` and `sk_live_*`
- Remove any test keys from production config
- Store keys in secure environment variables
## Security and correctness
- Enforce HTTPS across all payment pages
- Verify payment server-side before order fulfillment
- Validate `status`, `amount`, and `currency`
- Confirm callback and webhook endpoints are reachable
---
## LLM-Friendly Docs
Moyasar documentation is available in a machine-readable format designed for AI assistants and LLM-powered tools.
## What is llms.txt?
[llms.txt](https://llmstxt.org) is an emerging standard for exposing documentation in a clean, structured format that AI tools can consume directly — without parsing HTML or stripping JavaScript noise.
## Available files
| File | Description |
| :--------------------------------------------------------- | :------------------------------------------------------------ |
| [`/llms.txt`](https://docs.moyasar.com/llms.txt) | Index of all documentation pages with titles and descriptions |
| [`/llms-full.txt`](https://docs.moyasar.com/llms-full.txt) | Full content of every page in a single file |
Individual pages also have a clean `.md` version available under `/docs/.md`.
## How to use it
Point your AI assistant or LLM tool at `https://docs.moyasar.com/llms.txt` to give it structured access to the Moyasar documentation. Most tools that support context loading or custom knowledge bases can consume these files directly.
---
## Overview
# Getting Started Overview
This section is a complete onboarding path for a new integration.
What you will achieve:
- Set up a test account and keys correctly
- Complete one end-to-end test payment
- Verify payments securely on backend
- Understand test vs live differences
- Prepare your production launch checklist
---
## SDK and Libraries
# Mobile SDKs
With Moyasar you can accept payments on many platforms including native and hybrid mobile application.
## Available SDKs
Here is the available list of SDKs we offer:
- [iOS SDK](../sdk/ios/installation.mdx)
- [Android SDK](../sdk/android/installation.mdx)
- [Flutter SDK](../sdk/flutter/installation.mdx)
- [React Native SDK](../sdk/react-native/installation.mdx)
---
## Test vs Live Environments
Moyasar provides two environments to separate testing from real transactions.
## Test environment
- Keys: `pk_test_*` and `sk_test_*`
- Purpose: development and QA
- Uses sandbox behavior and test card numbers
## Live environment
- Keys: `pk_live_*` and `sk_live_*`
- Purpose: real transactions with real customers
- Requires production-ready security and monitoring
## What changes when switching to live
1. Replace test keys with live keys.
2. Confirm `callback_url` points to production HTTPS domain.
3. Re-test full payment lifecycle in production-safe rollout.
4. Enable logs/alerts for payment failures and webhook failures.
## Test Cards
Use only documented test card numbers in sandbox:
- [Card test scenarios](../guides/card-payments/test-cards.md)
Using random card numbers in test mode will fail.
---
## Your First Payment
# Your First Payment
This page will guide you to complete your first card payment using the Moyasar Form.
## Before Starting
1. Sign up for a Moyasar account on our [dashboard](https://dashboard.moyasar.com/register/new).
2. Get your publishable API key from [Get your API keys](../guides/dashboard/get-your-api-keys.md).
3. Review form configuration [here](../guides/references/form-configuration/index.md).
## Include Moyasar Form
Add these tags inside your page ``:
## Initialize the Payment Form
```html title="HTML"
```
## Complete a Test Payment
Use one of the [test cards](../guides/card-payments/test-cards.md) to complete the flow.
After payment, user will be redirected to your `callback_url` with payment `id`.
## Verify on Backend
Fetch payment by `id` using [Fetch Payment API](../api/payments/02-fetch-payment.api.mdx), then verify:
- `status` is `paid`
- `amount` and `currency` match your order
Only after backend verification, mark order as paid.
---
## 3DS in a Payment
By default, creating a card payment runs 3D Secure automatically — this is the
recommended approach for most integrations. You don't call any 3DS endpoint
yourself; Moyasar authenticates the cardholder as part of the payment.
## How it works
1. Create a payment with a card `source`. With 3DS enabled (the default), the
payment comes back `initiated` with a `source.transaction_url`.
2. Redirect the cardholder to `source.transaction_url`. They complete the
challenge with their bank (frictionless authentications complete without a
visible challenge).
3. The cardholder is returned to your `callback_url`, and the payment moves to
`paid` or `failed`. Always confirm the final status by
[fetching the payment](../../api/payments/02-fetch-payment.api.mdx).
**Endpoint:** `POST /v1/payments`
**Authentication:** Publishable key
```json title="POST /v1/payments"
{
"amount": 10000,
"currency": "SAR",
"callback_url": "https://merchant.example/return",
"source": {
"type": "creditcard",
"name": "John Doe",
"number": "4111111111111111",
"month": "12",
"year": "2030",
"cvc": "123",
"3ds": true
}
}
```
```bash title="POST /v1/payments"
curl -X POST https://api.moyasar.com/v1/payments \
-u pk_test_YOUR_PUBLISHABLE_KEY: \
-H "Content-Type: application/json" \
-d '{
"amount": 10000,
"currency": "SAR",
"callback_url": "https://merchant.example/return",
"source": {
"type": "creditcard",
"name": "John Doe",
"number": "4111111111111111",
"month": "12",
"year": "2030",
"cvc": "123",
"3ds": true
}
}'
```
## Controlling 3DS
The `source["3ds"]` flag toggles authentication for the payment. It defaults to
`true`.
| Value | Behavior |
| :--------------- | :----------------------------------------------------------------------- |
| `true` (default) | The payment is authenticated with 3DS before authorization. |
| `false` | 3DS is skipped (MOTO). Only allowed if your account is enabled for MOTO. |
:::warning[MOTO]
Skipping 3DS with `"3ds": false` is only permitted for accounts enabled for
mail-order/telephone-order (MOTO) transactions. Contact your account manager to
enable it. Without 3DS, fraud liability stays with the merchant.
:::
## Beyond the default
If you need to authenticate without charging, reuse an authentication across
payments, or supply values you obtained elsewhere, see:
- [Standalone authentication](./standalone-authentication)
- [Use an authentication in a payment](./use-an-authentication-in-a-payment)
When a payment fails during authentication, see [3DS Errors](../references/3ds-errors.md)
for the failure reasons.
---
## Overview(3d-secure)
# 3D Secure
3D Secure (3DS) is an authentication protocol that adds a layer of security to
online card transactions by letting the card's issuer verify the cardholder —
typically through an OTP or their banking app. A successful authentication also
shifts fraud liability from the merchant to the issuer.
Moyasar gives you several ways to run 3DS, depending on how much control you need.
:::note
Standalone 3D Secure is enabled only for selected merchants.
:::
## The ways to do 3DS
| Approach | How | When to use it |
| :-------------------------------------------------------------- | :------------------------------------------ | :------------------------------------------------------------------------------ |
| [Inside a payment](./3ds-in-a-payment) _(default)_ | Create a payment; Moyasar runs 3DS for you. | The common case — let Moyasar handle authentication and authorization together. |
| [Standalone authentication](./standalone-authentication) | `POST /v1/card_auths` | Authenticate a card on its own, without (or before) charging it. |
| [Reuse an authentication](./use-an-authentication-in-a-payment) | `source.card_auth_id` on a payment | Charge a card you already authenticated with a Moyasar standalone `card_auth`. |
| [Bring your own values](./use-an-authentication-in-a-payment) | `source.card_auth_data` on a payment | You ran 3DS elsewhere and want to pass the resulting values into a payment. |
:::note
The standalone and bring-your-own flows are opt-in: a payment uses them only when
you include `source.card_auth_id` or `source.card_auth_data`. A normal card payment
that omits both still runs 3DS automatically — see [3DS in a Payment](./3ds-in-a-payment).
:::
## Reference
- [Card Authentication API](../../api/card_auths/01-create-card-auth.api.mdx) — the `/v1/card_auths` endpoints.
- [Create Payment API](../../api/payments/01-create-payment.api.mdx) — the `source` fields used above.
- [3DS Errors](../references/3ds-errors.md) — failure reasons and messages.
Amounts throughout are in the currency's smallest unit (e.g. `10000` is `100.00 SAR`).
---
## Standalone Authentication
A standalone authentication (`card_auth`) is a 3D Secure authentication on its own
— it has an amount, a currency, and a card, but it does not charge anything. Use it
to authenticate now and charge later, or to authenticate on Moyasar and authorize
elsewhere.
Full request/response details are in the
[Card Authentication API](../../api/card_auths/01-create-card-auth.api.mdx) reference;
this page walks through the flow.
:::note
Standalone 3D Secure is enabled only for selected merchants.
:::
## 1. Create the authentication
**Endpoint:** `POST /v1/card_auths`
**Authentication:** Publishable key
```json title="POST /v1/card_auths"
{
"amount": 10000,
"currency": "SAR",
"callback_url": "https://merchant.example/3ds/return",
"source": {
"type": "creditcard",
"name": "John Doe",
"number": "4111111111111111",
"month": "12",
"year": "2030",
"cvc": "123"
}
}
```
```bash title="POST /v1/card_auths"
curl -X POST https://api.moyasar.com/v1/card_auths \
-u pk_test_YOUR_PUBLISHABLE_KEY: \
-H "Content-Type: application/json" \
-d '{
"amount": 10000,
"currency": "SAR",
"callback_url": "https://merchant.example/3ds/return",
"source": {
"type": "creditcard",
"name": "John Doe",
"number": "4111111111111111",
"month": "12",
"year": "2030",
"cvc": "123"
}
}'
```
When a challenge is needed, the response is `available` with a `transaction_url`:
```json
{
"id": "ca_2a1b...",
"status": "available",
"amount": 10000,
"currency": "SAR",
"transaction_url": "https://api.moyasar.com/v1/card_auth/ca_2a1b.../prepare",
"callback_url": "https://merchant.example/3ds/return",
"card": { "company": "visa", "last_digits": "1111" },
"result": null,
"created_at": "2026-05-20T10:00:00Z"
}
```
If the card isn't enrolled, the status comes back `failed` with no `transaction_url`.
## 2. Send the cardholder through the challenge
Redirect the cardholder to `transaction_url`. The in-browser flow is the same one
used by payments; frictionless authentications complete without a visible challenge.
Afterwards the cardholder is returned to your `callback_url`.
## 3. Read the result
[Fetch the authentication](../../api/card_auths/02-fetch-card-auth.api.mdx). Once the
cardholder finishes, `status` is `authenticated` or `failed` and `result` is
populated.
**Endpoint:** `GET /v1/card_auths/{id}`
**Authentication:** Secret key
The `result` object is only returned with secret key authentication. A publishable
key may fetch the authentication for 15 minutes after creation — for example to
check the `status` after the redirect — but `result` is always `null` on those
responses.
```json
{
"id": "ca_2a1b...",
"status": "authenticated",
"result": {
"eci": "05",
"authentication_value": "AAICCGhVkQAAACcQaCFSdYh0YUg=",
"ds_transaction_id": "f8c3a0d2-7e76-4df1-8ba4-f457386d14bf",
"version": "2.2.0",
"transaction_status": "Y",
"auth_scheme": "visa",
"acs_transaction_id": "002cef25-c015-4f95-bfd5-220138133161",
"ds_reference_number": "VISA.V 17 0003",
"acs_reference_number": "3DS_LOA_ACS_MOMD_020301_00793",
"three_ds_server_transaction_id": "f0d50f2f-86c4-47aa-a4e3-c81547c1f8fa",
"is_frictionless": false,
"message": null
}
}
```
See the [API reference](../../api/card_auths/02-fetch-card-auth.api.mdx) for every field.
## Webhook
A webhook fires when the authentication reaches a terminal state:
`card_auth_authenticated` on success and `card_auth_failed` when it fails or
expires. The payload matches the fetch response. Both events are only available
once standalone authentication is enabled for your account — until then they do
not appear in the webhook event list and cannot be subscribed to. See
[Setting up webhooks](../dashboard/setting-up-webhooks.md).
## Next: use it in a payment
Once authenticated, charge the card by referencing the authentication — see
[Use an authentication in a payment](./use-an-authentication-in-a-payment).
---
## Use an Authentication in a Payment
Two optional `source` fields let a payment use a 3DS authentication you already
have, instead of running Moyasar's own 3DS step. Both apply to `creditcard` and
`card` sources, and **either field disables Moyasar's 3DS for that payment**.
Omitting both keeps the [default flow](./3ds-in-a-payment) unchanged.
:::note
Standalone 3D Secure is enabled only for selected merchants.
:::
## Reuse a Moyasar authentication — `source.card_auth_id`
Reference a [standalone `card_auth`](./standalone-authentication). Moyasar attaches
the existing authentication to the payment's card and goes straight to
authorization.
**Endpoint:** `POST /v1/payments`
**Authentication:** Publishable key
```json title="POST /v1/payments"
{
"amount": 10000,
"currency": "SAR",
"callback_url": "https://merchant.example/return",
"source": {
"type": "creditcard",
"name": "John Doe",
"number": "4111111111111111",
"month": "12",
"year": "2030",
"cvc": "123",
"card_auth_id": "ca_2a1b..."
}
}
```
```bash title="POST /v1/payments"
curl -X POST https://api.moyasar.com/v1/payments \
-u pk_test_YOUR_PUBLISHABLE_KEY: \
-H "Content-Type: application/json" \
-d '{
"amount": 10000,
"currency": "SAR",
"callback_url": "https://merchant.example/return",
"source": {
"type": "creditcard",
"name": "John Doe",
"number": "4111111111111111",
"month": "12",
"year": "2030",
"cvc": "123",
"card_auth_id": "ca_2a1b..."
}
}'
```
The authentication must:
- belong to the **same account**,
- be **`authenticated`**,
- not be **already consumed** (each authentication can back a single payment), and
- match the payment on **card fingerprint, amount, and currency**.
If any check fails, the request is rejected with an `invalid_card_auth` error.
## Bring your own — `source.card_auth_data`
Supply 3DS values you obtained elsewhere directly on the source. Moyasar attaches
them to the payment's card and authorizes without running its own 3DS.
**Endpoint:** `POST /v1/payments`
**Authentication:** Publishable key
```json title="POST /v1/payments"
{
"amount": 10000,
"currency": "SAR",
"callback_url": "https://merchant.example/return",
"source": {
"type": "creditcard",
"name": "John Doe",
"number": "4111111111111111",
"month": "12",
"year": "2030",
"cvc": "123",
"card_auth_data": {
"provider": "acme-mpi",
"eci": "05",
"authentication_value": "AAICCGhVkQAAACcQaCFSdYh0YUg=",
"ds_transaction_id": "f8c3a0d2-7e76-4df1-8ba4-f457386d14bf",
"version": "2.2.0",
"transaction_status": "Y"
}
}
}
```
```bash title="POST /v1/payments"
curl -X POST https://api.moyasar.com/v1/payments \
-u pk_test_YOUR_PUBLISHABLE_KEY: \
-H "Content-Type: application/json" \
-d '{
"amount": 10000,
"currency": "SAR",
"callback_url": "https://merchant.example/return",
"source": {
"type": "creditcard",
"name": "John Doe",
"number": "4111111111111111",
"month": "12",
"year": "2030",
"cvc": "123",
"card_auth_data": {
"provider": "acme-mpi",
"eci": "05",
"authentication_value": "AAICCGhVkQAAACcQaCFSdYh0YUg=",
"ds_transaction_id": "f8c3a0d2-7e76-4df1-8ba4-f457386d14bf",
"version": "2.2.0",
"transaction_status": "Y"
}
}
}'
```
### Fields
| Field | Required | Description |
| :--------------------- | :------- | :------------------------------------------------------------------------------------ |
| `provider` | Yes | Identifies where the 3DS data originated (e.g. the MPI or provider that produced it). |
| `eci` | Yes | Electronic Commerce Indicator. |
| `authentication_value` | Yes | The authentication value (CAVV / AAV), Base64. |
| `ds_transaction_id` | Yes | Directory Server transaction ID. |
| `version` | Yes | 3DS protocol version (e.g. `2.2.0`). |
| `transaction_status` | Yes | EMVCo transaction status (e.g. `Y`). |
| `auth_scheme` | No | Directory Server used (`visa`, `mada`, `master`). |
| `acs_transaction_id` | No | ACS transaction ID. |
| `ds_reference_number` | No | Directory Server reference number. |
| `acs_reference_number` | No | ACS reference number. |
:::warning[Acquirer requirements]
Some acquirers require the full set of 3DS values, including `acs_transaction_id`,
`ds_reference_number`, and `acs_reference_number`. If your acquirer rejects the
payment with a data validation error, include these optional fields.
:::
---
## Apple Developer Account
# Apple Pay Using Developer Account
This guide walks you through the steps necessary to start accepting Apple Pay payments using Moyasar and your Apple developer account.
## Who is this guide for?
Follow this guide if you intend on using Apple Pay natively within your iOS application or using a web platform that
does not support Moyasar [Web Registration](./web-registration.mdx).
## Before Starting
- [Register](https://dashboard.moyasar.com/register) for a free account in Moyasar Dashboard
- You must have an **Apple Developer Account** with an active subscription.
- Create a **Merchant ID** by following this guide [this guide.](https://developer.apple.com/documentation/apple_pay_on_the_web/configuring_your_environment).
## Configure Payment Processing Certificate
The Payment Processing Certificate (PPC for short) is used during the payment authorizatino process where an Apple
device will encrypt the Card details using the active certificate.
After the encryption, the merchant will receive a `token` object that they should pass to Moyasar in the payment request as follows:
```json
{
"type": "applepay",
"source": ""
}
```
Once received, Moyasar will use the certificate to decrypt the token and then perform the payment.
## Request and Download the CSR
From Moyasar Dashboard, you need to navigate through **Settings** to **Apple Pay - Certificate**.
Once you open the page, click on **Request CSR** then **Download CSR**.
## Upload and Sign the CSR with Apple Developer Account
Assuming you have followed the steps in [Before Starting](#before-starting) you should have your **Merchant ID**
ready within your Apple Developer Account.
Navigate to the Merchant ID you have created then locate the **Apple Pay Payment Processing Certificate** section
where you will find a button called **Create Certificate**.
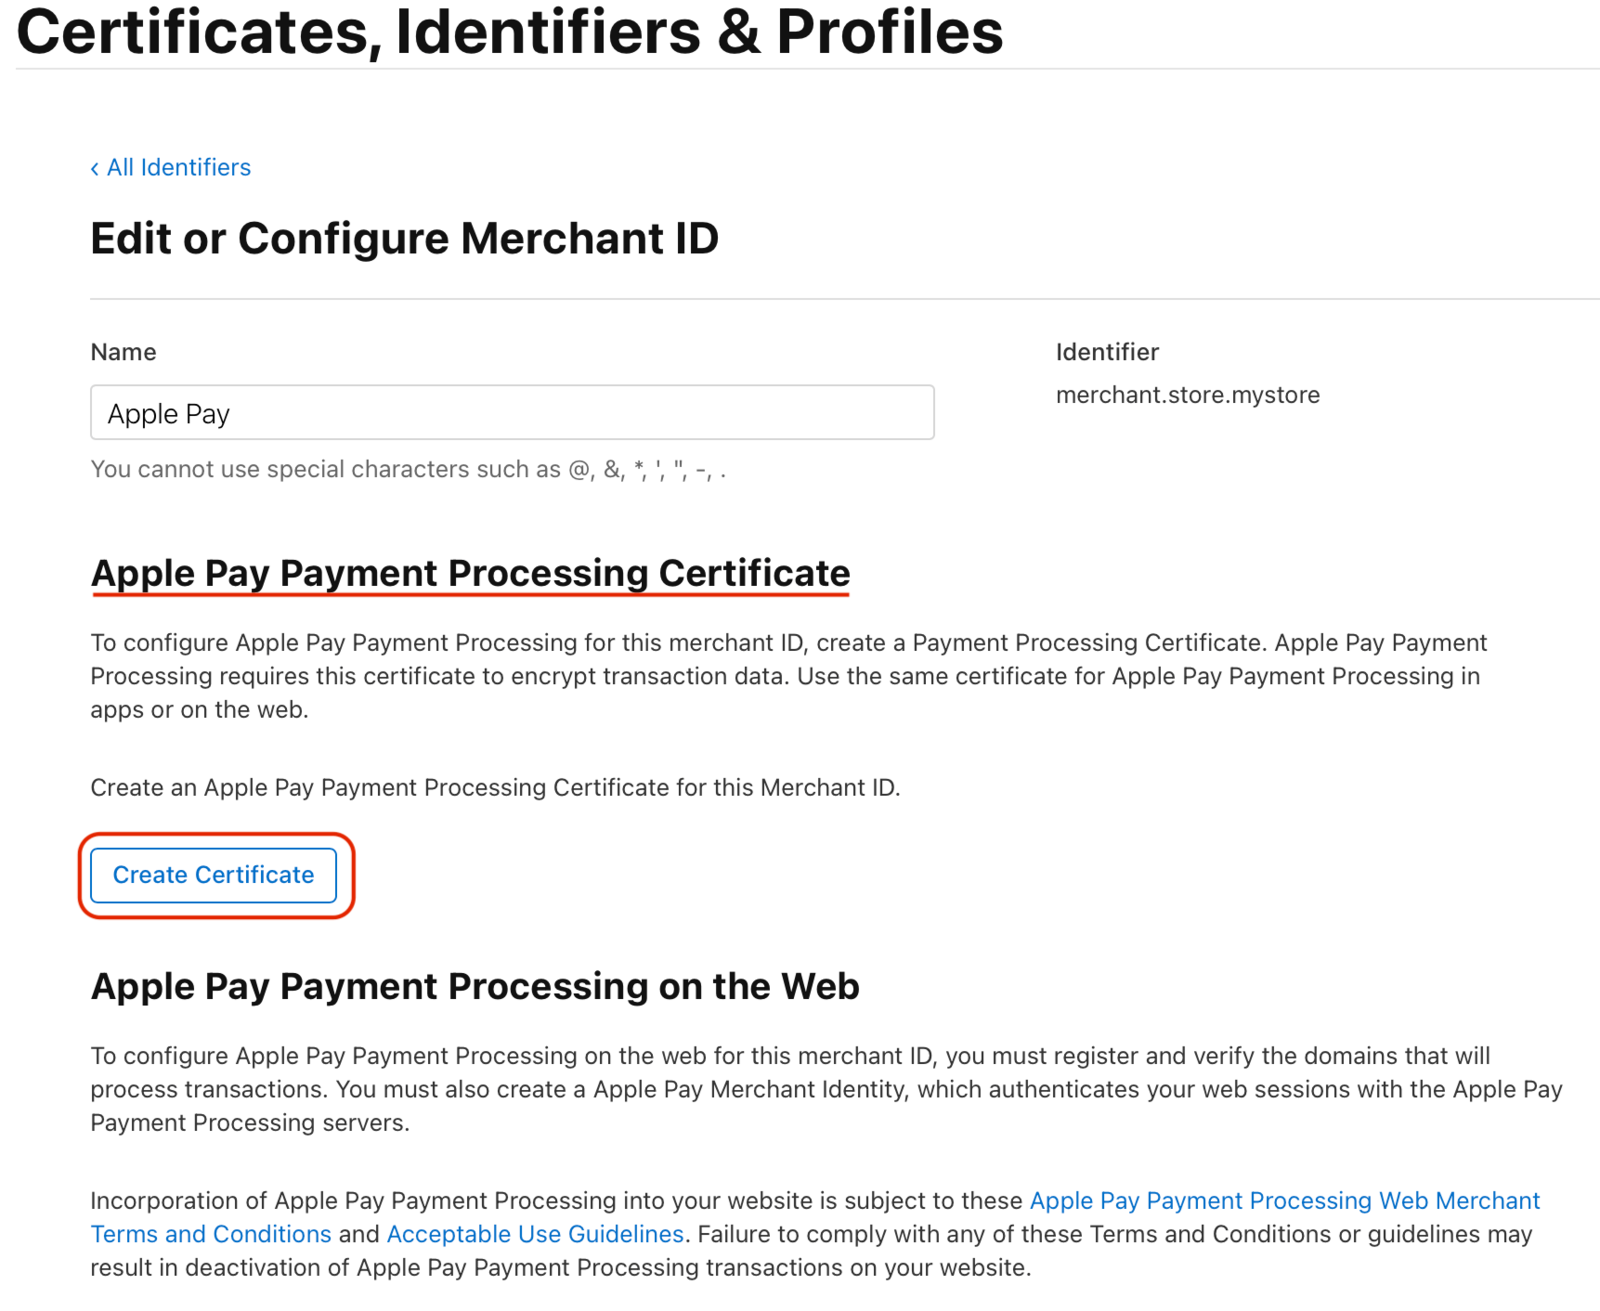
:::warning
You will be presented with a question asking you if the merchant is within **China Mainland**, make sure to
to select **No**.
If you select **Yes**, Apple Pay payments will not work with you as we do not support the RSA algorithm.
:::
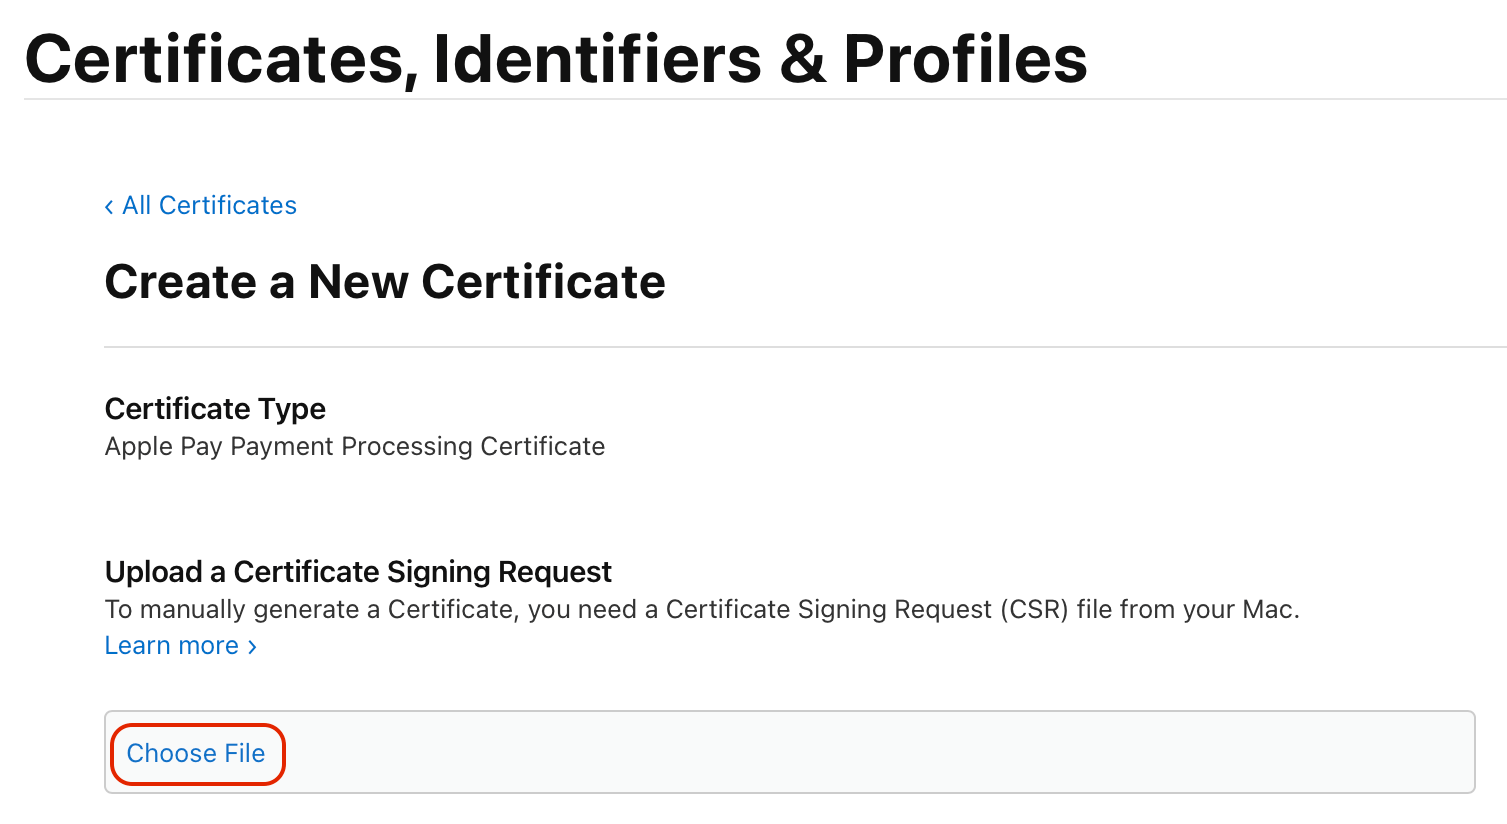
## Select the CSR file and upload it.
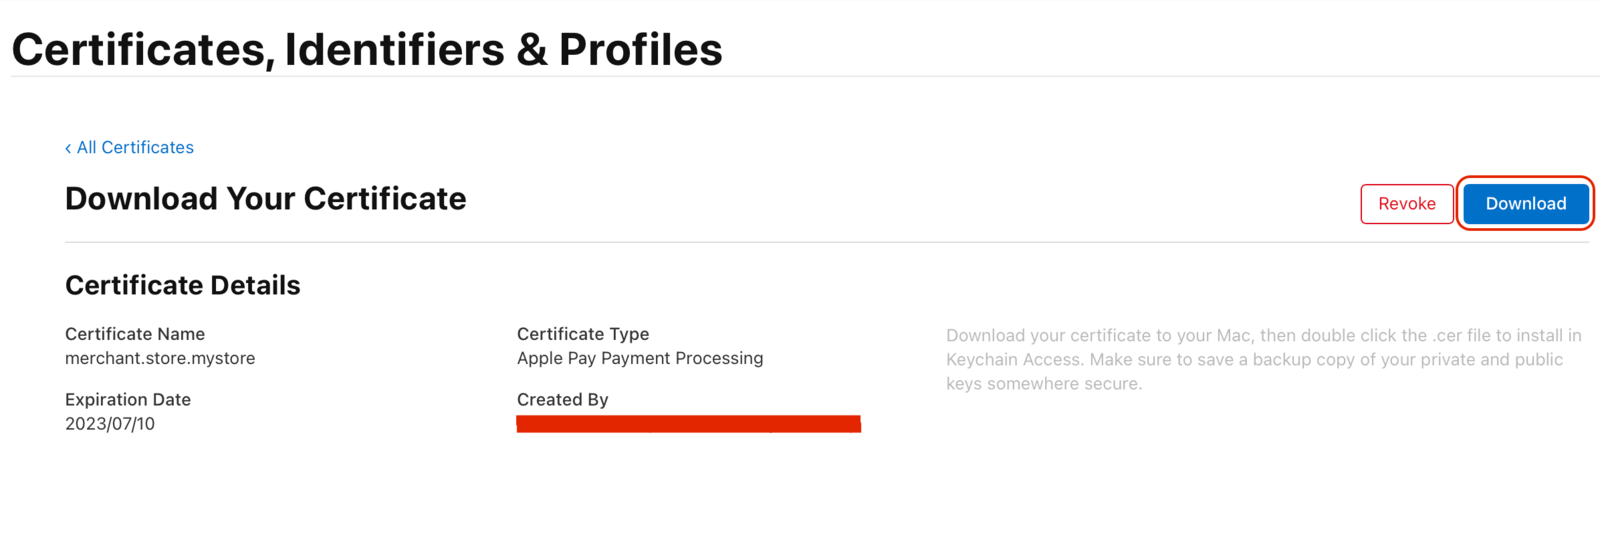
## Download the signed certificate.
## Upload Signed Certificate to Moyasar Dashboard
Navigate back again to **Apple Pay - Certificate** then click on the **Upload File** box at the end of the page.
Select `apple_pay.cer` from your computer and click **Upload**.
If the certificate matches the private key on Moyasar API, you will get the following success screen.
---
## Apple Pay iOS
This is a simple guide for using Apple's **PassKit** for implementing Apple Pay in native iOS apps. This guide
is intended for people who want to have full control over the experience, and if you are looking for an easy
setup, please check our [iOS SDK here](../../sdk/ios/installation.mdx).
## Who is this guide for?
- Users looking for advanced Apple Pay features.
## Before Starting
- [Register](https://dashboard.moyasar.com/register) for a free account in Moyasar Dashboard
- You must have an **Apple Developer Account** with an active subscription.
- Your payment processing certificate is registered with Moyasar, follow this guide: [Apple Pay Using Developer Account](./apple-developer-account.mdx)
## Integration
To start Apple Pay integration, please follow the guide here
[Apple Developer Documentation](https://developer.apple.com/documentation/passkit).
## Payment Authorization
When the user authorizes the payment using Face ID or Touch ID on their iOS device, the `didAuthorizePayment` event
will be dispatched. In this step you need to post the `paymentData` to Moyasar found within
the `PKPayment` object. Here is an example:
```swift
struct ApplePaySource: Codable {
var type = "applepay"
var token: String
}
struct PaymentRequest: Codable {
var amount: Int
var description: String
var publishable_api_key: String
var source: ApplePaySource
}
let payment: PKPayment = // Payment object we got in the didAuthorizePayment event
let source = ApplePaySource(token: String(data: payment.token.paymentData, encoding: .utf8))
let request = PaymentRequest(
amount: 100, // 100 Halalas == SAR 1.00
description: "iOS Apple Pay Payment",
publishable_api_key: "pk_live_12345",
source: source)
```
Now you need to serialize the `request` object as JSON and send it to Moyasar API like it was described
in [Apple Pay on Websites](./apple-pay-web.md).
---
## Apple Pay Web
This guide will go through how to integrate Apple Pay JS API with Moyasar, we will go step by step through the process of **including Apple Pay's scripts**, **Creating the payment request**, **Validating the merchant's URL**, and finally **Authorizing the payment.**
## Who is this guide for?
- Users looking for advanced Apple Pay features.
## Before Starting
- [Create an account](https://dashboard.moyasar.com) with Moyasar, if you haven't already.
- Read through the following guides:
- [Apple Developer Documentation](https://developer.apple.com/documentation/apple_pay_on_the_web).
- [Apple Pay Demo](https://applepaydemo.apple.com/).
- [Web Registration](./web-registration.mdx).
## Display the Apple Pay Button
First, you need to include Apple Pay's script file into the web page:
```html
```
Then, you need to set the styles for the Apple Pay button and include the button in your HTML:
```html
```
:::tip
Learn more about Apple Pay button customizations here [Apple Pay Demo](https://applepaydemo.apple.com/).
:::
## Initiate Payment Session
```javascript
function onApplePayButtonClicked() {
if (!ApplePaySession) {
return;
}
// Define ApplePayPaymentRequest
const applePayPaymentRequest = {
countryCode: 'SA',
currencyCode: 'SAR',
supportedNetworks: ['mada', 'visa', 'masterCard'],
merchantCapabilities: ['supports3DS', 'supportsDebit', 'supportsCredit'],
total: {
label: 'Abdullah Store',
amount: '99.95',
},
};
// Create Apple Pay Session
const session = new ApplePaySession(5, applePayPaymentRequest);
// Provide Merchant Validation
// ...
// Payment Authorization
// ...
session.begin();
}
```
:::tip
- Add `amex` to the `supportedNetworks` list if your account supports accepting American Express cards.
- Add `unionpay` to the `supportedNetworks` list if your account supports accepting UnionPay cards.
:::
## Merchant Validation
```javascript
function onApplePayButtonClicked() {
if (!ApplePaySession) {
return;
}
// Define ApplePayPaymentRequest ...
// Create Apple Pay Session
// ...
// Provide Merchant Validation
session.onvalidatemerchant = async (event) => {
const body = {
validation_url: event.validationURL,
display_name: 'Abdullah Software',
domain_name: window.location.hostname,
publishable_api_key: 'pk_test_123456',
};
try {
const response = await fetch('https://api.moyasar.com/v1/applepay/initiate', {
method: 'post',
headers: { 'Content-Type': 'application/json' },
body: JSON.stringify(body),
});
session.completeMerchantValidation(await response.json());
} catch (error) {
session.completeMerchantValidation(error);
}
};
// Payment Authorization
// ...
session.begin();
}
```
:::note
The previous example uses Moyasar API for merchant validation which saves your time by not requiring an Apple Developer
Account. This feature is described here at [Web Registration](./web-registration.mdx).
:::
## Payment Authorization
In the `onpaymentauthorized` event, you will receive the encrypted payment token, which will be sent to Moyasar to complete the transaction. We will be using [Moyasar API](../../api/api-introduction.md) for this.
### Create the request body to send to Moyasar
```javascript
function onApplePayButtonClicked() {
if (!ApplePaySession) {
return;
}
// Define ApplePayPaymentRequest ...
// Create Apple Pay Session
// ...
// Provide Merchant Validation
// ...
// Payment Authorization
session.onpaymentauthorized = async (event) => {
const token = event.payment.token;
// prepare request for moyasar
let body = {
amount: applePayPaymentRequest.total.amount * 100,
currency: applePayPaymentRequest.currencyCode,
description: 'My Awsome Order #1234',
publishable_api_key: 'pk_test_123456',
source: {
type: 'applepay',
token: token,
},
metadata: {
order: '1234',
},
};
// send the request
const response = await fetch('https://api.moyasar.com/v1/payments', {
method: 'post',
headers: { 'Content-Type': 'application/json' },
body: JSON.stringify(body),
});
const responseJson = await response.json();
if (!response.ok) {
session.completePayment({
status: ApplePaySession.STATUS_FAILURE,
errors: [responseJson.message],
});
return;
}
if (responseJson.status != 'paid') {
session.completePayment({
status: ApplePaySession.STATUS_FAILURE,
errors: [responseJson.source.message],
});
return;
}
// TODO: Report payment result to merchant backend
// TODO: Add any merchant related bussiness logic here
session.completePayment({
status: ApplePaySession.STATUS_SUCCESS,
});
};
session.begin();
}
```
## Handling Payment Sheet Cancellation (Optional)
The `ApplePaySession` object allows you to handle a special event when the user click away or dismisses the payment
sheet. This is useful when you need to run any custom business logic:
```javascript
function onApplePayButtonClicked() {
if (!ApplePaySession) {
return;
}
// Define ApplePayPaymentRequest
// ...
// Create Apple Pay Session
// ...
// Provide Merchant Validation
// ...
// Payment Authorization
// ...
session.oncancel = (event) => {
// Handle payment cancellation here
};
session.begin();
}
```
---
## Basic Integration
# Apple Pay Basic Integration
This page will guide you to Apple Pay payments on supported Apple devices using our
Payment Form Javascript library.
## Before Starting
Before you start accepting credit/debit card payments, make sure you complete these steps first:
1. Sign up for a Moyasar account on our [dashboard.](https://dashboard.moyasar.com/register/new)
2. [Get your publishable API key ](../dashboard/get-your-api-keys.md)to authenticate your form payment requests.
3. Review the Moyasar form configuration [here](../references/form-configuration/index.md).
## Supported Hardware
Apple Pay is only supported on Apple devices that has the T1 security chip which stores the card details and
provide encryption during the payment authorization process.
## Including Moyasar Form
Moyasar Form is a lightweight Javascript library that will take care of creating the payment components within your
website using a modern and responsive design.
You can start the integration by including the following tags within the `` tag of your page:
## Initiating the Payment Form
Once you decide on a good place for the form, add an empty `` tag and then invoke the `init` method on
the global `Moyasar` class.
```html title="HTML"
```
## Configuration Keys
Learn more about available configuration keys here [form configuration.](../references/form-configuration/index.md)
## Payment Form
## Apple Pay Payment Flow
```mermaid
sequenceDiagram
participant User
participant Merchant
participant Apple
participant Moyasar
User->>Merchant: Click on Apple Pay Button
Merchant->>Apple: Request Session Validation
Apple->>Merchant: Session Token
Merchant->>User: Session Token
User->>User: Verify Identitiy using TouchID or FaceID
User->>Moyasar: Send Payment Authorization Request
Moyasar-->>User: Authorization Response
```
## Save Payment ID
This step is optional but **highly recommended** to save the payment ID, which grants you the ability to verify payment details in case your user's connection drops.
To save the payment ID you can provide the **on_completed** configuration option with an async function.
```javascript title="JS"
Moyasar.init({
element: '.mysr-form',
amount: 1000,
currency: 'SAR',
description: 'Coffee Order #1',
publishable_api_key: 'pk_test_AQpxBV31a29qhkhUYFYUFjhwllaDVrxSq5ydVNui',
supported_networks: ['visa', 'mastercard', 'mada'],
methods: ['applepay'],
apple_pay: {
country: 'SA',
label: 'Awesome Cookie Store',
validate_merchant_url: 'https://api.moyasar.com/v1/applepay/initiate',
},
on_completed: async function (payment) {
await savePaymentOnBackend(payment);
},
});
```
The method `savePaymentOnBackend` is a placeholder, and you must provide your own custom logic.
## Step 4: Verify Payment
Once the user has completed the payment and got redirected to your website or app using the `callback_url`
you provided earlier, the following HTTP query parameters will be appended:
- `id`
- `status`
- `message`
Here is an example:
```http request title="Callback URL"
https://www.my-store.com/payments_redirect?id=79cced57-9deb-4c4b-8f48-59c124f79688&status=paid&message=Succeeded
```
Now fetch the payment using its **id** through our [fetch API](../../api/payments/02-fetch-payment.api.mdx), and verify
its `status`, `amount`, and `currency` before accepting your user's order or completing any business action.
Next, just show success or failure according to the previous validation.
---
## Mobile SDKs
With Moyasar you can accept Apple Pay payments on many platforms including native and hybrid mobile application.
## Available SDKs
Here is the available list of SDKs that offer Apple Pay support:
- [iOS SDK](../../sdk/ios/installation.mdx)
- [Flutter SDK](../../sdk/flutter/installation.mdx)
- [React Native SDK](../../sdk/react-native/installation.mdx)
---
## Testing
Moyasar provides a sandbox environment for testing Apple Pay payments. This allows you to test your integration and ensure that everything is working correctly before going live with actual payments.
Unlike card payments where you enter different cards to simulate the result, testing Apple Pay is based on the
sent amount to Moyasar API. Different amounts will result into different results.
There are no test cards for Apple Pay. A real card must be added to an Apple Pay Wallet to test Apple Pay payments.
Make sure to use the test environment API keys when testing Apple Pay payments.
## Test Amounts
| Amount (Minor Unit) | Amount (SAR) | Status | Message | Response Code |
| ------------------- | ------------------ | ---------- | ---------------------------------- | ------------- |
| 20000 to 30000 | 200.00 to 300.00 | **paid** | APPROVED | 00 |
| 100000 to 110000 | 1000.00 to 1100.00 | **failed** | UNSPECIFIED FAILURE | 99 |
| 110100 to 120000 | 1101.00 to 1200.00 | **failed** | INSUFFICIENT FUNDS | 51 |
| 120100 to 130000 | 1201.00 to 1300.00 | **failed** | DECLINED: LOST CARD | 41 |
| 130100 to 140000 | 1301.00 to 1400.00 | **failed** | DECLINED | 05 |
| 140100 to 150000 | 1401.00 to 1500.00 | **failed** | DECLINED: EXPIRED CARD | 54 |
| 150100 to 160000 | 1501.00 to 1600.00 | **failed** | DECLINED: EXCEEDS WITHDRAWAL LIMIT | 61 |
| 160100 to 170000 | 1601.00 to 1700.00 | **failed** | DECLINED: STOLEN CARD | 43 |
:::note
Moyasar accepts payment amount in the minor current unit (e.g. cents), and the test environment uses this amount
to return different results.
:::
:::tip
Using any other amount range than the stated above will result in the payment failing.
:::
---
## Web Registration
Web Registration is a feature provided by Moyasar that allows merchants to enable Apple Pay on the web without
the need for an Apple Developer account.
The merchant will register their domain name with Moyasar and use the
[Request Apple Pay Session](../../api/other/apple-pay/request-apple-pay-session.mdx) to initialize the payment session.
:::note
This feature is for Web implementations only. For mobile you must have an active Apple Developer
Account and setup the payment processing certificate by following the guide
[Apple Developer Account](./apple-developer-account.mdx).
:::
## Login Into Dashboard
Login into your account on [Moyasar Dashboard](https://dashboard.moyasar.com) then navigate through **Settings**
to the **Apple Pay Domains** page.
## Add Domain Name
Adding the domain name is an easy task, but you must first get the correct hostname that your Apple Pay payment
will start from.
Note that if your website is hosted on a sub-domain name, you must use that name. For example, if your store
is hosted on `store.company.com` then you must register this domain name instead of `company.com`.
## Upload Verification File
Once you have added your domain name, please download the verification file by clicking on the
**Download Association** button.
This file contains a special text that Apple will use for validating that you actually own and operate the domain just
added.
You must upload this file on your server on the path `/.well-known/apple-developer-merchantid-domain-association`
**without any extension**.
:::warning
Adding extensions like `.txt` or `.data` to the file name will result in failure when trying to
validate the domain name.
:::
:::tip
The `.well-known` directory is not enabled or prohibited by some web servers, please refer to your web server
operation manual to allow public access to `.well-known` for the validation process.
:::
If you have uploaded the file on your web server correctly, try to visit it using your favorate web browser:
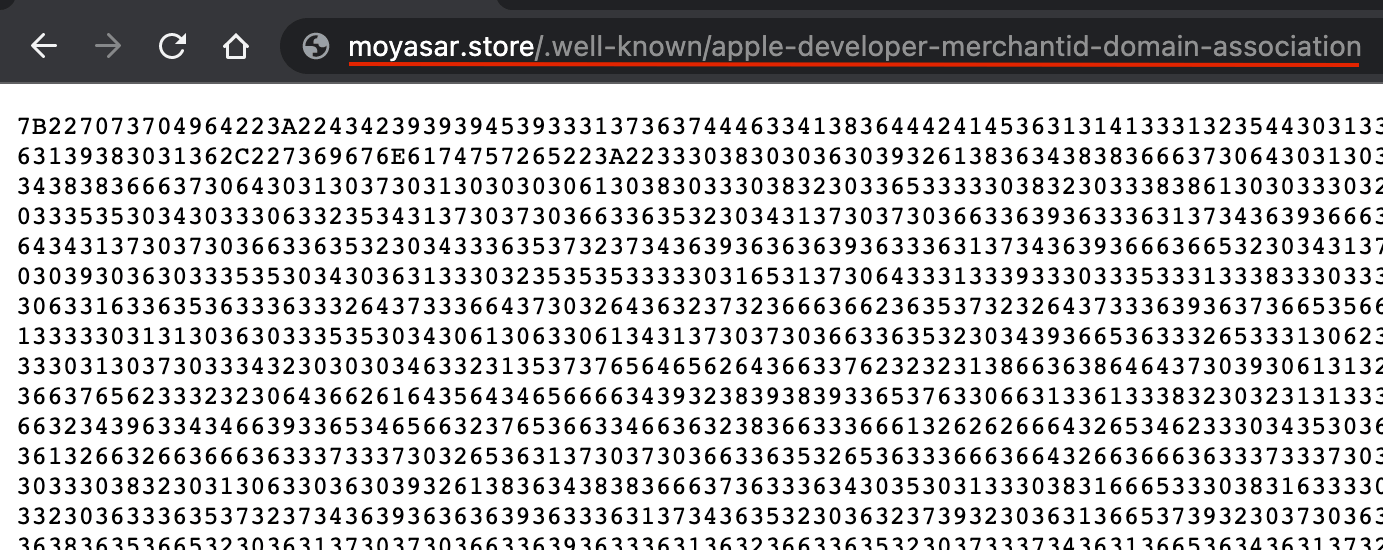.
## Validate + Register the Domain
Once you have uploaded file correctly, you need now to do the following steps:
- Click on **Validate**: this will allow us to validate that you have uploaded the file correctly.
- Click on **Register**: we will ask Apple to validate again and register the domain name to be used with Apple Pay.
## Register the Domain
Once you have registered the domain name, your screen should look like something like this:
---
## 5-Minute Integration(Card-payments)
# 5-Minute Integration
Use this guide to accept **mada**, **Visa**, **Mastercard**, **American Express**, and **UnionPay** in minutes using **Moyasar Form**.
## Before You Start
Before integration, prepare these requirements:
1. **Moyasar account and test mode**
- Create an account on the [dashboard](https://dashboard.moyasar.com/register/new).
- Start with **test mode** first so you can validate your flow safely before going live.
2. **API keys (important difference)**
- Copy your **publishable key** (`pk_test_...`) for frontend form initialization.
- Keep your **secret key** (`sk_test_...`) for backend verification only.
- Never expose `sk_*` in browser code, HTML, or mobile apps.
- Learn more here: [Get your API keys](../dashboard/get-your-api-keys.md).
3. **Callback URL**
- Prepare a callback page on your website (for example: `https://example.com/payment-result`).
- This page receives the payment `id` in the query string after redirect.
- Your backend should use this `id` to fetch and verify payment details before confirming the order.
4. **Basic security checklist**
- Use HTTPS.
- Verify payment server-side (`status`, `amount`, `currency`) and do not trust redirect alone.
- Save payment IDs for reconciliation and support.
## Step 1: Add Moyasar Form Assets
Place the following tags in your page ``:
## Step 2: Add Payment Container
```html title="HTML"
```
## Step 3: Initialize the Form
```html title="HTML"
```
## Step 4: Verify Payment on Callback
After redirect, read the `id` query parameter from your callback URL, then fetch the payment from your backend and verify:
- `status` is `paid`
- `amount` matches your order amount
- `currency` matches your order currency
Use the payment API here: [Fetch payment](../../api/payments/02-fetch-payment.api.mdx)
Example backend verification:
```javascript
const paymentId = req.query.id;
const response = await fetch(`https://api.moyasar.com/v1/payments/${paymentId}`, {
headers: {
Authorization: `Basic ${Buffer.from('sk_test_xxx:').toString('base64')}`,
},
});
const payment = await response.json();
if (payment.status === 'paid' && payment.amount === 1000 && payment.currency === 'SAR') {
// Mark order as paid
}
```
```python
payment_id = request.args.get("id")
response = requests.get(
f"https://api.moyasar.com/v1/payments/{payment_id}",
auth=("sk_test_xxx", ""),
)
payment = response.json()
if payment["status"] == "paid" and payment["amount"] == 1000 and payment["currency"] == "SAR":
# Mark order as paid
pass
```
```php
` tag of your page:
## Initiating the Payment Form
Once you decide on a good place for the form, add an empty `` tag and then invoke the `init` method on
the global `Moyasar` class.
```html title="HTML"
```
## Configuration Keys
| Field | Description |
| --------------------- | ------------------------------------------------------------------------------------------------------------------------------------------------------------------------------------------------------- |
| `amount` | Payment amount which should be positive integer representing the smallest currency unit (e.g., 100 Halala to charge 1.00 SAR or 100 to charge ¥100, a zero-decimal currency). The minimum value is 100. |
| `currency` | 3-letter [ISO Code](https://en.wikipedia.org/wiki/ISO_4217) for currency. E.g., `SAR`, `CAD`. |
| `description` | An arbitrary string that you can attach to a payment object. Payment description is only for your reference and it is **not** displayed to your users. |
| `publishable_api_key` | Your publishable API key, learn more on how to get the key [here.](../dashboard/get-your-api-keys.md) |
| `callback_url` | URL of your website page to be redirected to after the customer completes a transaction. (e.g., `https://example.com/orders`). |
| `methods` | This is used to enable and disable payment methods on the form. By default, all the methods are enabled **creditcard**, **applepay** and **stcpay**. |
Learn more about available configuration keys here [form configuration.](../references/form-configuration/index.md)
## Payment Form
## Save Payment ID
This step is optional but **highly recommended** to save the payment ID before redirecting the user to 3-D Secure,
which grants you the ability to verify payment details in case your user's connection drops.
To save the payment ID you can provide the **on_completed** configuration option with an async function.
```jsx title="JS"
Moyasar.init({
element: '.mysr-form',
amount: 1000,
currency: 'SAR',
description: 'Coffee Order #1',
publishable_api_key: 'pk_test_AQpxBV31a29qhkhUYFYUFjhwllaDVrxSq5ydVNui',
callback_url: 'https://moyasar.com/thanks',
supported_networks: ['visa', 'mastercard', 'mada'],
methods: ['creditcard'],
on_completed: async function (payment) {
await savePaymentOnBackend(payment);
},
});
```
The method `savePaymentOnBackend` is a placeholder, and you must provide your own custom logic.
## Step 4: Verify Payment
After the user completes the payment and is redirected to your website or app via the previously provided `callback_url`, the `id` will be appended as an HTTP query parameter.
Here is an example:
```http request title="Callback URL"
https://www.my-store.com/payments_redirect?id=79cced57-9deb-4c4b-8f48-59c124f79688
```
Now fetch the payment using its **id** through our [fetch API](../../api/payments/02-fetch-payment.api.mdx), and verify
its `status`, `amount`, and `currency` before accepting your user's order or completing any business action.
Next, just show success or failure according to the previous validation.
## Payment Flow
```mermaid
sequenceDiagram
participant C as Cardholder
participant S as Store
participant M as Moyasar
participant I as Issuing Bank
participant A as Accuring Bank
C ->> M: POST /v1/payments (by Payment Form)
M ->> I: Request bank 3D secure challenge
I -->> M: Returns 3D secure challenge URL
M -->> C: Redirect cardholder to 3D secure challenge URL
C ->> I: Accept's challenge
I -->> M: Returns authentication response
M ->> A: Requests to authorize the amount
A -->> M: Returns authorization result
M -->> C: Redirect to URL in callback_url store.com/thanks?id=d2i1...
C ->> S: Requests to view the page
S ->> M: GET v1/payments/d2i1... to verify payment
M -->> S: {"id":"d2i1...", "amount":"100", ....}
S -->>C: Show page to cardholder
```
---
## Custom UI
This guide walks you through implementing your own card payment form with custom HTML code. We recommend following
this guide only if the integration provided by our payment form does not meet your requirements,
For more information about the payment form please checkout [Basic Integration](basic-integration).
## Overview
In this guide, we'll see how to set up a basic payment form to accept credit/debit card payments. The payment flow will
be as follows:
- Tokenize card information temporarely.
- Use generated token to start the payment.
- Redirect user to 3DS page.
- Validate payment result.
## Before Starting
Before you start the integration process, make sure you complete these steps:
1. Sign up for a Moyasar test account at [Moyasar's Dashboard.](https://dashboard.moyasar.com)
2. [Get your API Key ](../dashboard/get-your-api-keys.md)To authenticate your API request.
For more details about used APIs in this tutorial, please refer to [Moyasar API Docs](../../api/api-introduction.md)
Due to security considerations, you are not allowed to post user details to your own server and the tokenization process
must be started from the client browser directly against Moyasar API.
## Integrate Your Payment Form
We need to create a simple HTML form having two different sets of input fields:
- `Hidden` input fields are required to authenticate the tokenization request.
- Visible input fields for user-related data.
Here is the specification of the required data and fields to be included in the submission:
### Step 1: Connect the HTML Payment Form
First, set your form’s action attribute to payment create endpoint URL, and set the method attribute to `POST`
```html
```
You are not allowed to use any other action other than the one indicated earlier.
### Step 2: Include Authentication Fields
Next, we need to include some required `hidden` fields for the tokenization process, which are:
- `publishable_api_key`: used to identify the merchant account and is safe to include in frontend code. To learn more, check out the [Authentication](../../api/authentication.mdx) guide.
- `save_only`: this fields must be set to `true` to indicate for the server that this is a checkout token.
Here are the HTML elements need to be added:
```html
```
### Step 3: Include Payment Details Fields
Finally, we need a few visible elements to allow users to enter their payment details. Here are the required fields for credit card payments:
- `name` for the card holder name.
- `number` for the card number.
- `month` for the card expiry month.
- `year` for the card expiry year.
- `cvc` for the card security value CVC/CVV.
### Final Code
```html
```
## Starting Payment
To start the payment process, we must control the HTML form to create the token then start the payment process from
the merchant backend.
The following Javascript code will create the token then pass it to the backend code to start the payment:
```javascript
async function initiatePayment(event) {
// This line is crucial to prevent the default form behaviour
event.preventDefault();
const form = document.getElementById('moyasar-token-form');
const tokenData = Object.fromEntries(new FormData(form));
// Create temporary checkout token
let response = await fetch('https://api.moyasar.com/v1/tokens', {
method: 'post',
headers: {
'Content-Type': 'application/json',
},
body: JSON.stringify(tokenData),
});
response = await response.json();
// Send token to merchant backend
let backendResponse = await fetch('https://mystore.example.com/initiate-payment', {
method: 'post',
headers: {
'Content-Type': 'application/json',
},
body: JSON.stringify({
// You can add any other information related to your business logic here.
token: response.token,
}),
});
backendResponse = await backendResponse.json();
// Redirect the user to payment page
window.location.href = backendResponse.transaction_url;
}
document.addEventListener('DOMContentLoaded', () => {
document
.getElementById('moyasar-payment-button')
.addEventListener('click', (e) => initiatePayment(e));
});
```
The previous Javascript code **assumes** you have your backend on `https://mystore.example.com`. Your backend must provide
an endpoint (e.g. `/initiate-payment`) for starting the payment process as follows:
```php
input('order_number'))->first();
if (! ($order && $order-payable())) {
return response()
->json(['message' => 'Invalid order'])
->setStatusCode(400);
}
$response = Http::asJson()
->withBasicAuth('pk_live_123', '')
->post('https://api.moyasar.com/v1/payments', [
'amount' => 100,
'currency' => 'SAR',
'description' => 'Test Payment',
'callback_url' => 'https://mystore.example.com/payment-return',
'source' => [
'type' => 'token',
'token' => $request->input('token')
]
])
->throw()
->json();
if ($response['status'] != 'initiated') {
return response()
->json(['message' => 'Payment cannot be initiated: ' . $response['source']['message']])
->setStatusCode(400);
}
return response()->json([
'transaction_url' => $response['source']['transaction_url']
]);
}
}
```
```ruby
require 'mint_http'
class PaymentsController < ApplicationController
def initiate_payment
# Assuming you have an Order model where we will check if the order exists first
order = Order.find_by(number: params[:order_number])
unless order && order.payable?
render json: { message: 'Invalid order' }, status: :bad_request and return
end
response = MintHttp
.accept_json
.basic_auth('pk_live_123')
.post('https://api.moyasar.com/v1/payments', {
amount: 100,
currency: 'SAR',
description: 'Test Payment',
callback_url: 'https://mystore.example.com/payment-return',
source: {
type: 'token',
token: params[:token]
}
})
.raise!
.json
if response['status'] != 'initiated'
render json: { message: "Payment cannot be initiated: #{response['source']['message']}" }, status: :bad_request
else
render json: { transaction_url: response['source']['transaction_url'] }
end
end
end
```
```js
const axios = require('axios');
const initiatePayment = async (req, res) => {
const { order_number, token } = req.body;
// Assuming Order is a mongoose model or equivalent ORM
const order = await Order.findOne({ number: order_number });
if (! (order && order.isPayable())) {
return res.status(400).json({ message: 'Invalid order' });
}
try {
const response = await axios.post('https://api.moyasar.com/v1/payments', {
amount: 100,
currency: 'SAR',
description: 'Test Payment',
callback_url: 'https://mystore.example.com/payment-return',
source: {
type: 'token',
token: token,
},
}, {
auth: {
username: 'pk_live_123',
password: '',
},
headers: {
'Content-Type': 'application/json',
},
});
if (response.data.status !== 'initiated') {
return res.status(400).json({
message: `Payment cannot be initiated: ${response.data.source.message}`,
});
}
res.json({ transaction_url: response.data.source.transaction_url });
} catch (error) {
res.status(500).json({ message: 'Something went wrong', error: error.message });
}
};
module.exports = { initiatePayment };
```
:::note
Backend code provided here is only an example and might not be the same backend you are using. You may need to change
or adjust the code in order for it to run within your environment.
:::
:::warning
Error handling is intentionally left out of the previous code examples and it is your responsibility to handle error
cases that might arise.
Here is a non-exhaustive list of error cases:
- Creating token might return a validation or business error 4xx.
- Creating payment might return a validation or business error 4xx or might return a payment that has status `failed`.
:::
### Verify the Payment
Once the user has completed the payment, they are redirected back to your website or app using the
`callback_url` you provided earlier and the following HTTP query parameters will be appended:
- **id**
- **status**
- **message**
```none
https://www.my-store.com/payments_redirect?id=79cced57-9deb-4c4b-8f48-59c124f79688&status=paid&message=Succeeded
```
Fetch the payment using its **ID** through the API, and verify its status, amount, and currency before accepting or placing any user's purchase or, using the ID we have saved in the Javascript example, perform the same verifications.
---
## Mobile SDKs(Card-payments)
With Moyasar you can accept payments on many platforms including native and hybrid mobile application.
## Available SDKs
Here is the available list of SDKs we offer:
- [iOS SDK](../../sdk/ios/installation.mdx)
- [Android SDK](../../sdk/android/installation.mdx)
- [Flutter SDK](../../sdk/flutter/installation.mdx)
- [React Native SDK](../../sdk/react-native/installation.mdx)
---
## Test Cards
Moyasar provides a sandbox environment for testing credit card payments without the need to have a live account
or use real card numbers. This allows you to test your integration and ensure that everything is
working correctly before going live with actual payments.
## Before You Start
You can use any of the cards below to simulate different payment scenarios.
:::warning
Using any card that is not listed below will result in a failed payment.
:::
## Card Info
The following fields must contain syntactically correct values:
| Field | Value |
| ----- | -------------------------------------------- |
| Name | Use any name made of at least two words |
| Year | Any future year |
| Month | Any future month relative the expiry year |
| CVC | Any Three digits code (Four digits for Amex) |
## Mada
| Card Number | Status | Message | Response Code | 3DS Note |
| ------------------ | ---------- | ---------------------------------- | ------------- | -------- |
| `4201320111111010` | **paid** | APPROVED | 00 | ---- |
| `4201320000013020` | **failed** | UNSPECIFIED FAILURE | 99 | ---- |
| `4201320000311101` | **failed** | INSUFFICIENT FUNDS | 51 | ---- |
| `4201320131000508` | **failed** | DECLINED: LOST CARD | 41 | ---- |
| `4201321234411220` | **failed** | DECLINED | 05 | ---- |
| `4201322267774310` | **failed** | DECLINED: EXPIRED CARD | 54 | ---- |
| `4201326324640570` | **failed** | DECLINED: EXCEEDS WITHDRAWAL LIMIT | 61 | ---- |
| `4201321144311528` | **failed** | DECLINED: STOLEN CARD | 43 | ---- |
## Visa
| Card Number | Status | Message | Response Code | 3DS Note |
| ------------------ | ---------- | ------------------------------------------------------------------------------------------------------------ | ------------- | --------------------------------------- |
| `4111118250252531` | **failed** | 3DS: attempted but not available, please ensure that you have enabled Online Purchase from your bank portal. | ---- | ECI 06 |
| `4111114005765430` | **paid** | APPROVED | 00 | Frictionless Authentication |
| `4111111111111111` | **paid** | APPROVED | 00 | ---- |
| `4111113343111067` | **failed** | 3DS service error occurred. | ---- | 3DS fails during enrollement check |
| `4111116611600661` | **failed** | The card is not enrolled in 3DS service. | ---- | ---- |
| `4111112205628150` | **failed** | 3DS service error occurred. | ---- | 3DS fails during authentication attempt |
| `4111115784228433` | **failed** | The authentication attempt was rejected by the issuer bank. | ---- | ---- |
| `4111115620358287` | **failed** | The authentication is unavailable, please try again later or contact issuer bank if problem persisted. | ---- | ---- |
| `4123120000000000` | **failed** | UNSPECIFIED FAILURE | 99 | ---- |
| `4123120001090000` | **failed** | INSUFFICIENT FUNDS | 51 | ---- |
| `4123450131000508` | **failed** | DECLINED: LOST CARD | 41 | ---- |
| `4123120001090109` | **failed** | DECLINED | 05 | ---- |
| `4123128518640738` | **failed** | DECLINED: EXPIRED CARD | 54 | ---- |
| `4123123033308648` | **failed** | DECLINED: EXCEEDS WITHDRAWAL LIMIT | 61 | ---- |
| `4123125276780003` | **failed** | DECLINED: STOLEN CARD | 43 | ---- |
## Mastercard
| Card Number | Status | Message | Response Code | 3DS Note |
| ------------------ | ---------- | ---------------------------------- | ------------- | -------- |
| `5421080101000000` | **paid** | APPROVED | 00 | ---- |
| `5105105105105100` | **failed** | UNSPECIFIED FAILURE | 99 | ---- |
| `5457210001000092` | **failed** | INSUFFICIENT FUNDS | 51 | ---- |
| `5204010101000000` | **failed** | DECLINED: LOST CARD | 41 | ---- |
| `5204730000002514` | **failed** | DECLINED | 05 | ---- |
| `5105107550274126` | **failed** | DECLINED: EXPIRED CARD | 54 | ---- |
| `5105106475101067` | **failed** | DECLINED: EXCEEDS WITHDRAWAL LIMIT | 61 | ---- |
| `5105107304607225` | **failed** | DECLINED: STOLEN CARD | 43 | ---- |
## American Express
| Card Number | Status | Message | Response Code | 3DS Note |
| ----------------- | ---------- | ---------------------------------- | ------------- | -------- |
| `340000000900000` | **paid** | APPROVED | 00 | ---- |
| `371111111111114` | **failed** | UNSPECIFIED FAILURE | 99 | ---- |
| `340033000000000` | **failed** | INSUFFICIENT FUNDS | 51 | ---- |
| `340012340501000` | **failed** | DECLINED: LOST CARD | 41 | ---- |
| `340033000000133` | **failed** | DECLINED | 05 | ---- |
| `340000018441278` | **failed** | DECLINED: EXPIRED CARD | 54 | ---- |
| `340000753060788` | **failed** | DECLINED: EXCEEDS WITHDRAWAL LIMIT | 61 | ---- |
| `340000418501838` | **failed** | DECLINED: STOLEN CARD | 43 | ---- |
## UnionPay
| Card Number | Status | Message | Response Code | 3DS Note |
| ------------------ | ---------- | ---------------------------------- | ------------- | -------- |
| `6200000000000005` | **paid** | APPROVED | 00 | ---- |
| `6200000000000013` | **failed** | UNSPECIFIED FAILURE | 99 | ---- |
| `6200000000000021` | **failed** | INSUFFICIENT FUNDS | 51 | ---- |
| `6200000000000039` | **failed** | DECLINED: LOST CARD | 41 | ---- |
| `6200000000000047` | **failed** | DECLINED | 05 | ---- |
| `6200000000000054` | **failed** | DECLINED: EXPIRED CARD | 54 | ---- |
| `6200000000000062` | **failed** | DECLINED: EXCEEDS WITHDRAWAL LIMIT | 61 | ---- |
| `6200000000000070` | **failed** | DECLINED: STOLEN CARD | 43 | ---- |
---
## Coupons
Moyasar provides a powerful feature for merchants to offer discounts through **Coupons**. This allows merchants to define specific rules for coupon eligibility, which are then automatically checked during the payment process. If a coupon is applicable, it will be applied to the payment, reducing the total amount according to the discount defined by the merchant.
The following section outlines how to set up and apply coupons using the Moyasar API, including the required parameters and a step-by-step guide on how the coupon is processed.
## Creating a Coupon
Merchants cannot create coupons directly by themselves. Instead, they must provide the following information to Moyasar, who will handle the coupon creation process:
- **Name**: A human-readable name to identify the coupon.
- **Code**: A machine-readable identifier for the coupon, for example, `RAJHI15`. This code is for reference only and is not used by customers to apply the coupon.
- **Discount Percentage**: A value from 1% to 100% indicating the discount to be applied.
- **Max Discount**: The cap for the discount, for example, `50 SAR`.
- **Start Day**: The start date for when the coupon becomes valid.
- **End Day**: The end date for when the coupon expires.
- **BIN List**: A list of BINs (Bank Identification Numbers) that the coupon applies to.
- Note: Physical card and Apple Pay BINs are different, so you’ll need to get both from your card issuer.
## How Coupons Are Applied
Let’s suppose you have a coupon with the following details:
- **Coupon Name**: `RAJHI15`
- **Discount Percentage**: 15%
- **Max Discount**: 150 SAR
- **Applicable BIN List**: `48478312`, `50696822`
Please note that the coupon will only be applied if the current date falls within the valid range (between the Start Day and End Day) set for the coupon. For the sake of this example, we will not mention the Start Day and End Day, but they are taken into account when applying the coupon.
If a payment matches the coupon criteria, such as having a valid BIN and being within the applicable date range, the coupon will be applied, and the payment amount will be reduced based on the defined discount.
Now, let’s suppose you make a payment using a **credit card or Apple Pay** with a card BIN starting with `48478312`. If this BIN is on the coupon's applicable list, the coupon will be applied.
In this case, the payment amount was `2000.00` SAR. When the coupon is applied, `300.00` SAR is deducted from the full amount, but only `150.00` SAR is actually deducted because the coupon has a maximum discount cap of `150.00` SAR.
The payment response metadata would look like this:
```json
{
"#coupon_id": "7848a897-10e7-4977-b719-81884d4cc999",
"#coupon_code": "RAJHI15",
"#coupon_discount": 15,
"#coupon_original_amount": 200000,
"#coupon_max_discount_amount": 15000
}
```
:::warning[Important]
When the merchant receives the payment response, they must check whether a coupon has been applied and update the order in their system accordingly. Failing to do so will result in inconsistencies in their records and the payment gateway.
:::
## BIN Ranges
Please note that each source has a different BIN range for the same card product, for example, the same exact mada card from a local Saudi issuer has the BIN ranges for:
- **Card**: 48478312
- **Apple Pay**: 50696822
## Coupon Flow
```mermaid
sequenceDiagram
Merchant->>Moyasar API: Payment Request
Moyasar API->>Moyasar API: Apply Coupon
Moyasar API->>Merchant: Payment Response
Merchant->>Merchant: Update Order with new Amount if coupon is applied
```
## Disable Coupon Per Payment
Moyasar enables merchants to have control whether a coupon should get applied or not per payment. For example, a merchant may want to limit coupon application per user per campaign. For more details, check the [Create Payment API](../../api/payments/01-create-payment.api.mdx).
## Checking Available Coupons
Before creating a payment, you can check whether a coupon will apply for a given card or wallet token by calling the **Available Coupon** endpoint. This is useful when you want to display a discount preview in your checkout UI (e.g. "You'll save 15% with this card") before the customer completes the payment.
### Endpoint
```
POST /v1/payments/available_coupon
```
Authenticated with your publishable or secret API key, the same as other Moyasar API endpoints.
### Request Parameters
| Parameter | Type | Required | Description |
| --------- | ------ | ---------------------------------------------------------------- | ----------------------------------------------------------------------------------------------- |
| `type` | string | Yes | The payment source type. One of: `creditcard`, `applepay`, `googlepay`, `samsungpay`. |
| `number` | string | Required when `type` is `creditcard` and `token` is not provided | The card number. Only the BIN is used to evaluate the coupon — the full number is never stored. |
| `token` | string | Required when `number` is not provided | A saved card token. The BIN associated with the token is used to evaluate the coupon. |
### Response
If a matching coupon is found, the endpoint returns the coupon object:
```json
{
"id": "7848a897-10e7-4977-b719-81884d4cc999",
"name": "Rajhi Card 15%",
"code": "RAJHI15",
"discount": 15,
"max_discount_amount": 15000,
"start_date": "2026-01-01T00:00:00.000Z",
"end_date": "2026-12-31T23:59:59.000Z",
"created_at": "2026-01-01T00:00:00.000Z",
"updated_at": "2026-01-01T00:00:00.000Z",
"disabled_at": null,
"active": true,
"criteria": {}
}
```
If no coupon matches the provided card or token, the endpoint returns `null` with HTTP `200 OK`.
| Field | Type | Description |
| --------------------- | ------- | -------------------------------------------------------------------------------------- |
| `id` | string | Unique identifier of the coupon. |
| `name` | string | Human-readable name of the coupon. |
| `code` | string | Internal coupon code, e.g. `RAJHI15`. Reference-only, not entered by customers. |
| `discount` | integer | Discount percentage (`1`–`100`). |
| `max_discount_amount` | integer | Maximum discount cap, in the smallest currency unit (e.g. halalas). |
| `start_date` | string | ISO-8601 timestamp from which the coupon becomes valid. |
| `end_date` | string | ISO-8601 timestamp at which the coupon expires. |
| `disabled_at` | string | ISO-8601 timestamp the coupon was disabled, or `null` if still enabled. |
| `active` | boolean | `true` if the coupon is currently active (not disabled and within its validity range). |
| `criteria` | object | The matching criteria used by the coupon (e.g. applicable BIN list). |
### Example Request
Using a card number:
```bash
curl https://api.moyasar.com/v1/payments/available_coupon \
-u sk_test_xxxx: \
-d "type=creditcard" \
-d "number=4847831234567890"
```
Using a saved card token:
```bash
curl https://api.moyasar.com/v1/payments/available_coupon \
-u sk_test_xxxx: \
-d "type=creditcard" \
-d "token=tok_xxxx"
```
For Apple Pay, Google Pay, or Samsung Pay, pass the corresponding `type` along with the source token.
### Typical Use Cases
- Display a discount badge or "You'll save X%" message in your checkout UI before the customer pays.
- Conditionally show or hide promotional content based on coupon eligibility.
- Pre-validate that a coupon will apply, so the customer is not surprised when the final payment is reduced.
:::note
This endpoint only returns whether a coupon is **available** for a given card or token — it does not apply the coupon. The coupon is automatically applied during the `Create Payment` call when the criteria match. See [How Coupons Are Applied](#how-coupons-are-applied) above.
:::
---
## Security Considerations
To ensure compliance with the Payment Card Industry Data Security Standard (PCI DSS), merchants who handle cardholder data must be PCI DSS Level 1 certified. This certification ensures that merchant systems meet the required security standards for processing payment information.
## PCI DSS and Coupons
When applying marketing coupons or discounts based on cardholder information, such as the card BIN (Bank Identification Number) or IIN (Issuer Identification Number), merchants must handle cardholder data directly. This requires merchants to be PCI DSS certified.
### How Moyasar Simplifies Compliance
Moyasar simplifies this process by handling cardholder data on behalf of merchants. Cardholder information is securely passed directly to Moyasar servers, which ensures the data is protected. As a result, merchants using Moyasar’s API do not need to manage sensitive payment information or obtain PCI DSS certification themselves.
### Important Reminder
Merchants who attempt to apply coupons based on cardholder information without the necessary PCI DSS certification risk compliance violations. It's crucial to follow the required procedures to ensure security and avoid potential issues.
---
## Configure Apple and Samsung Pay Certificates
# Configure Payment Certificates
This guide explains how to configure payment certificates for Apple Pay and Samsung Pay via your Moyasar dashboard.
## Common Prerequisites
- A CSR file from Moyasar
- Access to the respective developer portal (Apple or Samsung)
## Common Configuration Flow
- **Step1:** Request CSR File from Moyasar Dashboard
- **Step2:** Generate Payment Processing Certificate in the developer portal
- **Step3:** Upload Certificate back to Moyasar Dashboard
## Apple Pay Certificate
Apple Pay requires a payment processing certificate to securely process payments within your iOS app or on your website.
### Prerequisites
- An Apple Developer Account

## Samsung Pay Certificate
Samsung Pay certificate allows you to accept payments natively within your Samsung app or through platforms that don't support Web Merchant Registration.
### Prerequisites
- Access to Samsung Developer Portal

## Managing Certificates
### Certificate Status
Both Apple Pay and Samsung Pay certificates will show one of these statuses:
- **Not configured**: No certificate has been uploaded yet
- **Activated**: Certificate is successfully configured and active
- **Error**: There was an issue with the certificate
### Reset Certificate
You can reset your certificate configuration at any time by clicking the "Reset Certificate" button. This might be necessary if:
- Your certificate has expired
- You need to generate a new certificate
- You're experiencing issues with the current certificate
:::tip
- Keep track of certificate expiration dates
- Store downloaded certificates securely
- Test the payment flow after any certificate changes
:::
---
## Get Your API Keys
Moyasar provides unique API keys to clients to authenticate API requests. Each account has two pairs of keys - one for testing and one for live transactions.
---
## API Keys

| Term | Description |
| :-------------- | :--------------------------------------------------------------------------------------------------------------------------------------------------------------------------------------------------------------------------------------------------------------------------------------- |
| publishable key | The publishable key allows for only one operation - creating a payment and thus can be attached to public web forms, such as an HTML hidden field. |
| secret key | The secret key provides access to all operations in the documentation. If you have not generated any of your secret keys previously, or if you lose a generated one, you have to **regenerate** it and store it in a safe spot; as you will not be able to view it again -- only its ID. |
:::tip
- Secret keys start with the prefix: `sk_`.
- Publishable keys start with the prefix: `pk_`.
:::
### 1. Test API Keys
Test API keys allow you to test your integration with Moyasar without risking the usage of real money.
### 2. Live API Keys
Live API keys are used to accept real payments. (these will appear once you activate your account)
:::tip
- Test API key start with the prefix: `pk_test_` or `sk_test_`.
- Live API keys start with the prefix: `pk_live_` or `sk_live_`.
:::
---
### Regenerate API Keys
You can regenerate your API keys by clicking on the `Regenerate Key` button next to the key that you want to regenerate
---
## Configure Webhooks
This guide will go through how to setup and manage webhooks on your Moyasar account.
## Getting Started
1. Go to https://dashboard.moyasar.com/
2. Log in to your account.
3. Click on the Settings tab.
4. Go to the Webhooks tab
## Webhooks

## Add Webhook
To get started, click on add webhook
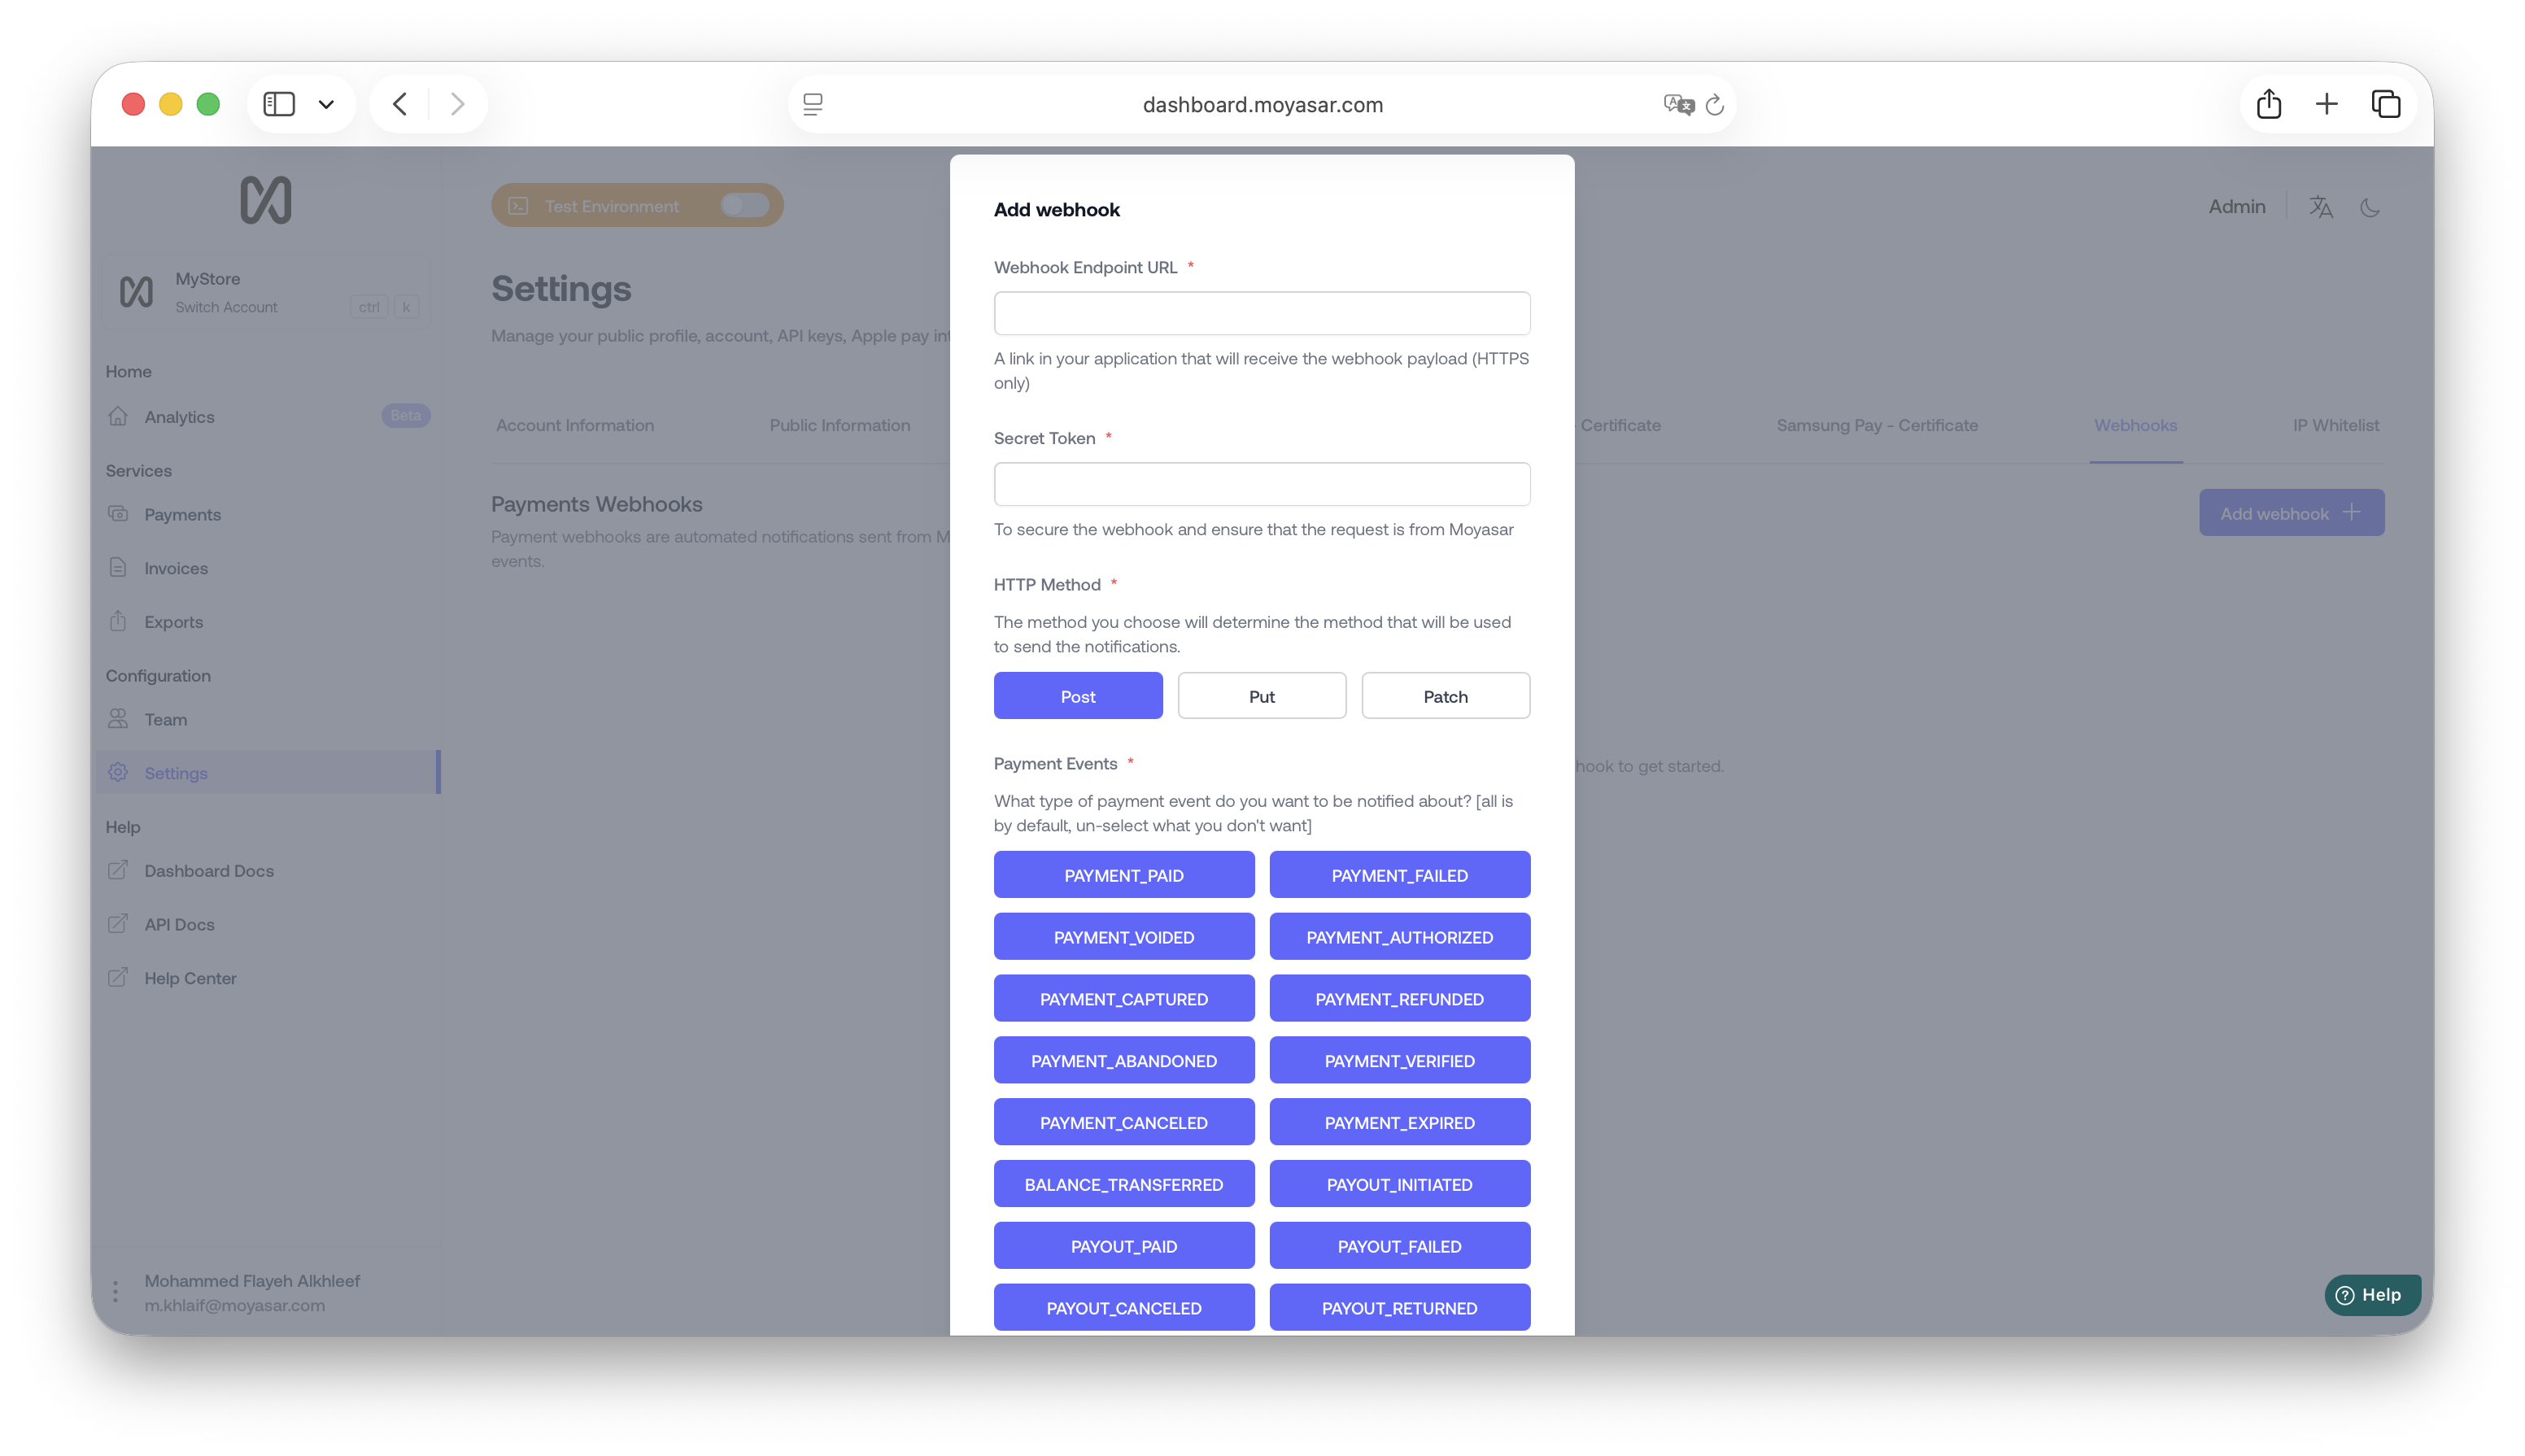
### Required Fields
| Term | Description |
| :----------- | :---------------------------------------------------------------------------------------------------------------------- |
| Endpoint | a URL on your server that will receive the notification (must be HTTPS) |
| Secret Token | is a password you need to validate on your server to make sure the notification is coming from moyasar |
| HTTP Method | Our Server will send the notification through this method, make sure it matches the one you're expecting on your server |
| Events | The events that you will be notified about |
### Payment Events
| Payment Event | Description |
| -------------------- | ----------------------------------------------------------------------------------------------------------------- |
| `payment_paid` | Get notified when a payment is successfully processed, indicating that the transaction is complete. |
| `payment_faild` | Receive alerts when a payment attempt fails, indicating that the transaction was not successful. |
| `payment_refunded` | Stay updated when a payment is refunded, indicating that the funds have been returned to the customer. |
| `payment_voided` | Be notified when a payment is voided, indicating that the transaction has been canceled or invalidated. |
| `payment_authorized` | Get notified when a payment is authorized, indicating that the funds have been reserved for the transaction. |
| `payment_captured` | Receive alerts when a payment is captured, indicating that the authorized funds have been successfully collected. |
| `payment_verified` | Stay updated when payment is verified, indicating that the payment details have been successfully validated. |
### Delete Webhook
To delete a webhook, click on the delete button (🗑️)
---
## Configure your IP whitelist
Moyasar provides an IP Whitelist feature to protect Secret Key from being compromised.
## Getting Started
1. Go to https://dashboard.moyasar.com/
2. Log in to your account.
3. Click on the Settings tab.
4. Go to the IP Whitelist tab
## IP Whitelist
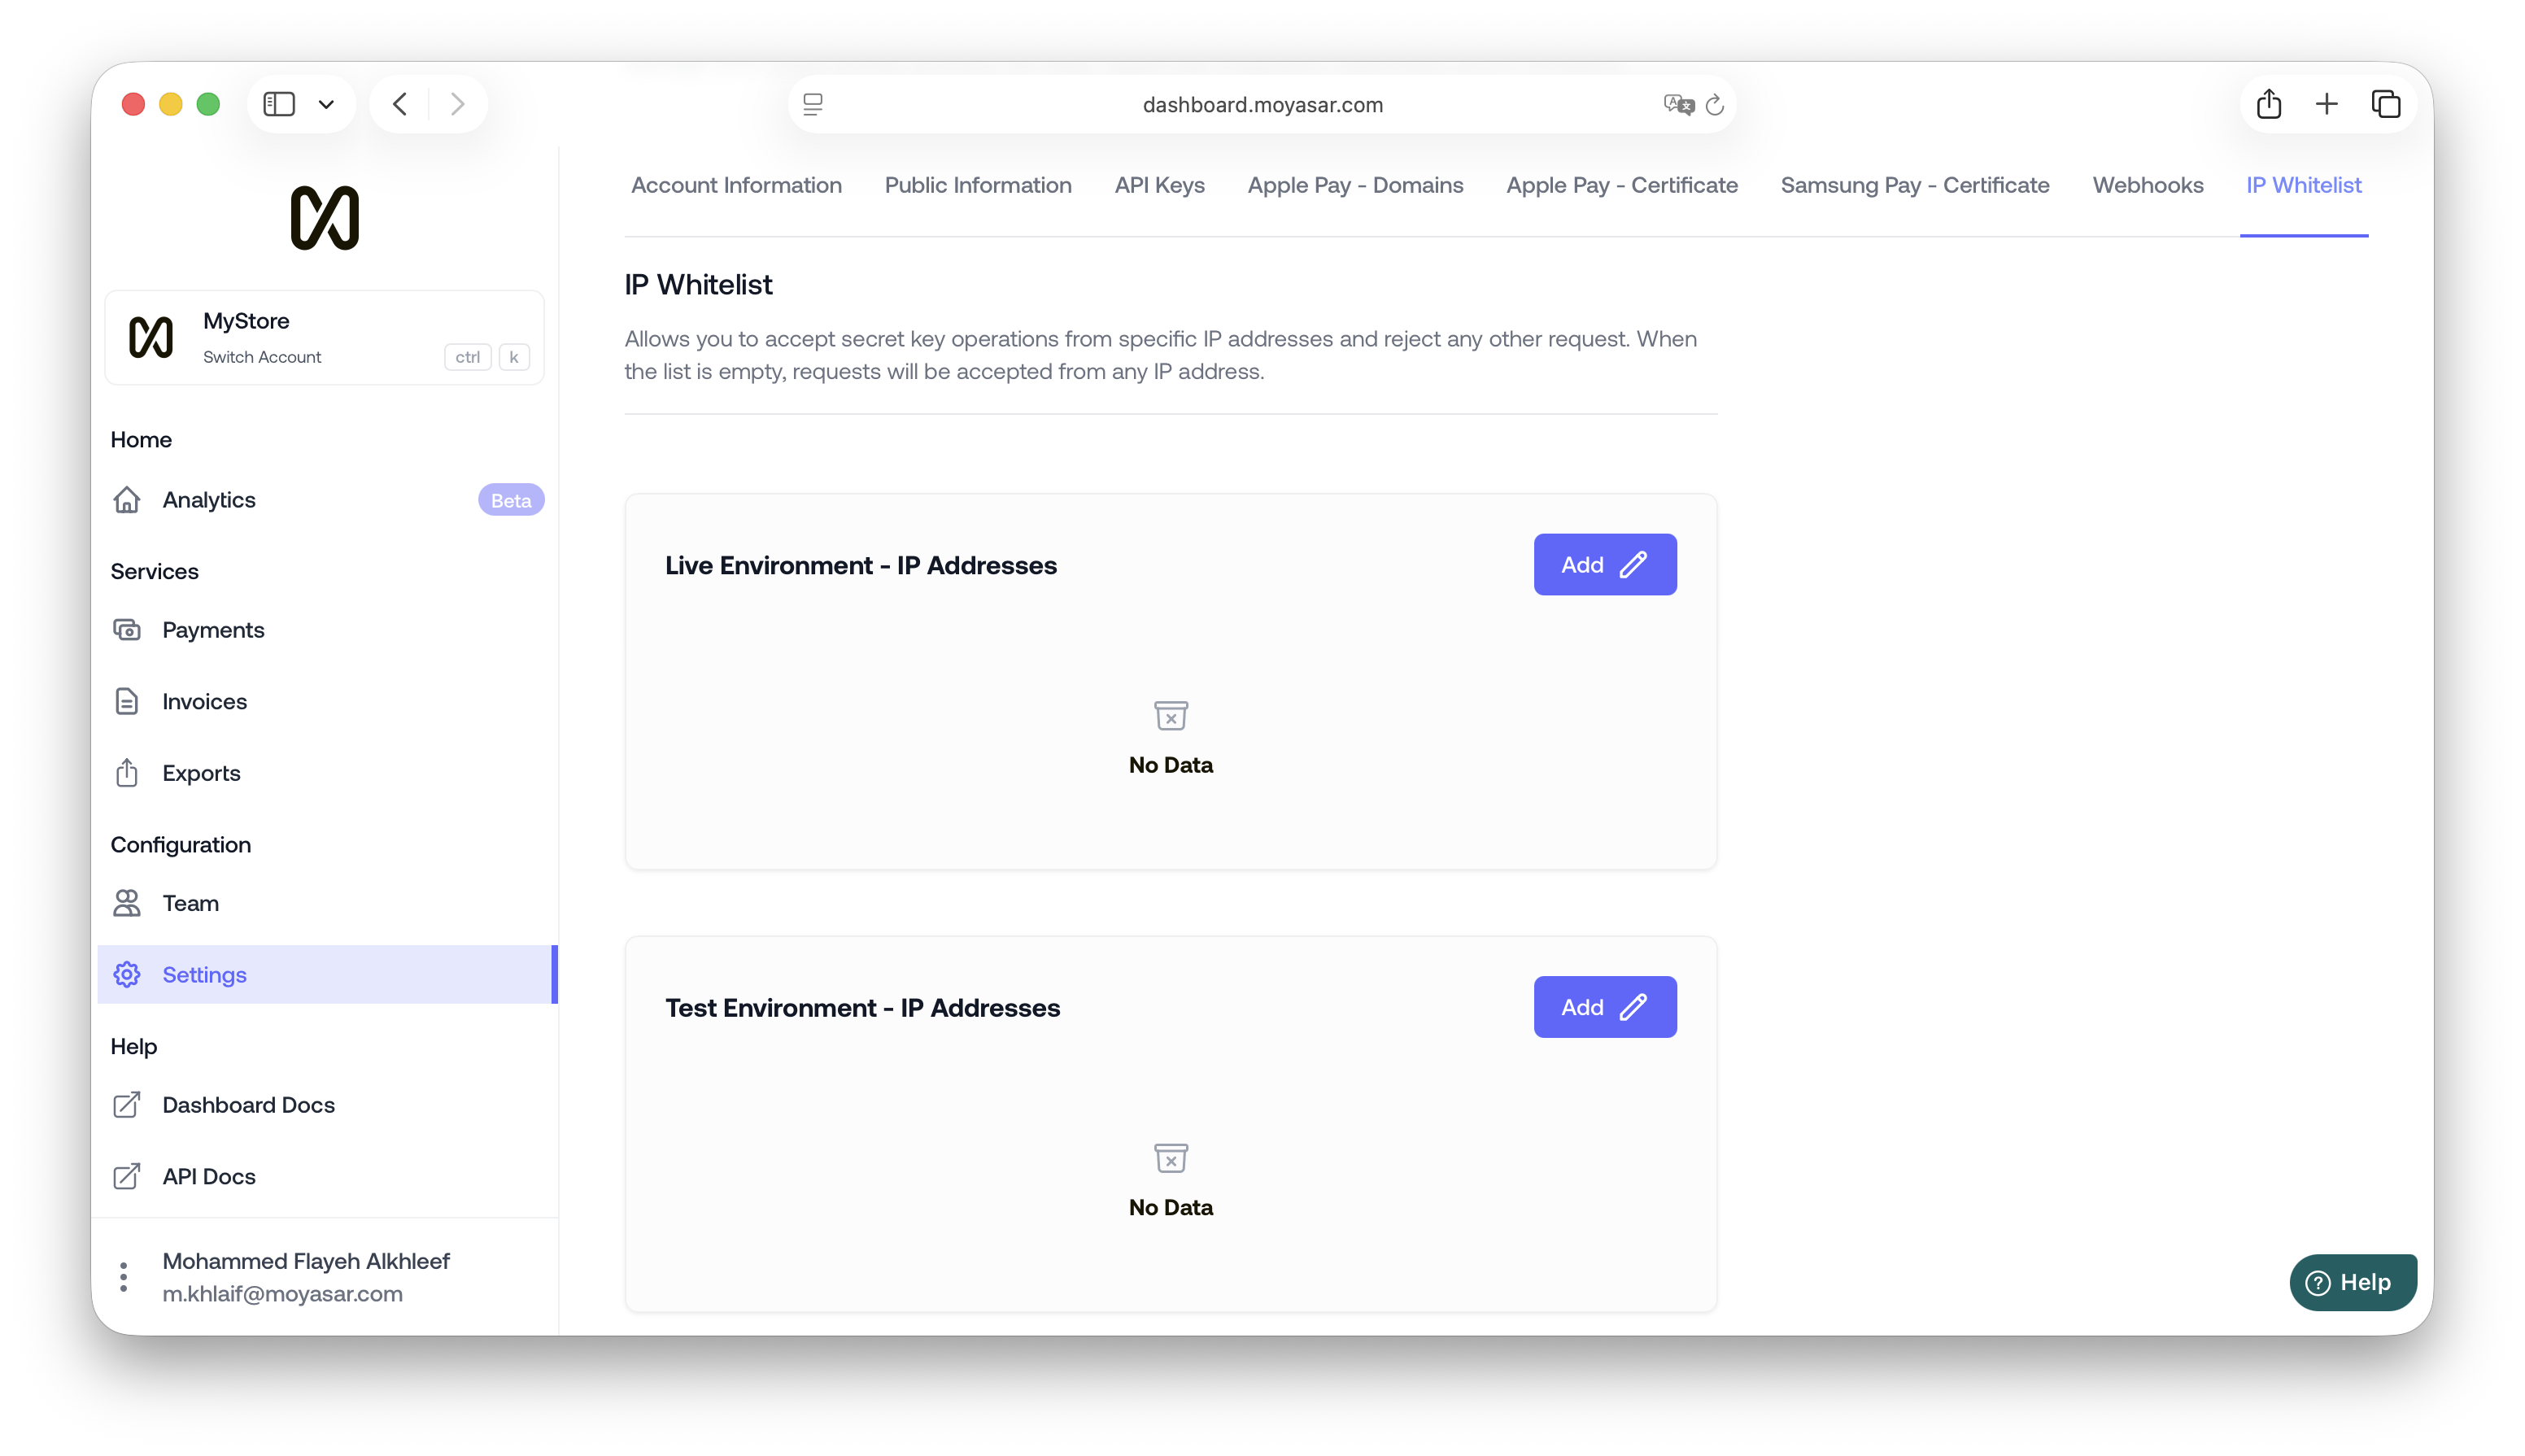
### Live IP Whitelist
The Live IP whitelist lets you test out our IP Whitelist feature in the production environment, meaning that any operation made using **Live Environment API Keys** will be restricted to the IPs in this list.
### Test IP Whitelist
The Test IP whitelist lets you test out our IP Whitelist feature in the sandbox environment, meaning that any operation made using **Test Environment API Keys** will be restricted to the IPs in this list.
### Add IP
To add an IP, Click on `Edit List` on the list you want.
| Term | Description |
| :--- | :--------------------------- |
| Name | Nickname for the IP |
| IP | The public IP of your server |
### Reset IP Whitelist
:::warning[Important]
This will allow anybody with access to the secret key to make operations on your account
:::
To reset the IP whitelist, click on `Reset List`.
---
## Google Pay Web
# Introduction
This guide will walk you through adding Google Pay™ to your website and accepting payments using Moyasar.
## Before Starting
Check the following key resources from Google Pay™:
- Web Developer Documentation: https://developers.google.com/pay/api/web/overview
- Web Integration Checklist: https://developers.google.com/pay/api/web/guides/test-and-deploy/integration-checklist
- Web Brand Guidelines: https://developers.google.com/pay/api/web/guides/brand-guidelines
- APIs Acceptable Use Policy: https://payments.developers.google.com/terms/aup
- API Terms of Service: https://payments.developers.google.com/terms/sellertos
When you are ready, ensure the following:
- [Create an account](https://dashboard.moyasar.com) with Moyasar, if you haven't already.
- Ensure to have your Moyasar [API Keys](../dashboard/get-your-api-keys.md) ready.
## Create Your Google Pay Merchant Profile
Follow this [guide](https://developers.google.com/pay/api/web/guides/test-and-deploy/publish-your-integration#create-your-profile) to set up your merchant profile and acquire your `merchantId` from Google.
## Add Your Website To Google Wallet
Follow this [guide](https://developers.google.com/pay/api/web/guides/test-and-deploy/publish-your-integration#integrate-your-website) to accept Google Pay payments from your website.
Ensure you select `Gateway` as the integration type.
## Initialize The Moyasar Form
Follow our [basic integration guide](../card-payments/basic-integration.mdx) to successfully show the web form.
:::info
Moyasar only accepts `CRYPTOGRAM_3DS` type of [authorization method](https://developers.google.com/pay/api/web/reference/request-objects#CardParameters).
:::
Add the following configuration to show the Google Pay button:
```js
Moyasar.init({
element: '.mysr-form',
amount: 1000,
currency: 'SAR',
description: 'Coffee Order #1',
publishable_api_key: 'YOUR_PUBLISHABLE_API_KEY',
callback_url: 'https://moyasar.com/thanks',
supported_networks: ['visa', 'mastercard', 'mada', 'unionpay'],
methods: ['creditcard', 'googlepay'], // Add Google Pay Method
google_pay: {
// Add Google Pay Config
merchant_id: 'MERCHANT_ID',
country: 'SA',
label: 'MERCHANT_NAME',
environment: 'PRODUCTION',
},
on_completed: async function (payment) {
await savePaymentOnBackend(payment);
},
});
```
You are now ready to accept Google Pay payments.
---
## Creating invoices
## Moyasar e-Invoices Overview
Moyasar e-invoice is an additional service dedicated to providing online payment for websites and electronic systems with a structured and secure mechanism. This allows the merchants to create e-invoices through Moyasar’s dashboard or Moyasar’s API and to be sent or presented to customers manually or automatically.
## Creating Invoice Via Moyasar’s Dashboard
In the Dashboard, you can:
- Create an invoice
- Add/Edit Amount, Description, Expire Date, and Metadata to invoices
Click [here](https://help.moyasar.com/en/article/moyasar-dashboard-invoice-rf3kyd/#2-creating-an-invoice) for the steps to create an invoice through the Dashboard.
## Creating Invoice Via Moyasar’s API
Moyasar e-Invoices APIs enable merchants to generate invoices programmatically and integrate them with their online stores and backend systems.
### Invoice LifeCycle
```mermaid
sequenceDiagram
participant Customer
participant Merchant as Merchant System
participant Moyasar as Moyasar API
Customer->>Merchant: Clicks on pay
Merchant->>Moyasar: Sends request to create invoice
Moyasar->>Merchant: Creates invoice instantaneously
Merchant->>Customer: Provides invoice link (via email, social media, or new tab)
Customer->>Moyasar: Perform payment
Moyasar->>Merchant: Sends payment success notification
```
## Before Starting
Before you start integrating with Moyasar API, make sure you complete these steps:
1. Sign up for a Moyasar test account at
2. [Get Your API Keys](../dashboard/get-your-api-keys.md) to authenticate your requests
### Step 1: Creating an invoice
Start by sending a request to Moyasar invoices and create an endpoint to create an invoice in your server.
> https://api.moyasar.com/v1/invoices
You will need to specify the following required data to be included in the request:
| Parameter | Description |
| ------------------------- | ------------------------------------------------------------------------------------------------------------------------------------------------------------------------------------------------------------------------------------------------------------------------------------ |
| \* amount (required) | The amount should be in the smallest currency unit. Means, ( 100 Halals to charges 1 Riyal ) |
| currency | 3-letter ISO code for currency. (default: SAR) |
| \* description (required) | An arbitrary string that you can attach to an invoice object. This may include a description of the merchandise or the service that your customer is billed for. The invoice description is displayed on the invoice alongside the amount when the invoice is presented to the user. |
| expired_at | Specifies when the invoice will get expired. An expired invoice cannot have payment attempts as its status will be expired. |
| success_url | An endpoint on your site, that we will redirect to after the customer pays successfully. |
| back_url | An endpoint on your site, that we will redirect to after the user clicks on the back button. |
| metadata | Set of key-value pairs that you can attach to an object. This can be useful for storing additional information about the object in a structured format. Individual keys can be unset by posting an empty value to them. All keys can be unset by posting an empty value to metadata. |
**Invoice Notification**
Invoices support asynchronous notification callback when the status changes from initiated to paid upon the customer's successful payment.
To enable notifications for an invoice, you’d provide:
| Parameter | Description |
| ------------ | --------------------------------------------------------------------------------------------------------------------- |
| callback_url | An endpoint on your server, for receiving notifications about paid invoices. (e.g. https\://yourdomain/some-endpoint) |
**For more technical details about Moyasar invoices API, please refer to our**[API](../../api/api-introduction.md)
### Step 2: Share with the customer
Then we will give you a link to the invoice on our website, you can send that link to the user or redirect him to the invoice page, then we will handle the payment form and validations.
---
## Payment Operations
# Payment Flows
Moyasar supports two payment flows:
#### 1. Purchase (default)
Authorizes and captures in one step. The card is charged immediately and the payment status is `paid`.
```mermaid
flowchart TD
A([Create Payment]) --> B[paid]
B -->|Refund| C[refunded]
B -->|Void| D[voided]
```
#### 2. Authorization
Only places a hold on the card without capturing the funds. You then decide whether to capture (charge) or void (release) the held amount.
```mermaid
flowchart TD
A([Create Payment\nmanual: true]) --> B[authorized]
B -->|Capture| C[captured]
B -->|Void| D[voided]
C -->|Refund| E[refunded]
C -->|Void| D
```
---
## Authorization
To authorize a payment without charging, set `manual` to `true` in the source when creating the payment.
**Endpoint:** `POST /v1/payments`
**Authentication:** Publishable key
```json title="POST /v1/payments"
{
"amount": 5000,
"currency": "SAR",
"description": "Order #1234",
"callback_url": "https://example.com/callback",
"source": {
"type": "creditcard",
"name": "John Doe",
"number": "4111111111111111",
"month": "01",
"year": "2027",
"cvc": "123",
"manual": true
}
}
```
```bash title="POST /v1/payments"
curl -X POST https://api.moyasar.com/v1/payments \
-u pk_test_YOUR_PUBLISHABLE_KEY: \
-H "Content-Type: application/json" \
-d '{
"amount": 5000,
"currency": "SAR",
"description": "Order #1234",
"callback_url": "https://example.com/callback",
"source": {
"type": "creditcard",
"name": "John Doe",
"number": "4111111111111111",
"month": "01",
"year": "2027",
"cvc": "123",
"manual": true
}
}'
```
The response will have `"status": "authorized"` instead of `"paid"`.
:::warning[Capture Window]
Authorized payments must be captured within **14 days** on the **Mada** scheme. Other card schemes (Visa, Mastercard, etc.) may allow longer capture windows. If you do not capture or void in time, the hold will eventually expire and the funds will be released back to the cardholder.
:::
---
## Capture
Captures an authorized payment, charging the cardholder.
**Endpoint:** `POST /v1/payments/{id}/capture`
**Authentication:** Secret key
### Full Capture
```bash title="POST /v1/payments/{id}/capture"
curl -X POST https://api.moyasar.com/v1/payments/{payment_id}/capture \
-u sk_test_YOUR_SECRET_KEY:
```
No request body is needed. The full authorized amount is captured.
### Partial Capture
To capture less than the authorized amount, pass the `amount` parameter (in the smallest currency unit).
```json title="POST /v1/payments/{id}/capture"
{
"amount": 3000
}
```
```bash title="POST /v1/payments/{id}/capture"
curl -X POST https://api.moyasar.com/v1/payments/{payment_id}/capture \
-u sk_test_YOUR_SECRET_KEY: \
-H "Content-Type: application/json" \
-d '{ "amount": 3000 }'
```
- Capture amount cannot exceed the authorized amount.
- The payment status changes to `captured`.
---
## Void
Releases the hold on an authorized payment, or reverses a paid/captured payment.
**Endpoint:** `POST /v1/payments/{id}/void`
**Authentication:** Secret key
```bash title="POST /v1/payments/{id}/void"
curl -X POST https://api.moyasar.com/v1/payments/{payment_id}/void \
-u sk_test_YOUR_SECRET_KEY:
```
No request body is needed. The payment status changes to `voided`.
:::warning[Void window]
- **Authorized payments** — can be voided within **14 days** on the **Mada** scheme. Other card schemes may allow a longer window. If not voided in time, the issuer will automatically release the held funds back to the cardholder.
- **Paid/captured payments** — can only be voided within approximately **2 hours** of the original transaction. After that, use a refund instead.
:::
:::tip
Prefer void over refund when possible. Voids release the hold instantly and avoid processing fees.
:::
---
## Refund
Returns funds to the cardholder for a charged payment.
**Endpoint:** `POST /v1/payments/{id}/refund`
**Authentication:** Secret key
### Full Refund
```bash title="POST /v1/payments/{id}/refund"
curl -X POST https://api.moyasar.com/v1/payments/{payment_id}/refund \
-u sk_test_YOUR_SECRET_KEY:
```
No request body is needed. The full charged amount is refunded.
### Partial Refund
To refund less than the charged amount, pass the `amount` parameter (in the smallest currency unit).
```json title="POST /v1/payments/{id}/refund"
{
"amount": 2000
}
```
```bash title="POST /v1/payments/{id}/refund"
curl -X POST https://api.moyasar.com/v1/payments/{payment_id}/refund \
-u sk_test_YOUR_SECRET_KEY: \
-H "Content-Type: application/json" \
-d '{ "amount": 2000 }'
```
- Refund amount cannot exceed the charged amount.
- For `paid` payments, the maximum refundable amount is the full `amount`.
- For `captured` payments, the maximum refundable amount is the `captured` amount.
- The payment status changes to `refunded`.
- For live accounts using aggregation, your account balance must be sufficient to cover the refund.
---
## Handling Failures
### Capture Failure
1. Check the payment status via `GET /v1/payments/{id}`.
2. If still `authorized`, retry the capture once.
3. If it fails again, ask the cardholder to use a different card and create a new payment.
```mermaid
flowchart TD
A[Capture fails] --> B[GET /v1/payments/id]
B --> C{Status?}
C -->|captured| D[Done - already succeeded]
C -->|authorized| E[Retry once]
E --> F{Succeeded?}
F -->|Yes| D
F -->|No| G[Ask cardholder to use a different card]
```
### Void Failure
1. Check the payment status via `GET /v1/payments/{id}`.
2. If still voidable, retry the void once.
3. If it fails again:
- **Authorized payments:** No action needed. The hold will expire on its own and the funds will return to the cardholder.
- **Paid/captured payments:** Issue a refund instead.
```mermaid
flowchart TD
A[Void fails] --> B[GET /v1/payments/id]
B --> C{Status?}
C -->|voided| D[Done - already succeeded]
C -->|authorized / paid / captured| E[Retry once]
E --> F{Succeeded?}
F -->|Yes| D
F -->|No| G{Payment status?}
G -->|authorized| H[No action needed - hold expires on its own]
G -->|paid / captured| I[Issue a refund instead]
```
### Refund Failure
1. Check the payment status via `GET /v1/payments/{id}`.
2. If still `paid` or `captured`, retry the refund once.
3. If it fails again, contact Moyasar support with the payment ID.
```mermaid
flowchart TD
A[Refund fails] --> B[GET /v1/payments/id]
B --> C{Status?}
C -->|refunded| D[Done - already succeeded]
C -->|paid / captured| E[Retry once]
E --> F{Succeeded?}
F -->|Yes| D
F -->|No| G[Contact Moyasar support]
```
---
## Quick Reference
| Operation | Endpoint | Auth | Allowed From Status |
| --------- | --------------------------------------- | --------------- | -------------------------------- |
| Authorize | `POST /v1/payments` with `manual: true` | Publishable key | — |
| Capture | `POST /v1/payments/{id}/capture` | Secret key | `authorized` |
| Void | `POST /v1/payments/{id}/void` | Secret key | `authorized`, `paid`, `captured` |
| Refund | `POST /v1/payments/{id}/refund` | Secret key | `paid`, `captured` |
---
## Payout Account Verification
This feature should enable you to verify the details of an account (destination) before sending a payout to it.
Currently, on STC Pay wallet is supported.
## Prerequisites
To test the account verification sandbox you will need to have a test account at Moyasar, you can create a test account using the following link:
- [Register a new account on Moyasar dashboard](https://dashboard.moyasar.com/register/new)
Once you have created the test account, navigate to `Settings -> API Keys`:
- If you have not generated any of your secret keys previously, or if you lose a generated one, you have to regenerate it and store it in a safe spot; as you will not be able to view it again -- only its ID (which starts wih `sk_test_`).
- The secret test key should start with the prefix: `sk_test_`.
:::tip
When you are ready to use the live account, please contact our support team to enable this feature for you.
:::
## Example
```shell
curl -u "sk_test_123:" --location 'https://api.moyasar.com/v1/account_verifications' \
--header 'Content-Type: application/json' \
--data '{
"type": "stcpay",
"id": "VALID_NATIONAL_ID_OR_IQAMA_ID",
"mobile": "VALID_SAUDI_NUMBER"
"consented_at": "2025-02-05 11:00:00 +0300",
}'
```
```json title="POST Request"
POST /v1/account_verifications HTTP/1.1
Host: api.moyasar.com
Content-Type: application/json
Authorization: Basic {BASE64 encoded secret key}
{
"type": "stcpay",
"id": "VALID_NATIONAL_ID_OR_IQAMA_ID",
"mobile": "VALID_SAUDI_NUMBER"
"consented_at": "2025-02-05 11:00:00 +0300",
}
```
Response body:
```json title="POST Request"
{
"id": "ee270205-afce-437f-bfb5-ebd173a8e207",
"correct": true
}
```
The `correct` value indicates if the account is verified or not. If you want to manipulate the result for testing purposes, please make the hours in the `consented_at` odd or even.
---
## Introduction
Moyasar Payouts allows you to easily send payouts from your bank account or digital wallet to any beneficiary.
:::warning[Important]
This API does not allow you to transfer your current balance at Moyasar to your bank account. **Settlements** are handled automatically by the system and are described [here.](../settlements/settlement-introduction.md)
:::
## Terminology
- **Payout Account:** Contains the source account information. It could be a bank account or a digital wallet.
- **Payout:** Represents a single transfer from a **Payout Account** to a **Destination**.
## Supported Services
We are continuously working to support more services through the unified payouts API.
### Supported Banks
- Al Rajhi Bank
- Saudi National Bank (SNB)
### Supported Wallets
- STC Pay
- URPay (soon)
---
## Payout Account Details
## Introduction
Creating a payout account is the first step in order to start sending payouts.
There are two types of payout accounts:
- Bank
- Wallet
The following sample is for adding ANB bank account
Verb, Path, and Headers
```http request
POST /v1/payout_accounts
Authorization: Basic {BASE64 encoded secret key}
```
JSON Body
```json
{
"account_type": "bank",
"properties": {
"iban": "SA8430400108057386290038"
},
"credentials": {
"client_id": "client_id",
"client_secret": "client_secret"
}
}
```
Response
```json
{
"id": "ceb461ea-3f35-4027-b20a-beb89f5ee574",
"account_type": "bank",
"currency": "SAR",
"properties": {
"iban": "SA8430400108057386290038"
},
"created_at": "2025-04-08T06:47:00.135Z"
}
```
:::info
In the example request above, the `client_id` and `client_secret` are secret information provided by the ANB bank team after enabling B2B service for your bank account. Each bank or wallet will share their on type of credentials. More on that in the coming sections.
:::
### Create Payout Account Request Details
| Field | Description |
| -------------- | --------------------------------------------------------------------------------------------------------------------------------------- |
| `account_type` | Indicates the type of the payout account. It can be either `bank` or `wallet` |
| `properties` | An object that contains the public information relevant to the payout account. For example, the IBAN of the bank account |
| `credentials` | An object that contains the secret information relevant to the payout account. For example, the private key configured for this account |
All information under `properties` and `credentials` relates to the payout account and is acquired from your service provider.
## Getting The Credentials
To use the service in the live environment, you should first acquire your B2B service credentials from your bank or wallet provider. Please reach out to your account manager to assist you with that.
### Banks Details
| Bank | Properties | Credentials |
| ------------------------- | --------------------------- | --------------------------------------------- |
| Al Rajhi Bank | `iban` | `company_code` `cert` `key` |
| Saudi National Bank (SNB) | `iban` `corporate_id` | `client_id` `client_secret` `key` |
| Arab National Bank (ANB) | `iban` | `client_id` `client_secret` |
### Wallets Details
| Wallet | Properties | Credentials |
| ------- | ------------- | ------------------ |
| STC Pay | `merchant_id` | `cert` `key` |
---
## Payout Details
## Introduction
After creating your payout account, you are now ready to send payouts.
You can send payouts to either:
- Bank
- Wallet
:::info
The payout account type should match the beneficiary account type. In other words, to send a payout to a bank account, the type of the source payout account should be a bank as well.
:::
## Create a Payout
The following example is for sending a payout from ANB bank account to ANB beneficiary.
Verb, Path, and Headers
```http request
POST /v1/payouts
Authorization: Basic {BASE64 encoded secret key}
```
```json
{
"source_id": "ceb461ea-3f35-4027-b20a-beb89f5ee574",
"amount": 100,
"purpose": "personal",
"destination": {
"type": "bank",
"iban": "SA5330400108057386290014",
"name": "Faisal Alghurayri",
"mobile": "0555555555",
"country": "SA",
"city": "Riyadh"
}
}
```
Response
```json
{
"id": "ac2cc6d8-1ffa-48e9-a6eb-d4e98dbdb8ec",
"source_id": "ceb461ea-3f35-4027-b20a-beb89f5ee574",
"sequence_number": "6244377266243449",
"channel": "internal",
"status": "initiated",
"amount": 100,
"currency": "SAR",
"purpose": "personal",
"comment": null,
"destination": {
"type": "bank",
"mobile": "0555555555",
"iban": "SA5330400108057386290014",
"name": "Faisal Alghurayri",
"country": "SA",
"city": "Riyadh"
},
"message": "Payment was received, please check back after 5 minutes",
"failure_reason": null,
"created_at": "2025-04-08T06:52:10.868Z",
"updated_at": "2025-04-08T06:52:10.895Z",
"metadata": null
}
```
## Payout Channel
The payout channel is automatically determined by Moyasar.
| Channel | Description | Criteria | Payout Delivery Timeline |
| ---------- | ---------------------------------------------- | ------------------------------------------------------------------------------------- | -------------------------------------------------------- |
| `internal` | The payout is sent internally | Source and destination are in the same bank or wallet | Instant |
| `ips` | Instant local transfer between different banks | Amount is less than or equal 20,000 SAR given both source and destination support IPS | Semi-Instant |
| `sarie` | Local transfer through SARIE between banks | Amount is more than 20,000 SAR | Semi-Instant during workdays between 9:00 AM and 3:00 PM |
## Payout Status
```mermaid
stateDiagram-v2
[*] --> Queued
Queued --> Canceled
Queued --> Initiated
Queued --> Failed
Initiated --> Paid
Initiated --> Failed
Paid --> Returned
```
| Status | Description |
| ----------- | -------------------------------------------------------------------- |
| `queued` | The initial status of the payout |
| `initiated` | Moyasar has sent the payout request to the bank or wallet |
| `paid` | The payout is successfully done |
| `failed` | The payout is failed |
| `canceled` | You have canceled the payout. Only `queued` payouts can get canceled |
| `returned` | The payout is reversed |
## Payout Flows
Below diagrams show normal scenarios. Eventually, all payouts will be processed to either paid or failed.
If there is a transient error like a timeout between Moyasar and the bank or wallet, the flow will become asynchronous. More on that below.
### Wallet or Bank (Internal Channel)
This flow is synchronous unless a transient error occurs. Almost all banks and wallets instantly process the payout if it is internal.
```mermaid
sequenceDiagram
Merchant->>+Moyasar: Create Payout
Moyasar->>+BankOrWallet: Create Payout
BankOrWallet-->>-Moyasar: Payout Created
Moyasar-->>-Merchant: Payout Created
```
### Bank (IPS Channel)
This flow is asynchronous.
```mermaid
sequenceDiagram
Merchant->>+Moyasar: Create Payout
Moyasar->>+Bank: Create Payout
Bank-->>-Moyasar: Payout Initiated
Moyasar-->>-Merchant: Payout Initiated
Bank->>+IPS: Create Payout
IPS-->>-Bank: Payout Created
Note over Moyasar,Bank: After some time
Moyasar->>+Bank: Get Payout Status
Bank-->>+Moyasar: Payout Created
Merchant->>+Moyasar: Get Payout Status
Moyasar-->>+Merchant: Payout Created
```
### Bank (SARIE Channel)
This flow is asynchronous.
If the payout is done within the SARIE working hours, the flow will be as same as IPS flow above.
However, if it is outside the working hours, it will be queued for later processing.
```mermaid
sequenceDiagram
Merchant->>+Moyasar: Create Payout
Moyasar-->>-Merchant: Queued
Note over Moyasar,Bank: When SARIE Opens
Moyasar->>+Bank: Create Payout
Bank-->>-Moyasar: Payout Initiated
Bank->>+SARIE: Create Payout
SARIE-->>-Bank: Payout Created
Note over Moyasar,Bank: After some time
Moyasar->>+Bank: Get Payout Status
Bank-->>-Moyasar: Payout Created
Merchant->>+Moyasar: Get Payout Status
Moyasar-->>-Merchant: Payout Created
```
### Transient Error
If there is a transient error like a timeout between Moyasar and the bank or wallet, the flow will become asynchronous.
Moyasar is going to retry sending the request after a few minutes for multiple times. When the retries are exhausted, the payout will be marked as failed accordingly. Therefore, you need to check the status every 5-10 minutes.
An alternative would be to set up webhooks to receive a notification once the payout status changes.
Thanks to relying on a `sequence_number` when trying to create the payout, duplicate payouts should never happen.
```mermaid
sequenceDiagram
Merchant->>+Moyasar: Create Payout
Moyasar->>+BankOrWallet: Create Payout
Note over Moyasar,BankOrWallet: Transient Error (Timeout)
Moyasar-->>-Merchant: Payout Queued
Note over Moyasar,BankOrWallet: After some time
Moyasar->>+BankOrWallet: Create Payout
BankOrWallet-->>-Moyasar: Payout Created
Merchant->>+Moyasar: Get Payout Status
Moyasar-->>-Merchant: Payout Created
```
## Payout Purposes
| Living & Expenses | Financial & Investments | Transfers & Others |
| ------------------- | ------------------------ | ---------------------- |
| `bills_or_rent` | `saving_investment` | `government_payment` |
| `expenses_services` | `investment_transaction` | `investment_house` |
| `purchase_assets` | `dividend_payment` | `payment_to_merchant` |
| `personal` | `credit_card_loan` | `own_account_transfer` |
| `family_assistance` | `donation` | |
| `payroll_benefits` | `money_exchange` | |
| `online_purchase` | | |
| `hajj_and_umra` | | |
| `government_dues` | | |
---
## Quick Start
You can start testing the Payout service in the sandbox in just a few seconds.
### 1. Create your Moyasar Account
:::info
If you already have an account at Moyasar, you can skip this step.
:::
- Create an account using the following [link](https://dashboard.moyasar.com/register/new)
- Once you have created the test account, navigate to `Settings -> API Keys`:
- If you have not generated any of your secret keys previously, or if you lose a generated one, you have to regenerate it and store it in a safe spot; as you will not be able to view it again -- only its ID (which starts wih `sk_test_`).
- The secret test key should start with the prefix: `sk_test_`.
### 2. Create a Payout Account (ANB Bank Example)
Verb, Path, and Headers
```http request
POST /v1/payout_accounts
Authorization: Basic {BASE64 encoded secret key}
```
JSON Body
```json
{
"account_type": "bank",
"properties": {
"iban": "SA8430400108057386290038"
},
"credentials": {
"client_id": "any-id",
"client_secret": "any-secret"
}
}
```
Response
```json
{
"id": "ceb461ea-3f35-4027-b20a-beb89f5ee574",
"account_type": "bank",
"currency": "SAR",
"properties": {
"iban": "SA8430400108057386290038"
},
"created_at": "2025-04-08T06:47:00.135Z"
}
```
### 3. Send The Payout
Verb, Path, and Headers
```http request
POST /v1/payouts
Authorization: Basic {BASE64 encoded secret key}
```
```json
{
"source_id": "ceb461ea-3f35-4027-b20a-beb89f5ee574",
"amount": 100,
"purpose": "personal",
"destination": {
"type": "bank",
"iban": "SA5330400108057386290014",
"name": "Faisal Alghurayri",
"mobile": "0555555555",
"country": "SA",
"city": "Riyadh"
}
}
```
Response
```json
{
"id": "ac2cc6d8-1ffa-48e9-a6eb-d4e98dbdb8ec",
"source_id": "ceb461ea-3f35-4027-b20a-beb89f5ee574",
"sequence_number": "6244377266243449",
"channel": "internal",
"status": "initiated",
"amount": 100,
"currency": "SAR",
"purpose": "personal",
"comment": null,
"destination": {
"type": "bank",
"mobile": "0555555555",
"iban": "SA5330400108057386290014",
"name": "Faisal Alghurayri",
"country": "SA",
"city": "Riyadh"
},
"message": "Payment was received, please check back after 5 minutes",
"failure_reason": null,
"created_at": "2025-04-08T06:52:10.868Z",
"updated_at": "2025-04-08T06:52:10.895Z",
"metadata": null
}
```
---
## Sandbox Testing Payouts
Moyasar provides a sandbox environment that allows you to test how payouts work.
:::info
Make sure to use your test secret key in the request headers.
:::
## Test Scenarios
| Scenario | Purpose | Amount |
| ----------------------------------------------- | ------------------- | ------ |
| `failed` | `expenses_services` | Any |
| `queued` then `paid` | `credit_card_loan` | 1000 |
| `queued` then transient error then `failed` | `credit_card_loan` | 1001 |
| `queued` then `failed` due to exhausted retries | `credit_card_loan` | 1005 |
| `initiated` then `paid` | `government_dues` | Any |
| `initiated` then `failed` | `payroll_benefits` | Any |
| `initiated` then transient error then `paid` | `investment_house` | 1000 |
| `initiated` then transient error then `failed` | `investment_house` | 1001 |
:::info
Status change may take up to 5 minutes for internal and IPS channels and up to 10 minutes for SARIE channel.
:::
---
## 3DS Errors
3D Secure (3DS) is an authentication protocol that adds an extra layer of security to online card transactions by
requiring cardholders to verify their identity through OTP SMS received from their banks.
Below are the failure reasons and message when such flow fails.
| **failure_reason** | **message** |
| :------------------------------------------ | :------------------------------------------------------------------------------------------------------------ |
| **3ds_timeout** | "3DS": request timed out. |
| **3ds_open_timeout** | "3DS": connection timed out. |
| **3ds_dns_error** | "3DS": DNS error occurred. |
| **3ds_connection_error** | "3DS": Service connection failed. |
| **3ds_authentication_error** | "3DS": Authentication error occurred. |
| **3ds_ds_timeout** | "3DS-"DS": 3DS and Directory Server request timed out |
| **3ds_ds_connection_error** | "3DS-"DS": 3DS and Directory Server connection error |
| **3ds_ptsp_invalid_request** | "3DS": Invalid request to the payment processor. |
| **3ds_ptsp_authentication_failed** | "3DS": Authentication with the payment processor failed. |
| **3ds_ptsp_missing_required_field** | "3DS": Missing required field in the request. |
| **3ds_ptsp_invalid_data** | "3DS": Invalid data in the request. |
| **3ds_service_error** | "3DS": service error occurred. |
| **3ds_service_busy** | "3DS": service busy. |
| **3ds_acs_error** | "3DS": error occurred at the Access Control Server. |
| **3ds_ds_error** | "3DS": error occurred at the Directory Server. |
| **3ds_unsupported_device** | "3DS": The device is unsupported. |
| **3ds_declined_exceeds_frequency_limit** | "3DS": Exceeds authentication frequency limit. |
| **3ds_declined_expired_card** | "3DS": The card has expired. |
| **3ds_declined_invalid_card** | "3DS": Invalid card number. |
| **3ds_invalid_transaction** | "3DS": Invalid transaction. |
| **3ds_declined_card_unregistered** | "3DS": The card is not enrolled in 3DS service. |
| **3ds_blocked_security_failure** | "3DS": Security failure. |
| **3ds_blocked_stolen_card** | "3DS": The card has been reported as stolen. |
| **3ds_blocked_suspected_fraud** | "3DS": The transaction is suspected to be fraudulent. |
| **3ds_confidence_issue** | "3DS": There is a confidence issue with the authentication. |
| **3ds_declined_exceeds_acs_max_challenges** | "3DS": Exceeds the maximum number of challenges allowed by the ACS. |
| **3ds_unsupported_transaction** | "3DS": The transaction type is unsupported. |
| **3ds_decoupled_issue** | "3DS": There is an issue with decoupled authentication. |
| **3ds_declined_authentication_failed** | "3DS": Card authentication declined. |
| **3ds_declined_challenge_bypassed** | "3DS": The challenge was bypassed and the transaction was declined. |
| **3ds_rejected_transaction** | "3DS": The authentication attempt was rejected by the issuer bank. |
| **3ds_unavailable_transaction** | "3DS": The authentication is unavailable, please try again later or contact issuer bank if problem persisted. |
| **3ds_expiration_check** | "3DS": The authentication session has expired. |
| **3ds_unspecified** | "3DS": An unspecified error occurred. |
---
## Form Configuration
# Overview
Here is a list of acceptable configuration values/options for the form.
## Element (required)
The element must be a valid CSS selector for the target element to mount the form. Or it can be an instance of a DOM element . Here is an example:
```javascript
element: '.payment-form', // Using a class
element: '#payment-form', // Using an ID
element: document.querySelector('.payment-form'), // or just providing an Element instance
```
## Language (optional)
This option can be used to set the display language for the form. If left empty,
language will be inferred from `` element then fallback to `en` if it can't
be inferred. Here is an example:
```javascript
language: 'en', // Displaying the form in English
language: 'ar', // Displaying the form in Arabic
language: 'fr', // Displaying the form in French (You need to provide your own translations)
```
## Translations (optional)
This option is used to add more translations to the form. Here is an example:
```javascript
translations: {
fr: {
"validation.should_be_english_letters_only": "Le nom ne peut avoir que l'alphabet anglais et des espaces",
"validation.first_and_last_name_required": "Le prénom et le nom de famille sont obligatoires",
}
},
```
## Publishable API Key (required)
The [publishable API key](../../dashboard/get-your-api-keys.md) is required in order to communicate with Moyasar's API
and complete the payment request. Here is an example:
```javascript
// Live key is used in production environemnt and will require a valid SSL certificate
publishable_api_key: 'pk_live_AQpxBV31a29qhkhUYFYUFjhwllaDVrxSq5ydVNui',
// This will put the form in testing mode and allow you to test without an SSL certificate
publishable_api_key: 'pk_test_AQpxBV31a29qhkhUYFYUFjhwllaDVrxSq5ydVNui',
```
## Invoice ID (optional)
This field enables you to pay an [invoice](../../invoices/creating-invoices.md) that is already created but not paid.
The amount of the invoice should match the amount that the form is initialized with.
```javascript
invoice_id: '410d6b75-a210-41fb-b6cc-743bc90c7esd';
```
## Payment Methods (optional)
This is used to enable and disable payment methods on the form. Supported methods are:
- Credit Card (creditcard)
- Apple Pay (applepay)
- Samsung Pay (samsungpay)
- STC Pay (stcpay)
```javascript
// Enabling only Credit Card and Apple Pay
methods: ['creditcard', 'applepay'];
```
## Amount (required)
This sets the amount the user must pay. The amount must be in a minor unit of the selected currency, e.g. if we want to receive a payment of $10, we must represent the amount in cents 1000.
```javascript
amount: 1000;
```
## Currency (required)
This sets which currency is used for the amount to be paid.
```javascript
currency: 'USD', // Get payment in US Dollars
currency: 'SAR', // Get payment in Saudi Riyals
currency: 'JPY', // Get Payment in Japanese Yen
```
The currency must be in ISO 4217 3-letter currency code format.
## Description (required)
This option is used to set a description to be sent along with other payment information
to Moyasar's API.
```javascript
description: 'Payment for Order #34321';
```
The description can be any string you want.
## Callback URL (required)
This URL is used by Moyasar to redirect the user back after the payment is either
successful, or the user has completed the 3D Secure stage.
```javascript
callback_url: 'https://example.com/payment/return';
```
## Metadata (optional)
Adds searchable key/value pairs to the payments.
```javascript
metadata: {
'order_id': '10039'
}
```
## Supported Networks (optional)
This optional configuration option is used to set accepted card networks in the form.
The default value is all networks except `amex`.
Supported Networks:
- Mada (mada)
- Visa (visa)
- Mastercard (mastercard)
- American Express (amex)
- UnionPay (unionpay)
```javascript
supported_networks: ['mada', 'visa', 'mastercard', 'amex', 'unionpay'];
```
## Fixed Width (optional)
This option is used to limit the form width to only `360px` and it is enabled by default.
To disable this just set it to `false`.
```javascript
fixed_width: false;
```
## Apply Coupon (optional)
Controls coupon application; the coupon is applied by default if available, and this option is only needed when you want to disable it.
```javascript
apply_coupon: false;
```
## On Initiating (optional)
This callback is used to handle the event when a user starts a payment method
and before any information is sent to Moyasar's API. You can use this to perform
any last-second validations or to prepare something.
When you handle this event, you can return a `false` to stop the payment process,
or a dictionary that is either empty or contains a `description`, `callback_url`, `amount`, or `metadata`
values to update the form configurations if you need to.
If you need to do a long-running process, you can return a `Promise` that returns
either of the mentioned values before.
Here is an example to stop the form from submitting:
```javascript
on_initiating: async function() {
if (somethingIsWrong) {
return false;
}
}
```
Make the form proceed:
```javascript
on_initiating: async function() {
return true;
}
```
Make the form proceed with overriding any of these values:
```javascript
on_initiating: async function() {
return {
amount: 20000,
description: 'VIP customer',
callback_url: 'https://vip.bookstore.com/moyasar-callback'
metadata: {
customerType: 'VIP',
}
};
}
```
## On Completed (optional)
This event is fired when a payment is created by Moyasar's API. You can intercept the payment to save it or do any other processing.
```javascript
on_completed: async function(payment) {
// Do stuff with payment object
}
```
## On Failure (optional)
This event is used to handle payment failure, you will get a `string` if there is an error.
```javascript
on_failure: async function(error) {
// Handle error
}
```
## On Redirect (optional)
When the form finishes its work and is about to redirect the user, you can intercept this action and handle redirection manually. Here is an example:
```javascript
on_redirect: async function(url) {
// Handle redirection manually
}
```
## Tokenize (Save) Credit Card (optional)
This option allows you to tokenize credit card information after successfully completing the transaction.
```javascript
credit_card: {
save_card: true,
}
```
## Manual Payments (optional)
This option allows you to only authorize payments without capturing them. To capture the payment, you need to make an API call to the capture endpoint later on. Please review the API section for more details.
```javascript
credit_card: {
manual: true,
}
```
```javascript
apple_pay: {
manual: true,
}
```
```javascript
samsung_pay: {
manual: true,
}
```
```javascript
apple_pay: {
manual: true,
}
```
```javascript
samsung_pay: {
manual: true,
}
```
## Statement Descriptor
Allows the merchant to add a statement descriptor for the payment that will show in the card statement.
```javascript
{
statement_descriptor: 'Merchant Name';
}
```
## Apple Pay Configurations (Required)
:::tip
Only required if apple pay is enabled.
:::
This is an object that contains Apple Pay specific configurations. Here is an example:
```javascript
apple_pay: {
// Apple Pay Configurations
}
```
## Version (optional)
This is used to specify the Apple Pay JS version. The default is `6`. Here is an example:
```javascript
apple_pay: {
version: 7;
}
```
## Country (required)
Apple Pay merchant country.
```javascript
apple_pay: {
country: 'SA';
}
```
## Merchant Capabilities (optional)
Merchant capabilities to activate this Apple Pay session. Default is:
```javascript
apple_pay: {
merchant_capabilities: [
'supports3DS',
'supportsCredit',
'supportsDebit'
],
},
```
## Label (required)
Label to be displayed in the payment modal.
```javascript
apple_pay: {
label: 'Ali Hardware Store';
}
```
## Merchant Validation URL (required)
This URL is used to initiate the Apple Pay session. A `POST` request will be made
to the specified endpoint with a `JSON` object containing the URL.
Here is the `JSON`snippet:
```json
{
"validation_url": "https://apple-pay-gateway.apple.com/paymentservices/paymentSession"
}
```
The endpoint must return a response with the header `Content-Type: application/json` and the session object obtained from Apple.
Here is the configuration example:
```javascript
apple_pay: {
validate_merchant_url: 'https://mystore.test/applepay/validate-merchant';
}
```
In order to perform merchant validation, you need to register for an [apple developer account](https://developer.apple.com/apple-pay/) and sign up for the Apple Developer program.
Now you must use the provided URL to perform the [merchant validation.](https://developer.apple.com/documentation/apple_pay_on_the_web/apple_pay_js_api/requesting_an_apple_pay_payment_session)
## Supported Countries (Optional)
An array of countries that cards are allowed from.
Default: `['SA']`. Only Saudi Arabia is enabled by default to prevent fraudulent transactions, you may enable more countries at your own risk.
```javascript
apple_pay: {
supported_countries: ['SA', 'US'];
}
```
## Tokenize (Save) Apple Pay (optional)
This option allows you to tokenize credit card information after successfully completing the transaction.
```javascript
apple_pay: {
save_card: true,
}
```
## Samsung Pay Configurations (Required)
:::tip
Only required if Samsung Pay is enabled.
:::
This is an object that contains Samsung Pay specific configurations. Here is an example:
```javascript
samsung_pay: {
// Samsung Pay Configurations
}
```
## Service ID (required)
This is used to specify the Samsung Pay service ID. Here is an example:
```javascript
samsung_pay: {
service_id: 'your_service_id';
}
```
## Order Number (required)
This is used to specify the Samsung Pay order number. Here is an example:
```javascript
samsung_pay: {
order_number: 'unique_order_number';
}
```
## Label (required)
Label to be displayed in the Samsung Pay payment sheet.
```javascript
samsung_pay: {
label: 'Store Name';
}
```
## Country (required)
Samsung Pay merchant country.
```javascript
samsung_pay: {
country: 'SA';
}
```
## Environment (required)
This is used to specify the Samsung Pay environment. Options are `PRODUCTION` and `STAGE`.
:::tip
We recommend always setting this option to `PRODUCTION`.
If you are testing, you can use the Moyasar API key along with the Samsung Pay CSR from the testing environment.
`STAGE` should only be used when testing with a Samsung Pay staging wallet APK and Service ID.
:::
```javascript
samsung_pay: {
environment: 'PRODUCTION';
}
```
## Tokenize (Save) Samsung pay (optional)
This option allows you to tokenize credit card information after successfully completing the transaction.
```javascript
samsung_pay: {
save_card: true,
}
```
## Tokenize (Save) Samsung pay (optional)
This option allows you to tokenize credit card information after successfully completing the transaction.
```javascript
samsung_pay: {
save_card: true,
}
```
# Advanced Integration
If the form does not satisfy your needs, you can always build your own integration solution, and try the [custom UI approach.](../../card-payments/custom-ui.mdx)
---
## Translations
This page contains the reference translations for **Arabic** and **English** languages for the Moyasar payment form.
## Arabic
```json
{
"error.authentication_error": "خطأ في عملية المصادقة ، خدمة الدفع غير متوفرة حاليًا",
"error.authorization_error": "خطأ في عملية التحقق من الصلاحيات ، خدمة الدفع غير متوفرة حاليًا",
"error.network": "خطأ في محاولة الإتصال",
"error.unknown": "حصل خطأ غير معروف",
"error.invalid_mobile": "رقم الجوال غير صحيح",
"error.invalid_otp": "رمز التحقق غير صحيح",
"error.invalid_request_error": "طلب عملية الدفع غير صحيح",
"error.mobile_not_registered": "رقم الجوال غير مسجل",
"error.account_inactive_error": "حساب البائع غير فعال",
"error.invalid_name": "يجب إدخال الإسم الأول والأخير",
"error.unsupported_cc_type": "نوع البطاقة الإئتمانية غير مدعوم",
"error.invalid_cc_number": "رقم البطاقة الإئتمانية غير صحيح",
"error.invalid_date": "تاريخ الإنتهاء غير صحيح",
"error.invalid_month": "شهر الإنتهاء غير صحيح",
"error.invalid_year": "سنة الإنتهاء غير صحيحة",
"error.invalid_csc": "رمز الأمان للبطاقة غير صحيح",
"error.cant_start_payment": "حصل خطأ أثناء محاولة بدء عملية الدفع ، نرجوا المحاولة مره أخرى",
"error.otp_time_out": "الوقت المسموح لإستخدام رمز التحقق إنتهى ، نرجوا المحاولة مره أخرى",
"error.api_error": "حدث خطأ أثناء محاولة الإتصال ، يرجى تحديث الصفحة و المحاولة مره أخرى.",
"error.m070": "3Ds غير مسموح للبائع إستخدام ميزة التحقق الثلاثي",
"error.m071": "3Ds يجب على البائع إستخدام ميزة التحقق الثلاثي لإستقبال المدفوعات",
"error.m072": "لا يوجد للبائع حساب بنكي فعال",
"error.m074": "بطاقة الإئتمان تم إصدارها من أحد البلدان الغير مسموح لها بالدفع هنا",
"error.m075": "لا يمكن للبائع إستخدام خدمة الفوترة",
"error.m076": "لا يمكن للبائع إستخدام طريقة الدفع",
"error.m077": "لإستقبال المدفوعات STC Pay لا يمكن للبائع إستخدام خدمة",
"form.cc": "بطاقة الإئتمان",
"form.code": "رمز التحقق",
"form.mobile": "رقم الجوال",
"form.otp": "رمز التحقق",
"form.required": "مطلوب",
"form.name_on_card": "الإسم على البطاقة",
"form.last_name": "الإسم الأخير",
"form.card_info": "معلومات بطاقة الإئتمان",
"form.date": "تاريخ الإنتهاء",
"form.csc": "رمز الأمان CVC",
"form.or_pay_with_card": "أو إدفع بإستخدام بطاقتك الإئتمانية",
"form.powered_by": "خدمة الدفع مقدمة من قبل",
"form.save_card_notice": ".سيتم حفظ بيانات البطاقة عند إتمام العملية",
"button.pay": "إدفع",
"button.verify": "تحقق",
"button.proceed": "إتمام العملية",
"button.cancel": "إلغاء",
"validation.is_invalid": "قيمة :attr غير صحيحة",
"validation.can_t_be_blank": "قيمة :attr مطلوبة",
"validation.should_be_english_letters_only": "الإسم يجب أن يحتوي على حروف إنجليزية و مسافات فقط",
"validation.first_and_last_name_required": "الإسم الأول والأخير مطلوب",
"common.moyasar": "ميسر",
"common.test_mode_disclaimer": "!وضع المدفوعات التجريبي ، الرجاء عدم إستخدامه في البيئة التشغيلية",
"config.error.no_methods": "لا توجد أي وسيلة دفع متاحة",
"config.error.no_networks": "لم يتم إعداد شبكات الدفع بشكل صحيح"
}
```
## English
```json
{
"error.authentication_error": "Authentication error, service is unavailable now",
"error.authorization_error": "Authorization error, service is unavailable now",
"error.network": "Network Error",
"error.unknown": "Unexpected error occurred",
"error.invalid_mobile": "Invalid mobile number",
"error.invalid_otp": "Invalid verification code",
"error.invalid_request_error": "Invalid payment request",
"error.mobile_not_registered": "Mobile number is not registered",
"error.account_inactive_error": "Merchant account is not active",
"error.invalid_name": "First and last names are required",
"error.unsupported_cc_type": "Unsupported card type",
"error.invalid_cc_number": "Invalid credit card",
"error.invalid_date": "Invalid date",
"error.invalid_month": "Invalid month",
"error.invalid_year": "Invalid year",
"error.invalid_csc": "Invalid CVC number",
"error.cant_start_payment": "Error initiating payment, please try again later",
"error.otp_time_out": "OTP time has finished, please try again",
"error.api_error": "An error has occurred, please refresh the page and try again.",
"error.m070": "Merchant is not allowed to transact in 3Ds",
"error.m071": "Merchant is not allowed to transact directly without 3Ds",
"error.m072": "Merchant does not have bank MID specified",
"error.m074": "Credit card country is not allowed",
"error.m075": "Merchant account is not subscribed to Moyasar invoices",
"error.m076": "Merchant account is not allowed to use this payment method",
"error.m077": "Merchant account can't use STC Pay method",
"form.cc": "Credit Card",
"form.code": "Code",
"form.mobile": "Mobile number",
"form.otp": "Verification code",
"form.required": "Required",
"form.name_on_card": "Name on card",
"form.last_name": "Last name",
"form.card_info": "Card information",
"form.date": "Expiry date",
"form.csc": "CVC",
"form.or_pay_with_card": "Or pay with card",
"form.powered_by": "Powered by",
"form.save_card_notice": "You card data will be saved upon submit.",
"button.pay": "Pay",
"button.verify": "Verify",
"button.proceed": "Proceed",
"button.cancel": "Cancel",
"validation.is_invalid": "Invalid :attr",
"validation.can_t_be_blank": ":attr is required",
"validation.should_be_english_letters_only": "Name may only have English alphabet and spaces",
"validation.first_and_last_name_required": "Both first and last name are required",
"common.moyasar": "Moyasar",
"common.test_mode_disclaimer": "Test Mode Enabled: Please do not use in production!",
"config.error.no_methods": "No payment method available",
"config.error.no_networks": "No networks configured",
"config.error.no_amount": "Amount is not configured",
"config.error.no_currency": "Currency is not configured",
"config.error.no_country": "Country is not configured",
"config.error.no_description": "Payment description is not configured",
"config.error.no_api_key": "API key is not configured",
"config.error.no_callback_url": "Callback URL is not configured",
"config.error.no_applepay_label": "Apple Pay label is missing",
"config.error.no_validate_merchant_url": "Apple Pay validate merchant URL is missing"
}
```
---
## Response Codes
# Gateway Response Codes
Gateway response codes are values that are composed of two digits indicating the status or failure reason of a
given payment. Response code are only available when the payment has been sent through the acquirer gateway
and will be `null` otherwise.
These codes are applicate to **Card** and **Apple Pay** payments.
| **Code** | **Reason** | **Status** | **Explanation** |
| :------- | :------------------------------------------------ | :--------- | :---------------------------------------------------------------------------------------------------------------------------------------------------- |
| **00** | Transaction Approved | paid | The transaction was successful. |
| **01** | Refer to Issuer | failed | The card's bank found an issue. Contact the bank or try another card. |
| **02** | Refer to Issuer, special | failed | The card's bank found an issue. Contact the bank or try another card. |
| **03** | No Merchant | failed | The merchant ID is invalid. Contact your bank with the correct merchant account number. |
| **04** | Pick Up Card | failed | The bank declined the transaction and wants the card to be kept due to it being reported lost or stolen. Use another card. |
| **05** | Do Not Honour | failed | The bank declined the transaction due to a security issue or lack of funds. Use another card. |
| **06** | Error | failed | The card's bank declined the transaction due to a card number error. Contact the bank or try another card. |
| **07** | Pick Up Card, Special | failed | The bank declined the transaction and wants the card to be kept due to it being reported lost or stolen. Use another card. |
| **08** | Honor With Identification | paid | The transaction was successful. This code is sometimes used instead of '00'. |
| **09** | Request In Progress | failed | The card's bank found an issue. Contact the bank or try another card. |
| **10** | Approved For Partial Amount | paid | The transaction was successful. |
| **11** | Approved, VIP | paid | The transaction was successful. (Not used in Australia.) |
| **12** | Invalid Transaction | failed | The bank declined the transaction due to incorrect information. Check and retry. |
| **13** | Invalid Amount | failed | There's an error with the amount entry. Check your website’s code. |
| **14** | Invalid Card Number | failed | The bank declined the transaction because the card number does not exist. Check the details and retry. |
| **15** | No Issuer | failed | The card's bank does not exist. Check the details and retry. |
| **16** | Approved, Update Track 3 | paid | The transaction was successful. |
| **19** | Re-enter Last Transaction | failed | The transaction was not processed. Try processing again. |
| **21** | No Action Taken | failed | The card's bank found an issue. Contact the bank or try another card. |
| **22** | Suspected Malfunction | failed | The bank could not be contacted during the transaction. Check the details and retry. |
| **23** | Unacceptable Transaction Fee | failed | An unspecified error occurred. |
| **25** | Unable to Locate Record On File | failed | The bank does not recognize the card details. Check the details and retry. |
| **30** | Format Error | failed | The bank does not recognize the transaction details. Check and retry, noting the TID might be incorrect. |
| **31** | Bank Not Supported By Switch | failed | The bank declined the transaction for mail/telephone, fax, email, or internet orders, particularly with a Discover Card. Use another card. |
| **33** | Expired Card, Capture | failed | The bank declined the transaction because the card has expired. Check the expiry date and retry. |
| **34** | Suspected Fraud, Retain Card | failed | The bank suspects fraud on this card. |
| **35** | Card Acceptor, Contact Acquirer, Retain Card | failed | The bank declined the transaction and wants the card to be kept due to it being reported lost or stolen. Use another card. |
| **36** | Restricted Card, Retain Card | failed | The bank declined the transaction and wants the card to be kept due to it being reported lost or stolen. Use another card. |
| **37** | Contact Acquirer Security Department, Retain Card | failed | The bank declined the transaction and wants the card to be kept due to it being reported lost or stolen. Use another card. |
| **38** | PIN Tries Exceeded, Capture | failed | The bank declined the transaction due to wrong PIN entered three times. It also requested retaining the card. Use another card and contact your bank. |
| **39** | No Credit Account | failed | The bank declined the transaction as the card is not linked to a credit account. Use another card. |
| **40** | Function Not Supported | failed | The bank declined the transaction as it doesn't allow this type of transaction. Use another card. |
| **41** | Lost Card | failed | The bank declined the transaction because the card was reported lost. Use another card. |
| **42** | No Universal Account | failed | The bank declined the transaction as the account type selected is not valid for this card. Use another card. |
| **43** | Stolen Card | failed | The bank declined the transaction because the card was reported stolen. Use another card. |
| **44** | No Investment Account | failed | The bank declined the transaction as the account type selected is not valid for this card. Use another card. |
| **51** | Insufficient Funds | failed | The bank declined the transaction due to insufficient funds. Use another card. |
| **52** | No Cheque Account | failed | The bank declined the transaction as the linked cheque account does not exist. Use another card. |
| **53** | No Savings Account | failed | The bank declined the transaction as the linked savings account does not exist. Use another card. |
| **54** | Expired Card | failed | The bank declined the transaction because the card has expired. Check the expiry date and retry, or use another card. |
| **55** | Incorrect PIN | failed | The bank declined the transaction due to an incorrect PIN. Re-enter PIN or use another card. |
| **56** | No Card Record | failed | The bank declined the transaction because the card number does not exist. Use another card. |
| **57** | Function Not Permitted to Cardholder | failed | The bank declined the transaction because this card can't be used for this transaction. Use another card. |
| **59** | Suspected Fraud | failed | The bank declined this transaction due to suspected fraud. |
| **60** | Acceptor Contact Acquirer | failed | The bank declined the transaction. Contact your bank and try again. |
| **61** | Exceeds Withdrawal Limit | failed | The bank declined the transaction as it exceeds the card's limit. Use another card. |
| **62** | Restricted Card | failed | The bank declined the transaction due to restrictions on the card. Use another card. |
| **63** | Security Violation | failed | The bank declined the transaction. Use another card. |
| **64** | Original Amount Incorrect | failed | The bank declined the transaction due to a wrong amount being processed. Check the amount and retry. |
| **65** | Exceeds withdrawal | failed | The bank declined the transaction as the withdrawal limit was exceeded. Use another card. |
| **66** | Acceptor Contact Acquirer, Security | failed | The bank declined the transaction and asks the merchant to contact the bank. Use another card. |
| **67** | Capture Card | failed | The bank declined the transaction as the card is suspected counterfeit and should be kept. Use another card. |
| **75** | PIN Tries Exceeded | failed | The bank declined the transaction because the wrong PIN was entered too many times. Use another card. |
| **79** | Life cycle (Mastercard use only) | failed | The transaction is refused due to invalid card data. |
| **82** | CVV Validation Error | failed | The bank declined the transaction because of an incorrect CVV. Check the CVV details and retry. If unsuccessful, use another card. |
| **90** | Cutoff In Progress | failed | The bank is temporarily unable to process the card. Try the transaction again later. |
| **91** | Card Issuer Unavailable | failed | The bank could not be contacted to authorise the transaction. Try again later. |
| **92** | Unable To Route Transaction | failed | The bank could not be found for routing, often with a test card number. Try the transaction again. |
| **93** | Cannot Complete, Violation Of The Law | failed | The bank declined the transaction and requests the customer to contact their bank. Use another card. |
| **94** | Duplicate Transaction | failed | The bank declined the transaction as it seems to be a duplicate. No further action required. |
| **96** | System Error | failed | The bank could not process the transaction. Try again later. |
---
## Payment Errors
The following lists each payment error message and provides a description of the error.
The API may also return an error in case the request failed that uses the HTTP status code. Those error descriptions are available in the [API errors.](../../api/errors.md)
| Error Message | Description (English) | Description (Arabic) |
| -------------------------------------------------------------------------------------------------------------- | ------------------------------------------------------------------------------------------------------------------------------------------------------------------------------------------------------------------------- | ----------------------------------------------------------------------------------------------------------------------------------------------------------------------------------------------------------------- |
| **1. INSUFFICIENT FUNDS** | The card doesn't have sufficient funds to complete the transaction | لايوجد رصيد كافي في البطاقة |
| **2. DECLINED** | Transaction declined by the customer’s bank. The customer should use an alternate credit card | عملية مرفوضة من بنك العميل، يجب استخدام بطاقة أخرى بديلة |
| **3. BLOCKED** | The acquiring bank blocked the transaction without specifying the reason "could be suspected of fraud" | البنك المحصل للأموال قام بحجب العملية دون تحديد سبب لذلك ، قد يكون إشتباه لعملية إحتيال |
| **4. Allowed time frame for transaction has been expired** | The payment process took too long (more than 15 minutes) and then failed. Either because the bank message containing the PIN was delayed to the customer’s mobile phone or because the customer was late in completing it | استغرقت عملية الدفع وقت أطول (أكثر من المسموح **15 دقيقة**) ثم فشلت ، إما بسبب تأخر رسالة البنك التي تحتوي على رمز التحقق إلى الهاتف المحمول الخاص بالعميل أو بسبب تأخر العميل في إكمالها |
| **5. UNSPECIFIED FAILURE** | The customer’s bank has declined the transaction for an undefined cause in their system. The customer should use an alternate credit card | رفض بنك العميل العملية لسبب غير محدد في نظامهم ، يجب على العميل استخدام بطاقة أخرى بديلة |
| **6. EXPIRED CARD** | The transaction failed as the card appears to have expired | فشلت العملية بسبب انتهاء البطاقة |
| **7. TIMED OUT** | The customer’s bank was unable to be connected. The customer should attempt to process this transaction again | فشل الإتصال مع بنك العميل، يجب على العميل محاولة معالجة العملية مره أخرى |
| **8. Value 'xxxx' is invalid. value: xxxx - reason: Invalid secure code length** | The security number (CVC/CVV) was entered incorrectly by the cardholder | تم إدخال رمز الأمان (CVC/CVV) بشكل خاطئ من قِبل حامل البطاقة |
| **9. REFERRED** | The customer’s bank has indicated there is a problem with the credit card number | أشار بنك العميل إلى وجود مشكلة في رقم بطاقة الإئتمان |
| **10. `3-D Secure` transaction attempt failed (AUTHENTICATION_FAILED)** | Authentication is unsuccessful or not attempted by the cardholder | المصادقة غير ناجحة أو قد تم إلغاؤها من قِبل حامل البطاقة |
| **11. `3-D Secure` transaction attempt failed (AUTHENTICATION_ATTEMPTED)** | Either the cardholder or card issuing bank is not `3D-Secure` enrolled. `3D-Secure` card authentication is unsuccessful | إما أن يكون حامل البطاقة أو البنك المصدّر للبطاقة غير مسجل في خدمة التحقق الأمني (`3D-Secure`) مصادقة البطاقة (`3D-Secure`) غير ناجحة |
| **12. `3-D Secure` transaction attempt failed (AUTHENTICATION_NOT_AVAILABLE)** | Either the cardholder or card issuing bank is not `3D-Secure` enrolled. `3D-Secure` card authentication is unsuccessful | إما أن يكون حامل البطاقة أو البنك المصدّر للبطاقة غير مسجل في خدمة التحقق الأمني (`3D-Secure`) مصادقة البطاقة (`3D-Secure`) غير ناجحة |
| **13. `3-D Secure` transaction attempt failed (Missing parameter)** | There was an authentication error | حدث خطأ في المصادقة |
| **14. `3-D Secure` transaction attempt failed (Relationship not found for merchantID XXX, card type VC)** | The merchant account is not configured to receive `Visa` transactions | لم يتاح لحساب التاجر من قِبل البنك بإستقبال عمليات فيزا |
| **15. `3-D Secure` transaction attempt failed (Relationship not found for merchantID XXX, card type MC)** | The merchant account is not configured to receive `MasterCard` transactions | لم يتاح لحساب التاجر من قِبل البنك بإستقبال عمليات ماستركارد |
| **16. `3-D Secure` transaction attempt failed (CARD_NOT_ENROLLED)** | The card was not listed `3D-Secure` with the issuing bank. The cardholder needs to communicate with his bank to activate the card for online payment. Or the card number was entered incorrectly by the cardholder | البطاقة غير مدرجة في خدمة التحقق الأمني (`3D-Secure`)، يجب على حامل البطاقة التواصل مع البنك الذي يتعامل معه لتمكين البطاقة من الدفع عبر الإنترنت . أو قد تم إدخال رقم البطاقة بشكل غير صحيح من قِبل حامل البطاقة |
| **17. `3-D Secure` transaction attempt failed (Value 'xxx' is invalid. Cannot determine card brand.)** | The card number was entered incorrectly by the cardholder | تم إدخال رقم البطاقة بشكل غير صحيح من قِبل حامل البطاقة |
| **18. `3-D Secure` transaction attempt failed (Value 'xxx' is invalid. Unable to determine card payment.)** | The card number was entered incorrectly by the cardholder | تم إدخال رقم البطاقة بشكل غير صحيح من قِبل حامل البطاقة |
| **19. `3-D Secure` transaction attempt failed (Value 'xxx' is invalid. Amount exceeds maximum allowed limit)** | The amount exceeded the limit per transaction | المبلغ تجاوز الحد الأقصى و المسموح لكل عملية |
---
## Tokenization
# Tokenization
This page covers saving a card via the Moyasar payment form. For the full tokenization guide — including all approaches, token statuses, and how to charge with a saved token — see the [Tokenization guides](../tokenization/overview).
---
## Step 1: Include Moyasar Form
Add the following tags inside the `` of your page:
## Step 2: Instantiate the payment form
Add an empty `` and call `Moyasar.init`:
```html title="HTML"
```
## Step 3: Enable tokenization
Add `credit_card.save_card: true` to your config:
```html title="HTML"
```
## Payment Form
## Step 4: Save the token
Use `on_completed` to capture the token before the 3DS redirect:
```js title="JS"
Moyasar.init({
element: '.mysr-form',
amount: 10000,
currency: 'SAR',
description: 'Order #123',
publishable_api_key: 'pk_test_YOUR_PUBLISHABLE_KEY',
callback_url: 'https://merchant.example/return',
supported_networks: ['visa', 'mastercard', 'mada', 'unionpay'],
methods: ['creditcard'],
credit_card: {
save_card: true,
},
on_completed: async function (payment) {
await saveTokenOnBackend(payment.source.token);
},
});
```
The token ID is in `payment.source.token`. It appears in the `initiated` response — save it before the 3DS redirect. The token becomes `active` after the cardholder completes 3DS.
## Next steps
- [Charge with a Token](../tokenization/tokenized-cards) — use an active token for recurring payments
- [Token Status Reference](../../api/other/tokens/token-status-reference.md)
---
## Basic Integration(Samsung-pay)
# Samsung Pay Basic Integration
This page will guide you to integrate Samsung Pay payments within your website using our
Payment Form Javascript library.
## Before Starting
Before you start accepting Samsung Pay, make sure you complete these steps first:
1. Sign up for a Moyasar account on our [dashboard.](https://dashboard.moyasar.com/register/new)
2. [Get your publishable API key ](../dashboard/get-your-api-keys.md)to authenticate your form payment requests.
3. Create a Samsung Developer Account and Apply for Samsung Pay Service.
4. Create Service ID and register your application.
5. Review the Moyasar form configuration [here](../references/form-configuration/index.md).
## Supported Hardware
Samsung Pay is only supported on Samsung devices. If you are using cards issued in Saudi Arabia, the device must be
purchased in Saudi Arabia.
## Including Moyasar Form
Moyasar Form is a lightweight Javascript library that will take care of creating the payment components within your
website using a modern and responsive design.
You can start the integration by including the following tags within the `` tag of your page:
## Initiating the Payment Form
Once you decide on a good place for the form, add an empty `` tag and then invoke the `init` method on
the global `Moyasar` class.
```html title="HTML"
```
## Configuration Keys
Learn more about available configuration keys here [form configuration.](../references/form-configuration/index.md)
## Payment Form
## Save Payment ID
This step is optional but **highly recommended** to save the payment ID which grants you the ability to verify payment details in case your user's connection drops.
To save the payment ID you can provide the **on_completed** configuration option with an async function.
```jsx title="JS"
Moyasar.init({
element: '.mysr-form',
amount: 1000,
currency: 'SAR',
description: 'Coffee Order #1',
publishable_api_key: 'pk_test_AQpxBV31a29qhkhUYFYUFjhwllaDVrxSq5ydVNui',
callback_url: 'https://moyasar.com/thanks',
supported_networks: ['visa', 'mastercard', 'mada'],
methods: ['samsungpay'],
samsung_pay: {
service_id: 'your_service_id',
order_number: 'unique_order_number',
country: 'SA',
label: 'Store Name',
environment: 'PRODUCTION',
},
on_completed: async function (payment) {
await savePaymentOnBackend(payment);
},
});
```
The method `savePaymentOnBackend` is a placeholder, and you must provide your own custom logic.
## Step 4: Verify Payment
Once the user has completed the payment and got redirected to your website or app using the `callback_url`
you provided earlier, the following HTTP query parameters will be appended:
- `id`
- `status`
- `message`
Here is an example:
```http request title="Callback URL"
https://www.my-store.com/payments_redirect?id=79cced57-9deb-4c4b-8f48-59c124f79688&status=paid&message=Succeeded
```
Now fetch the payment using its **id** through our [fetch API](../../api/payments/02-fetch-payment.api.mdx), and verify
its `status`, `amount`, and `currency` before accepting your user's order or completing any business action.
Next, just show success or failure according to the previous validation.
---
## Samsung Developer Account
Before starting with Samsung Pay, a developer account is required for access to the service. This account must also
have access to Samsung Pay.
## Create a Samsung Developer Account
If you haven't already, please create a Samsung Developer account by following this URL:
- https://developer.samsung.com/
Once you have created an account, please register a business profile by visiting:
- https://developer.samsung.com/enroll/business
## Apply for Samsung Pay Service
Before using the Samsung Pay service, you need to apply to become a partner. This can be done using this URL:
- https://developer.samsung.com/SamsungPay/business-partner/NTM0NTI4#goto-service
Samsung Wallet team in your respective country will review the application and you should recieve a notification
once it has been approved.
## Download the CSR (Certificate Signing Request)
Samsung Pay requires you to provide an RSA public key in order for transaction details to be encrypted on the device
the decrypted by the payment gateway for processing. Moyasar takes care of this task for you by allowing you to generate
the required public key in CSR form.
To generate the required CSR, please login to your account on [Moyasar Dashboard](https://dashboard.moyasar.com)
then navigate to **Settings** -> **Samsung Certificate** and then click on **Request CSR**.
Once you have requested the CSR, you will be presented by the following screen. Click on **Download CSR**
and proceed for the next step.
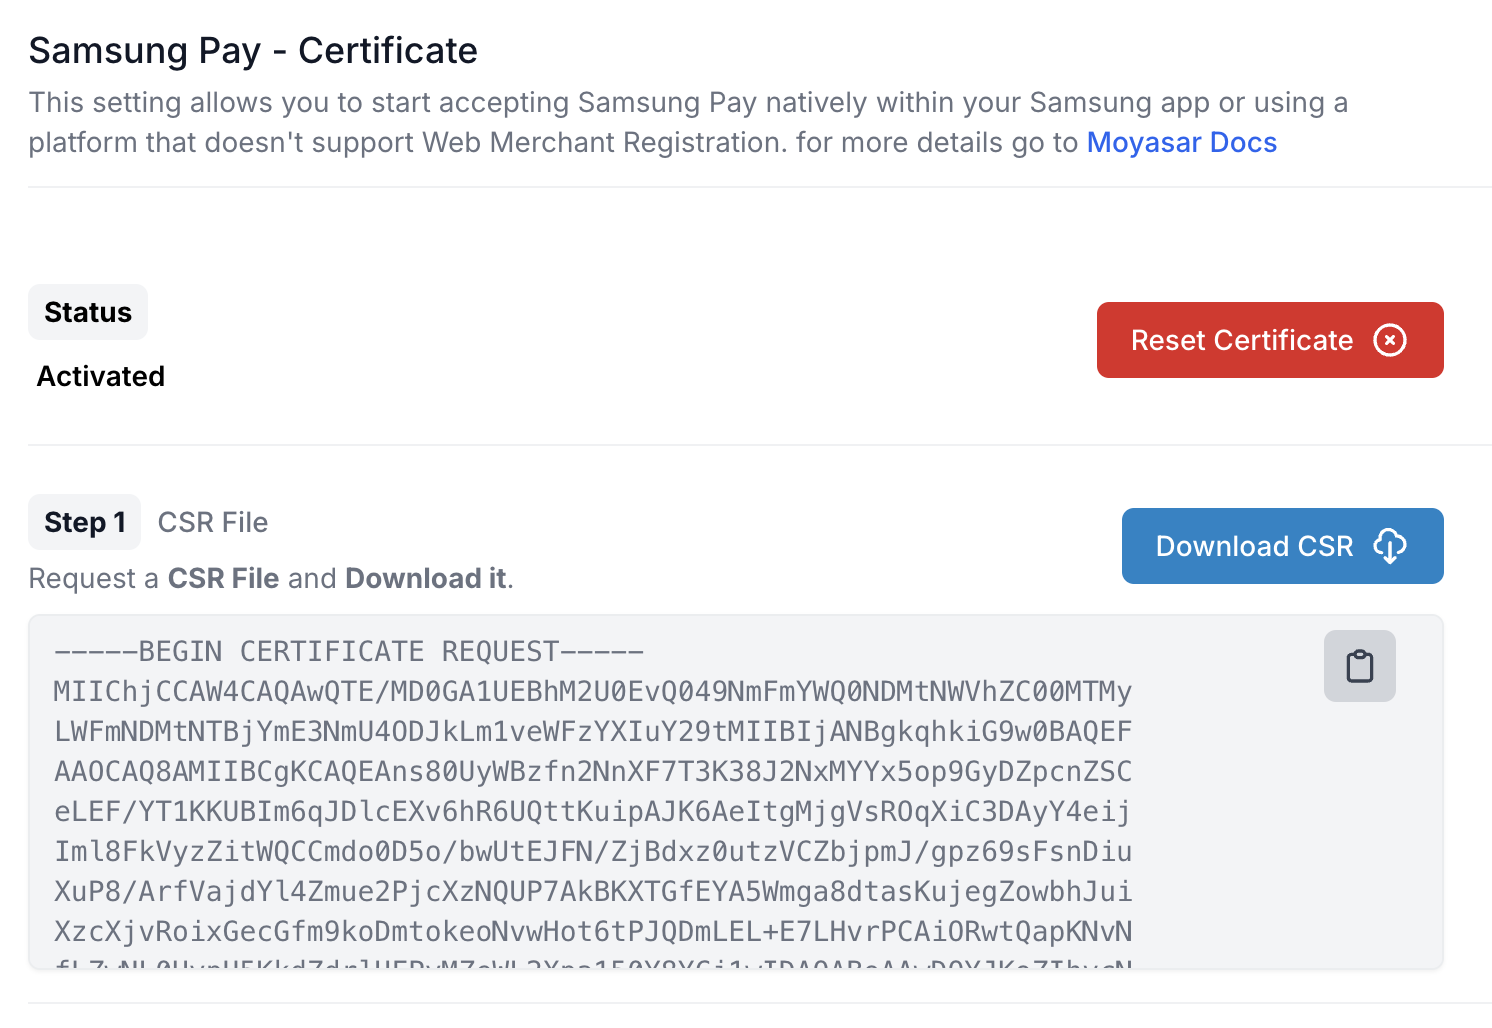
## Create a Sevice ID for Web
If you are planning to support Samsung Pay on your website, you need to create a **Service** which represent a single
application that will provide Samsung Pay as a payment option.
:::tip
Ensure that you have applied for the Samsung Pay service and obtained your `CSR` before proceeding with this step.
:::
Visit the [Service Management](https://pay.samsung.com/developer/projects/prdnsvc) page on your Samsung account
then proceed by clicking the **Create New Service** button as shown in the next screen.
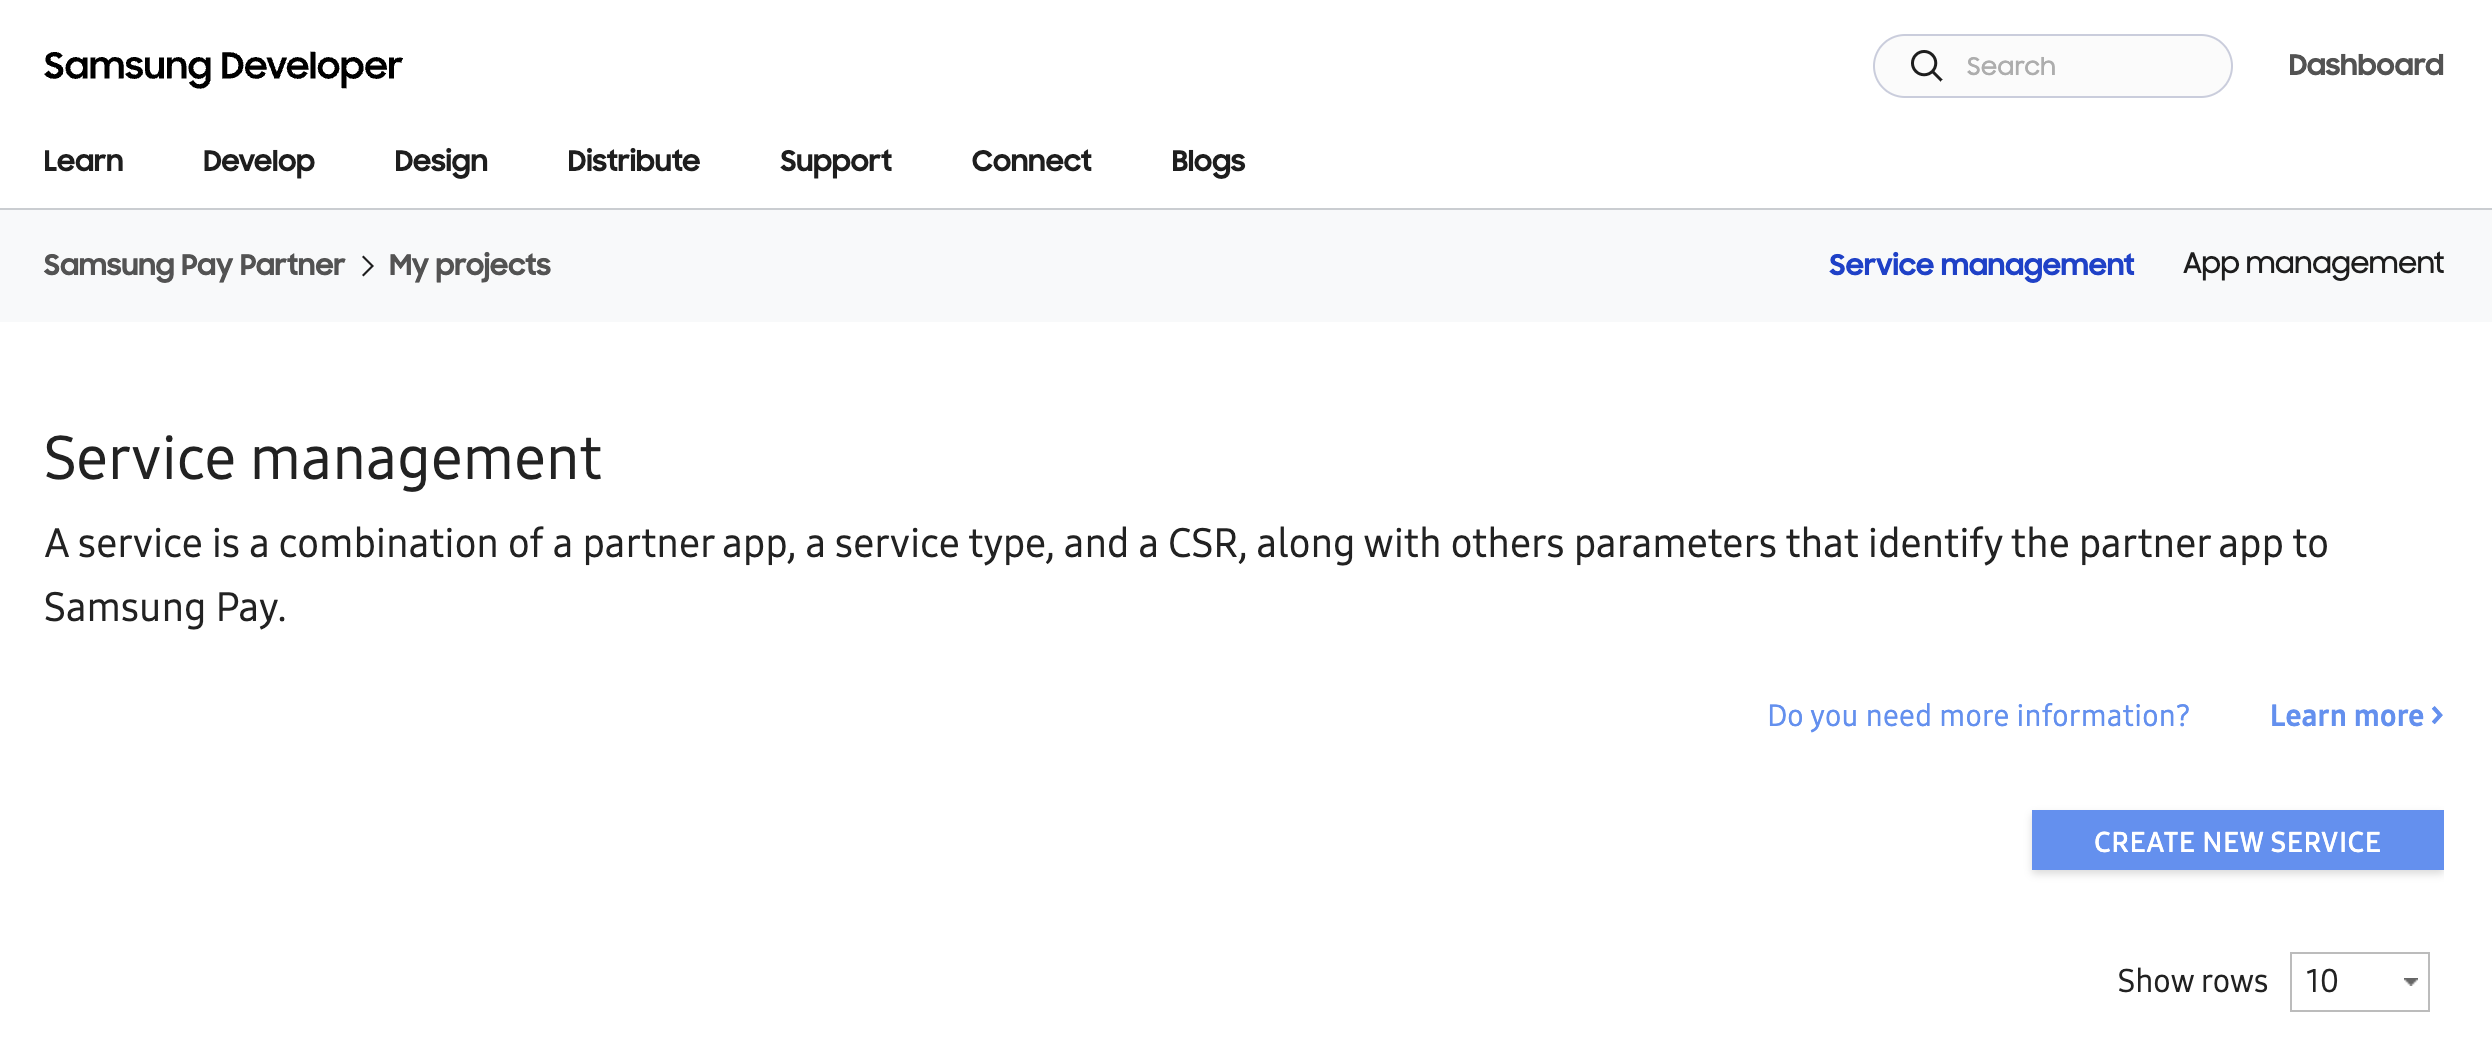
In the new service page, fill the data as follows and upload the **CSR** you have acquired earlier from Moyasar Dashboard.
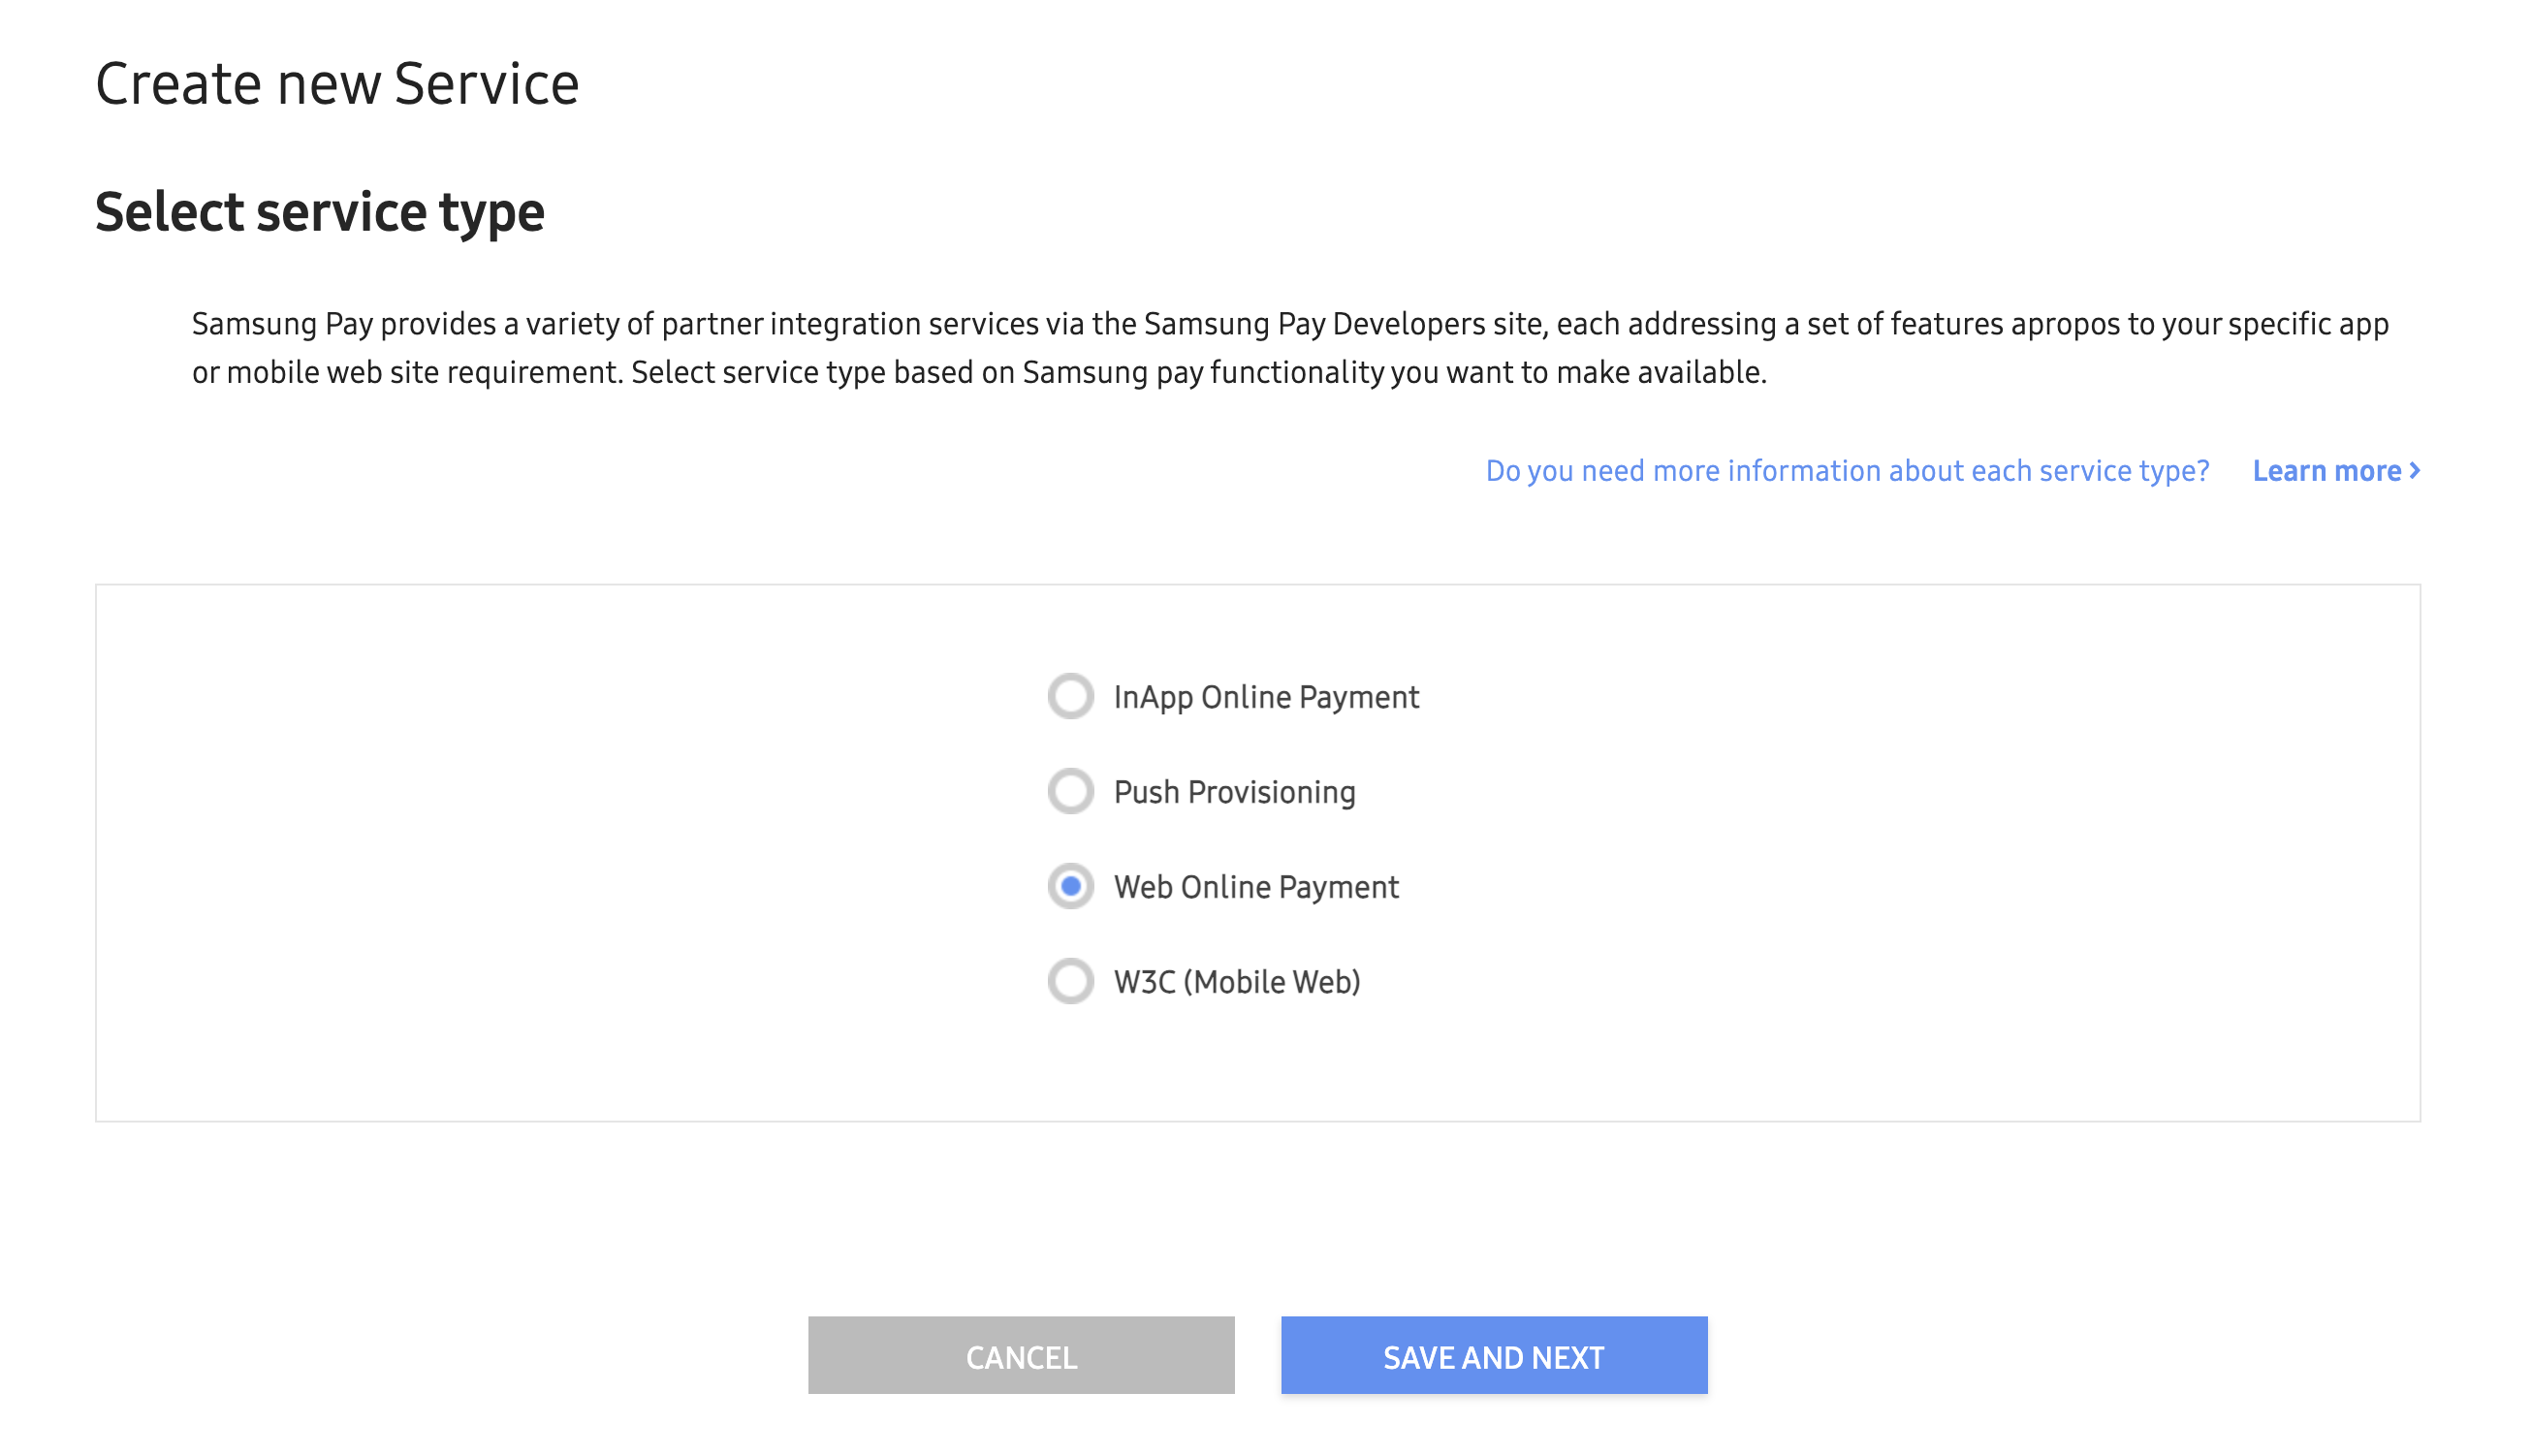
:::tip
Ensure that you have registered the exact hostname where your checkout page will be served from in the **Service Domain**
section. Example: registering only `example.com` will not allow for sub domains like `checkout.example.com` to function.
:::
Once you proceed to the next page, you will be asked to provide the email address for testing. Please provide the email
address of an active Samsung Account on the device you are testing/developing from.
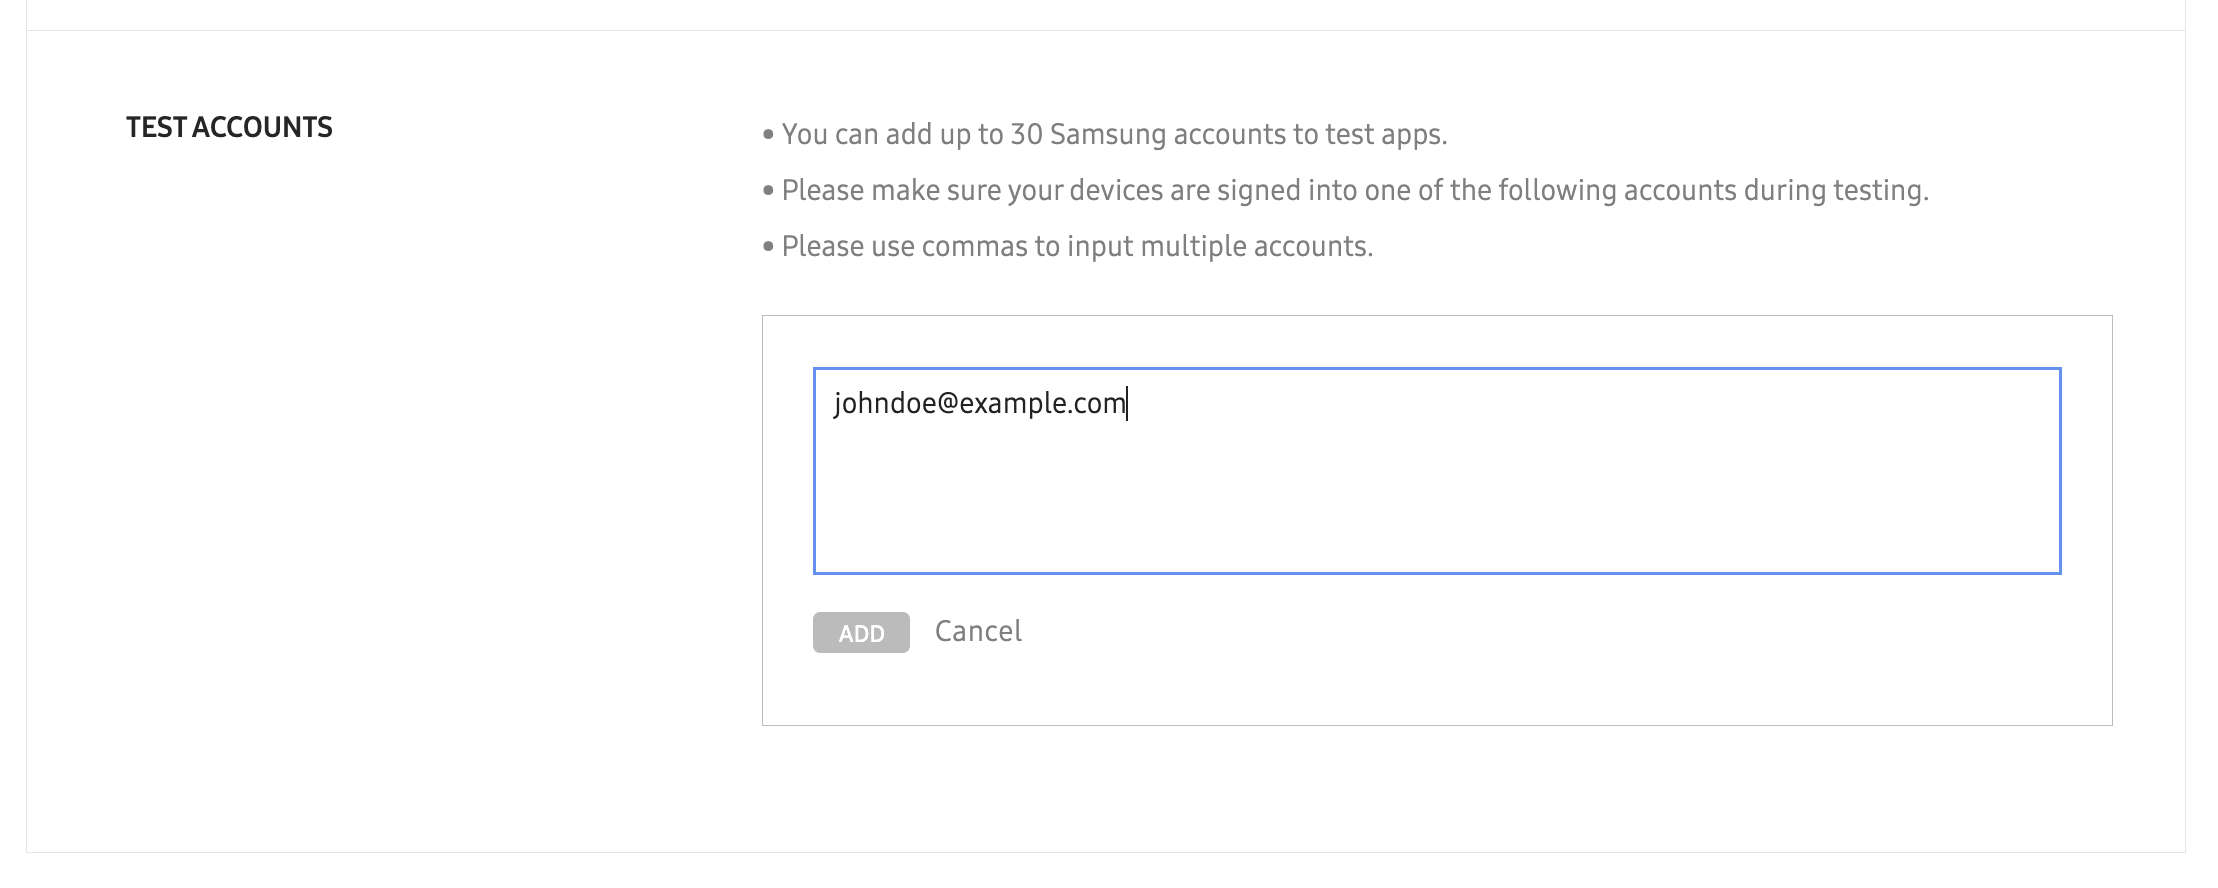
:::tip
Take a note of your Service ID which should look something like this: `22324f33498f450bbd1dbf`
:::
## Create a Service ID for Android Apps
For supporting native Samsung Pay implementation, you will need to create a service of type `InApp Online Payment`.
Visit the [Service Management](https://pay.samsung.com/developer/projects/prdnsvc) page then click on
**Create New Service**.
Choose **InApp Online Payment** as the service type.
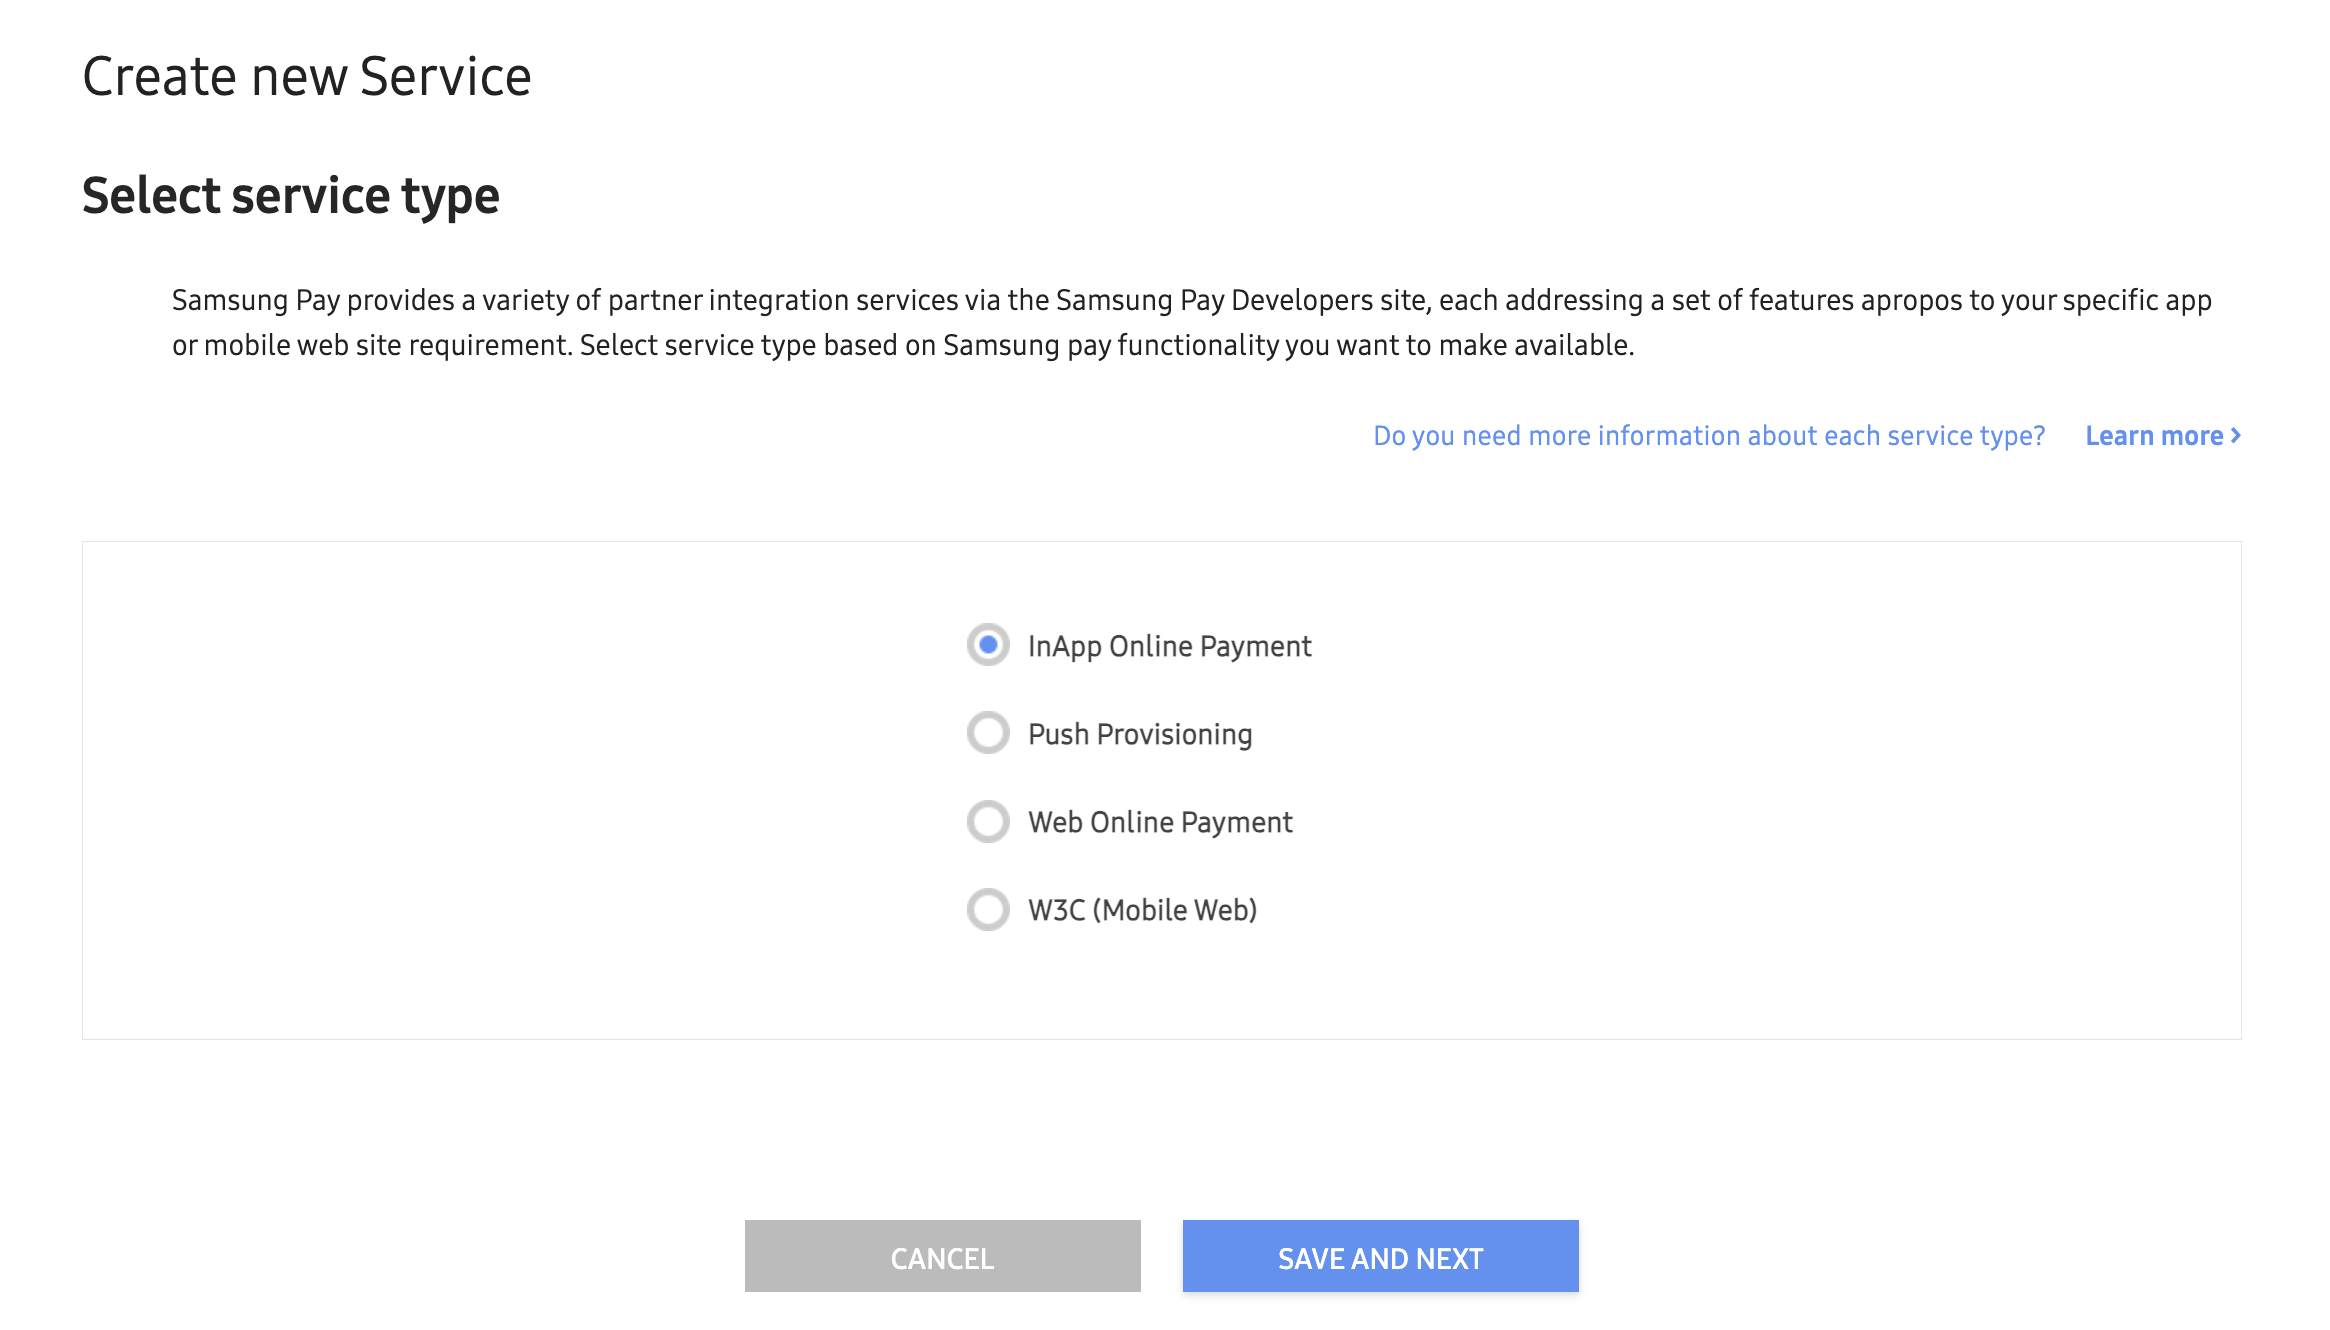
Complete service information and upload your CSR.
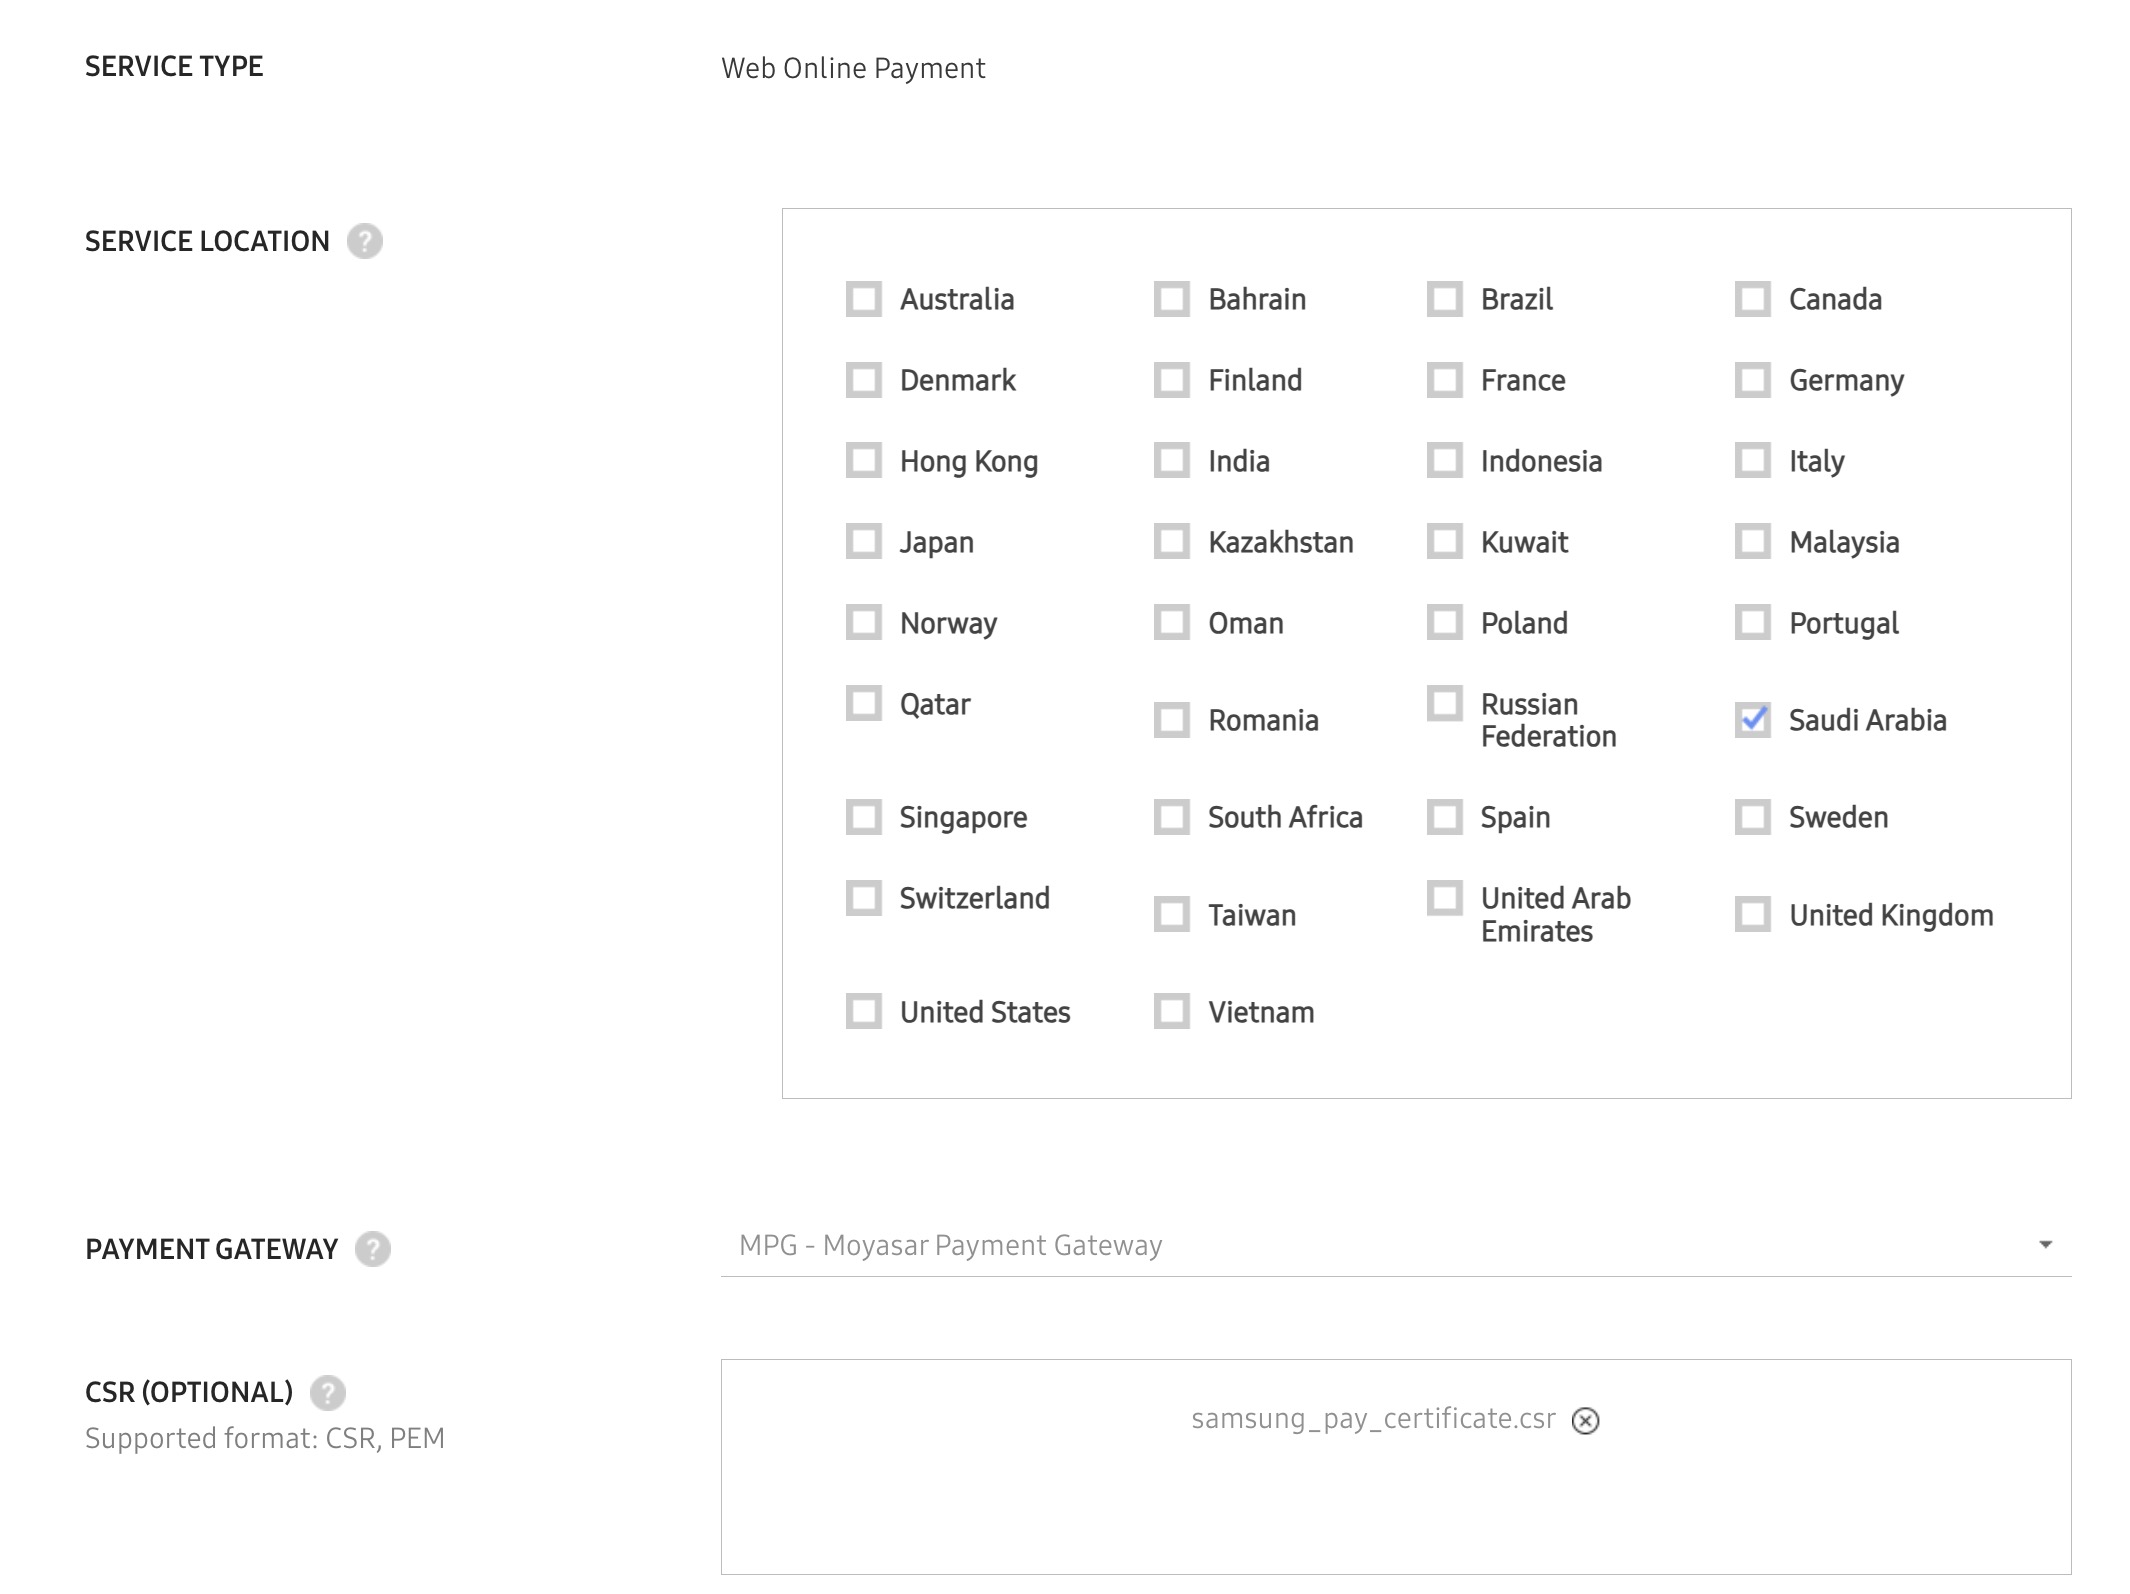
Register your Android application information and provide the exact package name that you are going to publish your
application under.
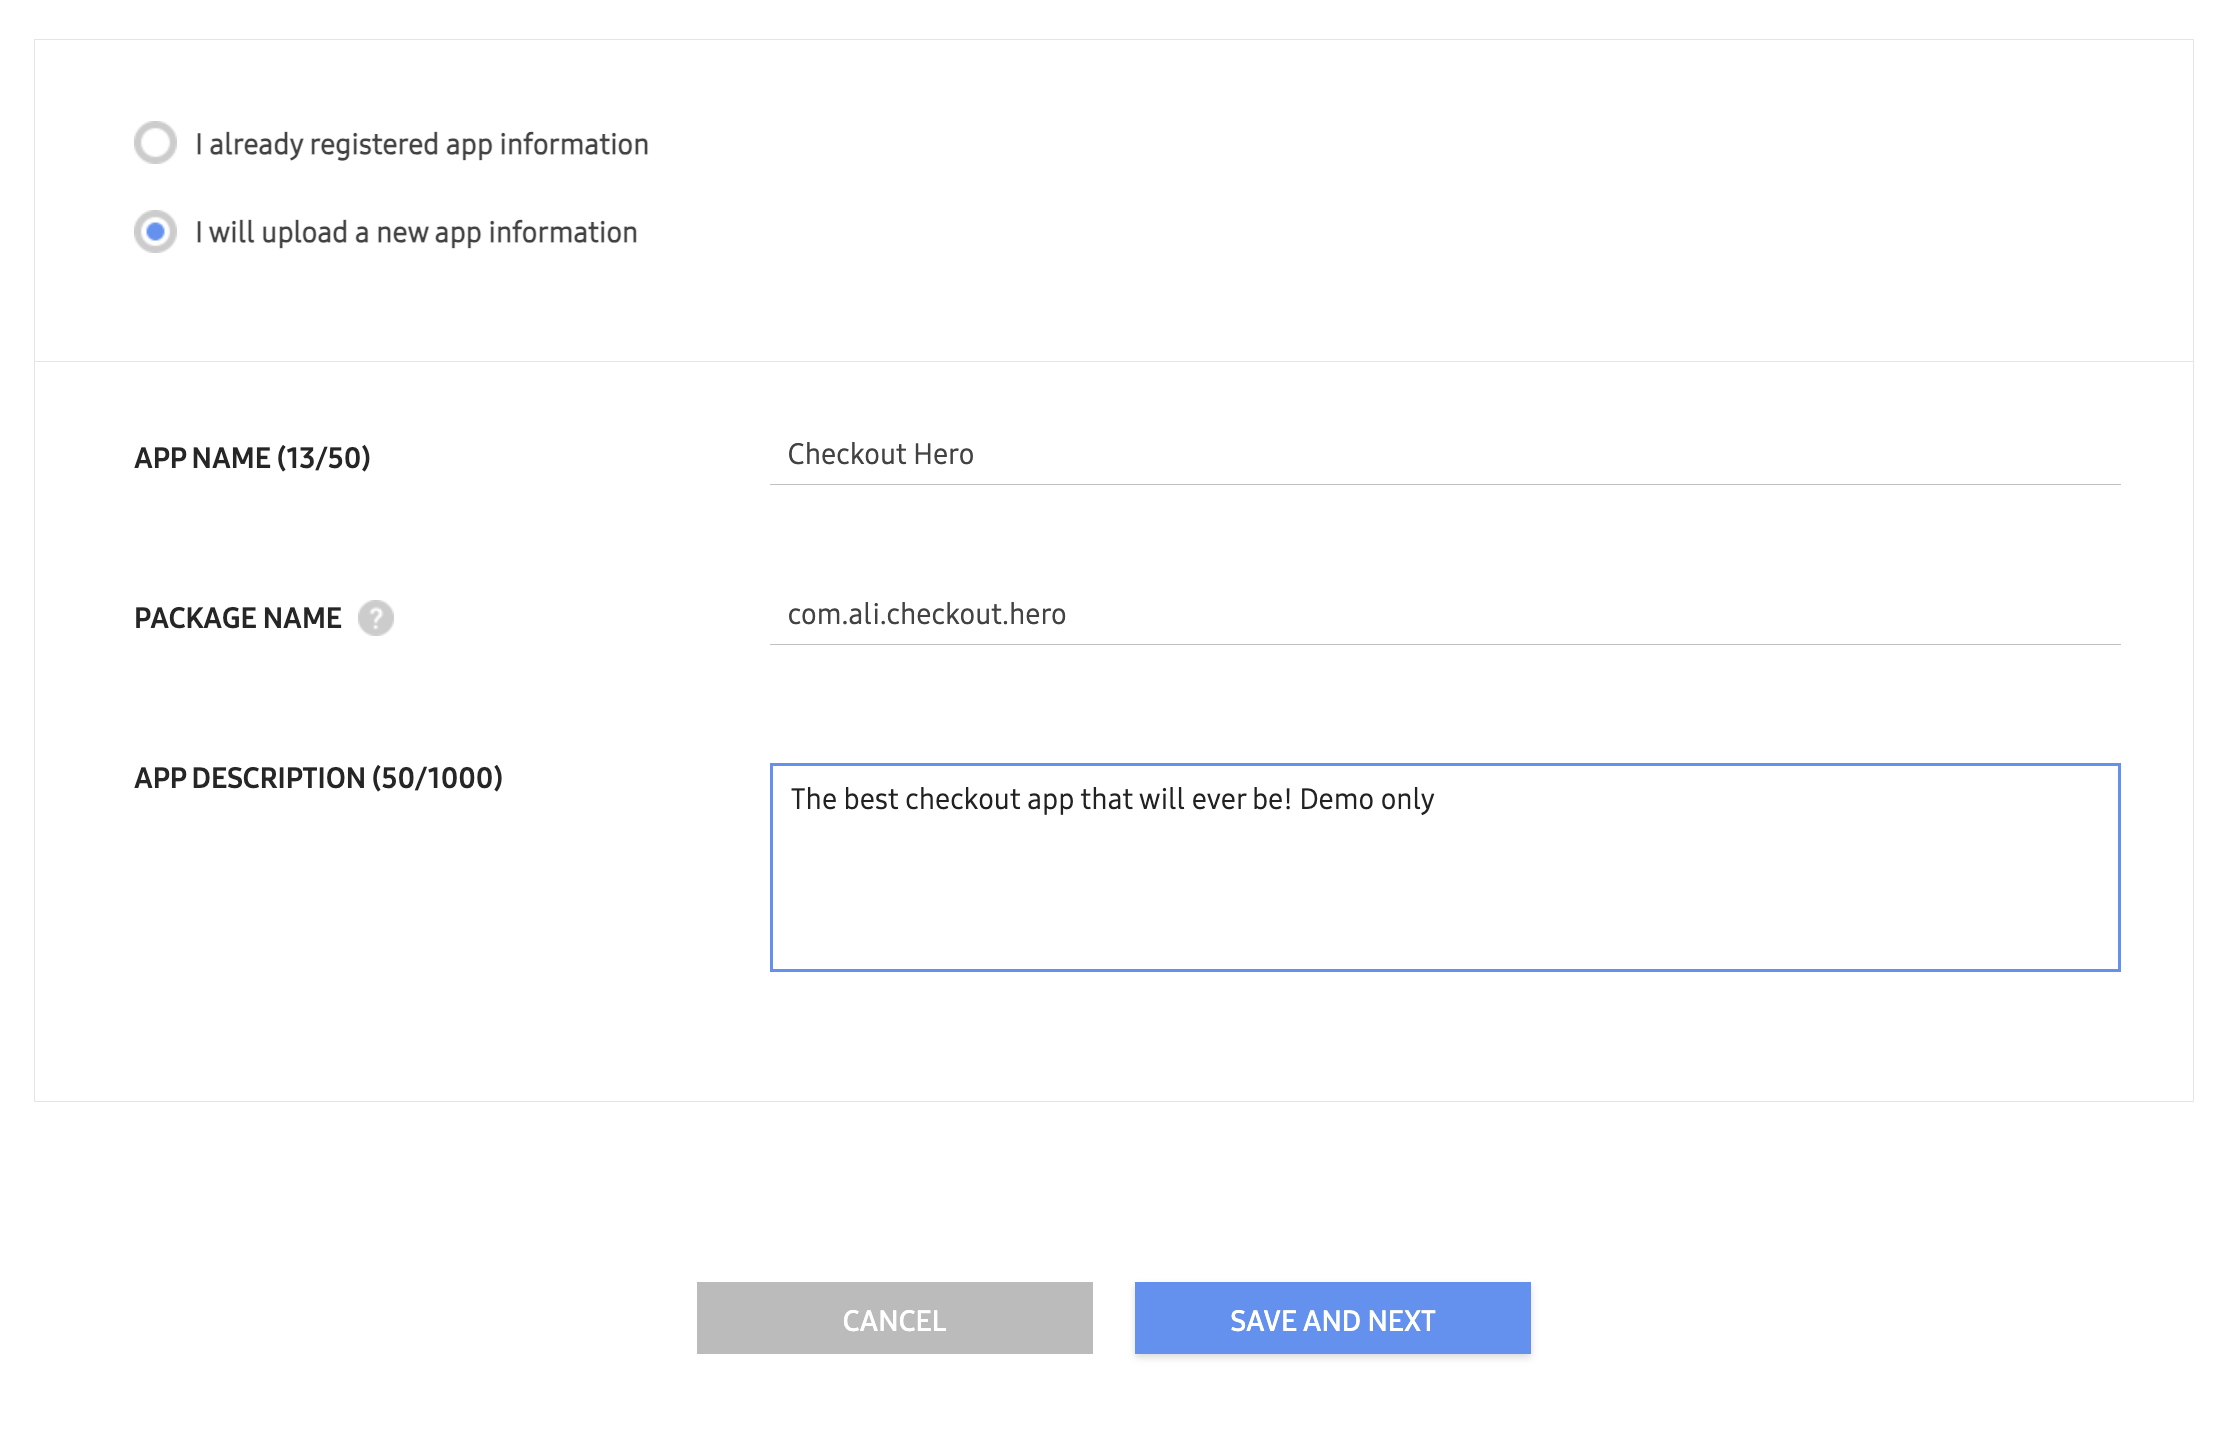
Add test emails.
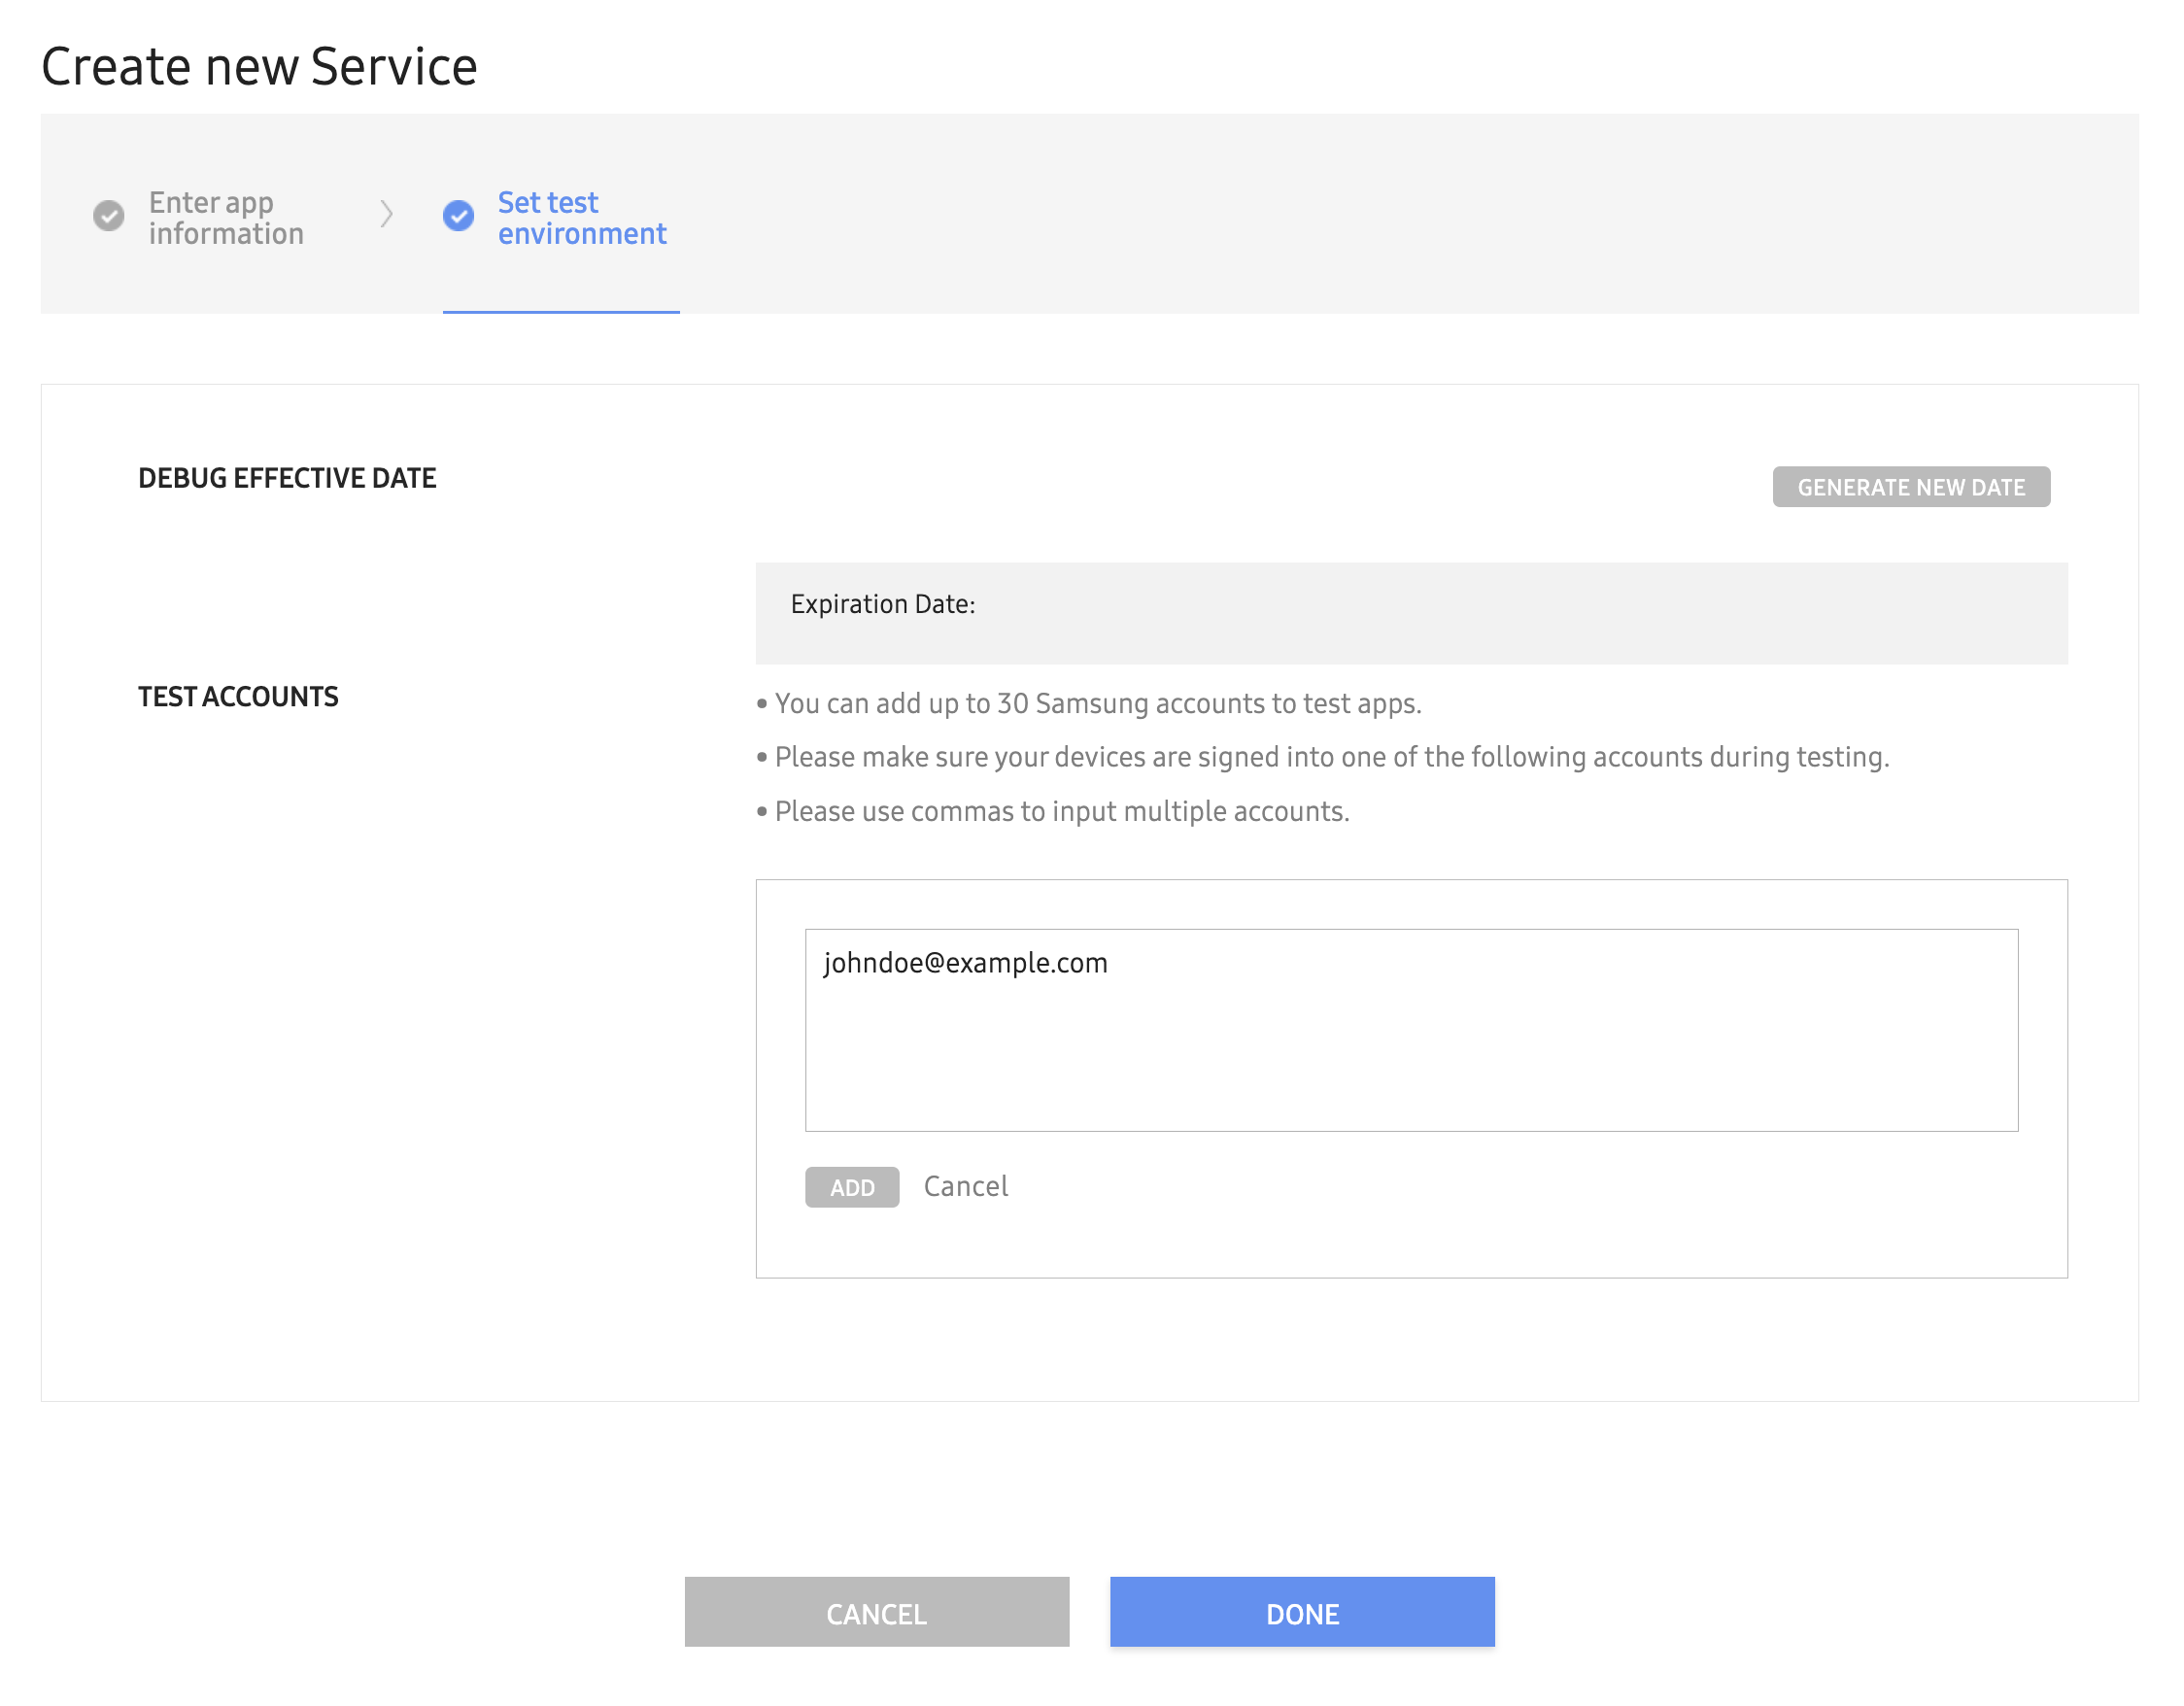
Now you have registered your service, make a note of the **Service ID** and proceed to implementation.
:::note
Once you have completed the intergration and performed test payments, your Service ID needs to be approved by Samsung Pay.
Contact us to assist you with the activation.
:::
---
## Samsung Pay Android
# Samsung Pay on Android
This guide will go through how to integrate Apple Pay JS API with Moyasar, we will go step by step through the process of **including Apple Pay's scripts**, **Creating the payment request**, **Validating the merchant's URL**, and finally **Authorizing the payment.**
## Who is this guide for?
- Users looking for advanced Apple Pay features.
## Before Starting
- [Create an account](https://dashboard.moyasar.com) with Moyasar, if you haven't already.
- Read through the following guides:
- [Apple Developer Documentation](https://developer.apple.com/documentation/apple_pay_on_the_web).
- [Apple Pay Demo](https://applepaydemo.apple.com/).
- [Web Registration](../apple-pay/web-registration.mdx).
## Display the Apple Pay Button
First, you need to include Apple Pay's script file into the web page:
```html
```
The you need to set the styles for the Apple Pay button and include the button in your HTML:
```html
```
:::tip
Learn more about Apple Pay button customizations here [Apple Pay Demo](https://applepaydemo.apple.com/).
:::
## Initiate Payment Session
```javascript
function onApplePayButtonClicked() {
if (!ApplePaySession) {
return;
}
// Define ApplePayPaymentRequest
const applePayPaymentRequest = {
countryCode: 'SR',
currencyCode: 'SAR',
supportedNetworks: ['mada', 'visa', 'masterCard'],
merchantCapabilities: ['supports3DS', 'supportsDebit', 'supportsCredit'],
total: {
label: 'Abdullah Store',
amount: '99.95',
},
};
// Create Apple Pay Session
const session = new ApplePaySession(5, applePayPaymentRequest);
// Provide Merchant Validation
// ...
// Payment Authorization
// ...
session.begin();
}
```
:::tip
- Add `amex` to the `supportedNetworks` list if your account supports accepting American Express cards.
- Add `unionpay` to the `supportedNetworks` list if your account supports accepting UnionPay cards.
:::
## Merchant Validation
```javascript
function onApplePayButtonClicked() {
if (!ApplePaySession) {
return;
}
// Define ApplePayPaymentRequest ...
// Create Apple Pay Session
// ...
// Provide Merchant Validation
session.onvalidatemerchant = async (event) => {
const body = {
validation_url: event.validationURL,
display_name: 'Abdullah Software',
domain_name: window.location.hostname,
publishable_api_key: 'pk_test_123456',
};
try {
const response = await fetch('https://api.moyasar.com/v1/applepay/initiate', {
method: 'post',
headers: { 'Content-Type': 'application/json' },
body: JSON.stringify(body),
});
session.completeMerchantValidation(await response.json());
} catch (error) {
session.completeMerchantValidation(error);
}
};
// Payment Authorization
// ...
session.begin();
}
```
:::note
The previous example uses Moyasar API for merchant validation which saves your time by not requiring an Apple Developer
Account. This feature is described here at [Web Registration](../apple-pay/web-registration.mdx).
:::
## Payment Authorization
In the `onpaymentauthorized` event, you will receive the encrypted payment token, which will be sent to Moyasar to complete the transaction. We will be using [Moyasar API](../../api/api-introduction.md) for this.
### Create the request body to send to Moyasar
```javascript
function onApplePayButtonClicked() {
if (!ApplePaySession) {
return;
}
// Define ApplePayPaymentRequest ...
// Create Apple Pay Session
// ...
// Provide Merchant Validation
// ...
// Payment Authorization
session.onpaymentauthorized = async (event) => {
const token = event.payment.token;
// prepare request for moyasar
let body = {
amount: applePayPaymentRequest.total.amount * 100,
currency: applePayPaymentRequest.currencyCode,
description: 'My Awsome Order #1234',
publishable_api_key: 'pk_test_123456',
source: {
type: 'applepay',
token: token,
},
metadata: {
order: '1234',
},
};
// send the request
const response = await fetch('https://api.moyasar.com/v1/payments', {
method: 'post',
headers: { 'Content-Type': 'application/json' },
body: JSON.stringify(body),
});
const responseJson = await response.json();
if (!response.ok) {
session.completePayment({
status: ApplePaySession.STATUS_FAILURE,
errors: [responseJson.message],
});
return;
}
if (responseJson.status != 'paid') {
session.completePayment({
status: ApplePaySession.STATUS_FAILURE,
errors: [responseJson.source.message],
});
return;
}
// TODO: Report payment result to merchant backend
// TODO: Add any merchant related bussiness logic here
session.completePayment({
status: ApplePaySession.STATUS_SUCCESS,
});
};
session.begin();
}
```
## Handling Payment Sheet Cancellation (Optional)
The `ApplePaySession` object allows you to handle a special event when the user click away or dismisses the payment
sheet. This is useful when you need to run any custom business logic:
```javascript
function onApplePayButtonClicked() {
if (!ApplePaySession) {
return;
}
// Define ApplePayPaymentRequest
// ...
// Create Apple Pay Session
// ...
// Provide Merchant Validation
// ...
// Payment Authorization
// ...
session.oncancel = (event) => {
// Handle payment cancellation here
};
session.begin();
}
```
---
## Samsung Pay Web
# Samsung Pay on Websites
This guide will go through how to integrate Apple Pay JS API with Moyasar, we will go step by step through the process of **including Apple Pay's scripts**, **Creating the payment request**, **Validating the merchant's URL**, and finally **Authorizing the payment.**
## Who is this guide for?
- Users looking for advanced Apple Pay features.
## Before Starting
- [Create an account](https://dashboard.moyasar.com) with Moyasar, if you haven't already.
- Read through the following guides:
- [Apple Developer Documentation](https://developer.apple.com/documentation/apple_pay_on_the_web).
- [Apple Pay Demo](https://applepaydemo.apple.com/).
- [Web Registration](../apple-pay/web-registration.mdx).
## Display the Apple Pay Button
First, you need to include Apple Pay's script file into the web page:
```html
```
The you need to set the styles for the Apple Pay button and include the button in your HTML:
```html
```
:::tip
Learn more about Apple Pay button customizations here [Apple Pay Demo](https://applepaydemo.apple.com/).
:::
## Initiate Payment Session
```javascript
function onApplePayButtonClicked() {
if (!ApplePaySession) {
return;
}
// Define ApplePayPaymentRequest
const applePayPaymentRequest = {
countryCode: 'SR',
currencyCode: 'SAR',
supportedNetworks: ['mada', 'visa', 'masterCard'],
merchantCapabilities: ['supports3DS', 'supportsDebit', 'supportsCredit'],
total: {
label: 'Abdullah Store',
amount: '99.95',
},
};
// Create Apple Pay Session
const session = new ApplePaySession(5, applePayPaymentRequest);
// Provide Merchant Validation
// ...
// Payment Authorization
// ...
session.begin();
}
```
:::tip
- Add `amex` to the `supportedNetworks` list if your account supports accepting American Express cards.
- Add `unionpay` to the `supportedNetworks` list if your account supports accepting UnionPay cards.
:::
## Merchant Validation
```javascript
function onApplePayButtonClicked() {
if (!ApplePaySession) {
return;
}
// Define ApplePayPaymentRequest ...
// Create Apple Pay Session
// ...
// Provide Merchant Validation
session.onvalidatemerchant = async (event) => {
const body = {
validation_url: event.validationURL,
display_name: 'Abdullah Software',
domain_name: window.location.hostname,
publishable_api_key: 'pk_test_123456',
};
try {
const response = await fetch('https://api.moyasar.com/v1/applepay/initiate', {
method: 'post',
headers: { 'Content-Type': 'application/json' },
body: JSON.stringify(body),
});
session.completeMerchantValidation(await response.json());
} catch (error) {
session.completeMerchantValidation(error);
}
};
// Payment Authorization
// ...
session.begin();
}
```
:::note
The previous example uses Moyasar API for merchant validation which saves your time by not requiring an Apple Developer
Account. This feature is described here at [Web Registration](../apple-pay/web-registration.mdx).
:::
## Payment Authorization
In the `onpaymentauthorized` event, you will receive the encrypted payment token, which will be sent to Moyasar to complete the transaction. We will be using [Moyasar API](../../api/api-introduction.md) for this.
### Create the request body to send to Moyasar
```javascript
function onApplePayButtonClicked() {
if (!ApplePaySession) {
return;
}
// Define ApplePayPaymentRequest ...
// Create Apple Pay Session
// ...
// Provide Merchant Validation
// ...
// Payment Authorization
session.onpaymentauthorized = async (event) => {
const token = event.payment.token;
// prepare request for moyasar
let body = {
amount: applePayPaymentRequest.total.amount * 100,
currency: applePayPaymentRequest.currencyCode,
description: 'My Awsome Order #1234',
publishable_api_key: 'pk_test_123456',
source: {
type: 'applepay',
token: token,
},
metadata: {
order: '1234',
},
};
// send the request
const response = await fetch('https://api.moyasar.com/v1/payments', {
method: 'post',
headers: { 'Content-Type': 'application/json' },
body: JSON.stringify(body),
});
const responseJson = await response.json();
if (!response.ok) {
session.completePayment({
status: ApplePaySession.STATUS_FAILURE,
errors: [responseJson.message],
});
return;
}
if (responseJson.status != 'paid') {
session.completePayment({
status: ApplePaySession.STATUS_FAILURE,
errors: [responseJson.source.message],
});
return;
}
// TODO: Report payment result to merchant backend
// TODO: Add any merchant related bussiness logic here
session.completePayment({
status: ApplePaySession.STATUS_SUCCESS,
});
};
session.begin();
}
```
## Handling Payment Sheet Cancellation (Optional)
The `ApplePaySession` object allows you to handle a special event when the user click away or dismisses the payment
sheet. This is useful when you need to run any custom business logic:
```javascript
function onApplePayButtonClicked() {
if (!ApplePaySession) {
return;
}
// Define ApplePayPaymentRequest
// ...
// Create Apple Pay Session
// ...
// Provide Merchant Validation
// ...
// Payment Authorization
// ...
session.oncancel = (event) => {
// Handle payment cancellation here
};
session.begin();
}
```
---
## Testing(Samsung-pay)
Moyasar provides a sandbox environment for testing Samsung Pay payments. This allows you to test your integration and ensure that everything is working correctly before going live with actual payments.
Unlike card payments where you enter different cards to simulate the result, testing Samsung Pay is based on the
sent amount to Moyasar API. Different amounts will result into different results.
There are no test cards for Samsung Pay. A real card must be added to an Samsung Pay Wallet to test Samsung Pay payments.
Make sure to use the test environment API keys when testing Samsung Pay payments.
## Test Amounts
| Amount (Minor Unit) | Amount (SAR) | Status | Message | Response Code |
| ------------------- | ------------------ | ---------- | ---------------------------------- | ------------- |
| 20000 to 30000 | 200.00 to 300.00 | **paid** | APPROVED | 00 |
| 100000 to 110000 | 1000.00 to 1100.00 | **failed** | UNSPECIFIED FAILURE | 99 |
| 110100 to 120000 | 1101.00 to 1200.00 | **failed** | INSUFFICIENT FUNDS | 51 |
| 120100 to 130000 | 1201.00 to 1300.00 | **failed** | DECLINED: LOST CARD | 41 |
| 130100 to 140000 | 1301.00 to 1400.00 | **failed** | DECLINED | 05 |
| 140100 to 150000 | 1401.00 to 1500.00 | **failed** | DECLINED: EXPIRED CARD | 54 |
| 150100 to 160000 | 1501.00 to 1600.00 | **failed** | DECLINED: EXCEEDS WITHDRAWAL LIMIT | 61 |
| 160100 to 170000 | 1601.00 to 1700.00 | **failed** | DECLINED: STOLEN CARD | 43 |
:::note
Moyasar accepts payment amount in the minor current unit (e.g. cents), and the test environment uses this amount
to return different results.
:::
:::tip
Using any other amount range than the stated above will result in the payment failing.
:::
---
## Facilitation Merchants
:::warning[Important]
This section is intended for facilitation merchants (direct bank merchants). If you are an aggregation merchant, please check out [Settlements](./settlement-introduction.md)
:::
## Getting the Settlement File
Facilitation merchants should to contact their acquirer bank and ask for the following file while providing their Merchant ID:
- Point of Sale (POS) Report
Some bank offer to download this file through the business portal as well, please refer to your bank manuals for more information.
---
## File Format
The settlement file provided by Moyasar is a CSV file (Comma Separated Values) encoded using UTF-8.
This file contains the following columns:
| Column | Possible Values |
| ---------------- | -------------------------------------------------------------------------------------------------- |
| payment_id | UUID v4 |
| description | Text |
| scheme | visa, mastercard, mada, amex, unionpay |
| source | Credit Card, Apple Pay |
| type | pay, refund, void, fee, platform_duties, other_duties, chargeback, chargeback_penalty, installment |
| currency | [ISO 4217](https://en.wikipedia.org/wiki/ISO_4217) Currency Code |
| amount | Payment amount |
| net_amount | Amount after taking out fees |
| fee | Transaction fee |
| vat | Value Added Tax |
| total_fee | Fee including VAT |
| transaction_date | Transaction date (UTC) |
| ...metadata | Payment metadata keys are automatically added (one column per key) |
## Line Type
Each line is assigned a type reflecting the operation:
- **pay**: A successful payment or a captured transaction.
- **refund**: A payment that has been refunded to the payer.
- **void**: A canceled payment that does not incur any fees, unlike a refund.
- **fee**: A service fee charged by the platform for processing a payment.
- **platform_duties**: Additional charges applied by an entity and paid to the platform.
- **other_duties**: Miscellaneous additional charges that do not fall into specific categories.
- **chargeback**: A refunded payment due to a chargeback dispute.
- **chargeback_penalty**: A penalty fee charged when a client loses a chargeback dispute.
- **installment**: A recurring payment deducted as part of a loan repayment through a partner.
## Opening in Excel
To open the CSV file in excel, please follow these steps:
Open a new empty document in Excel, the click on `Data -> Get Data -> From Text`
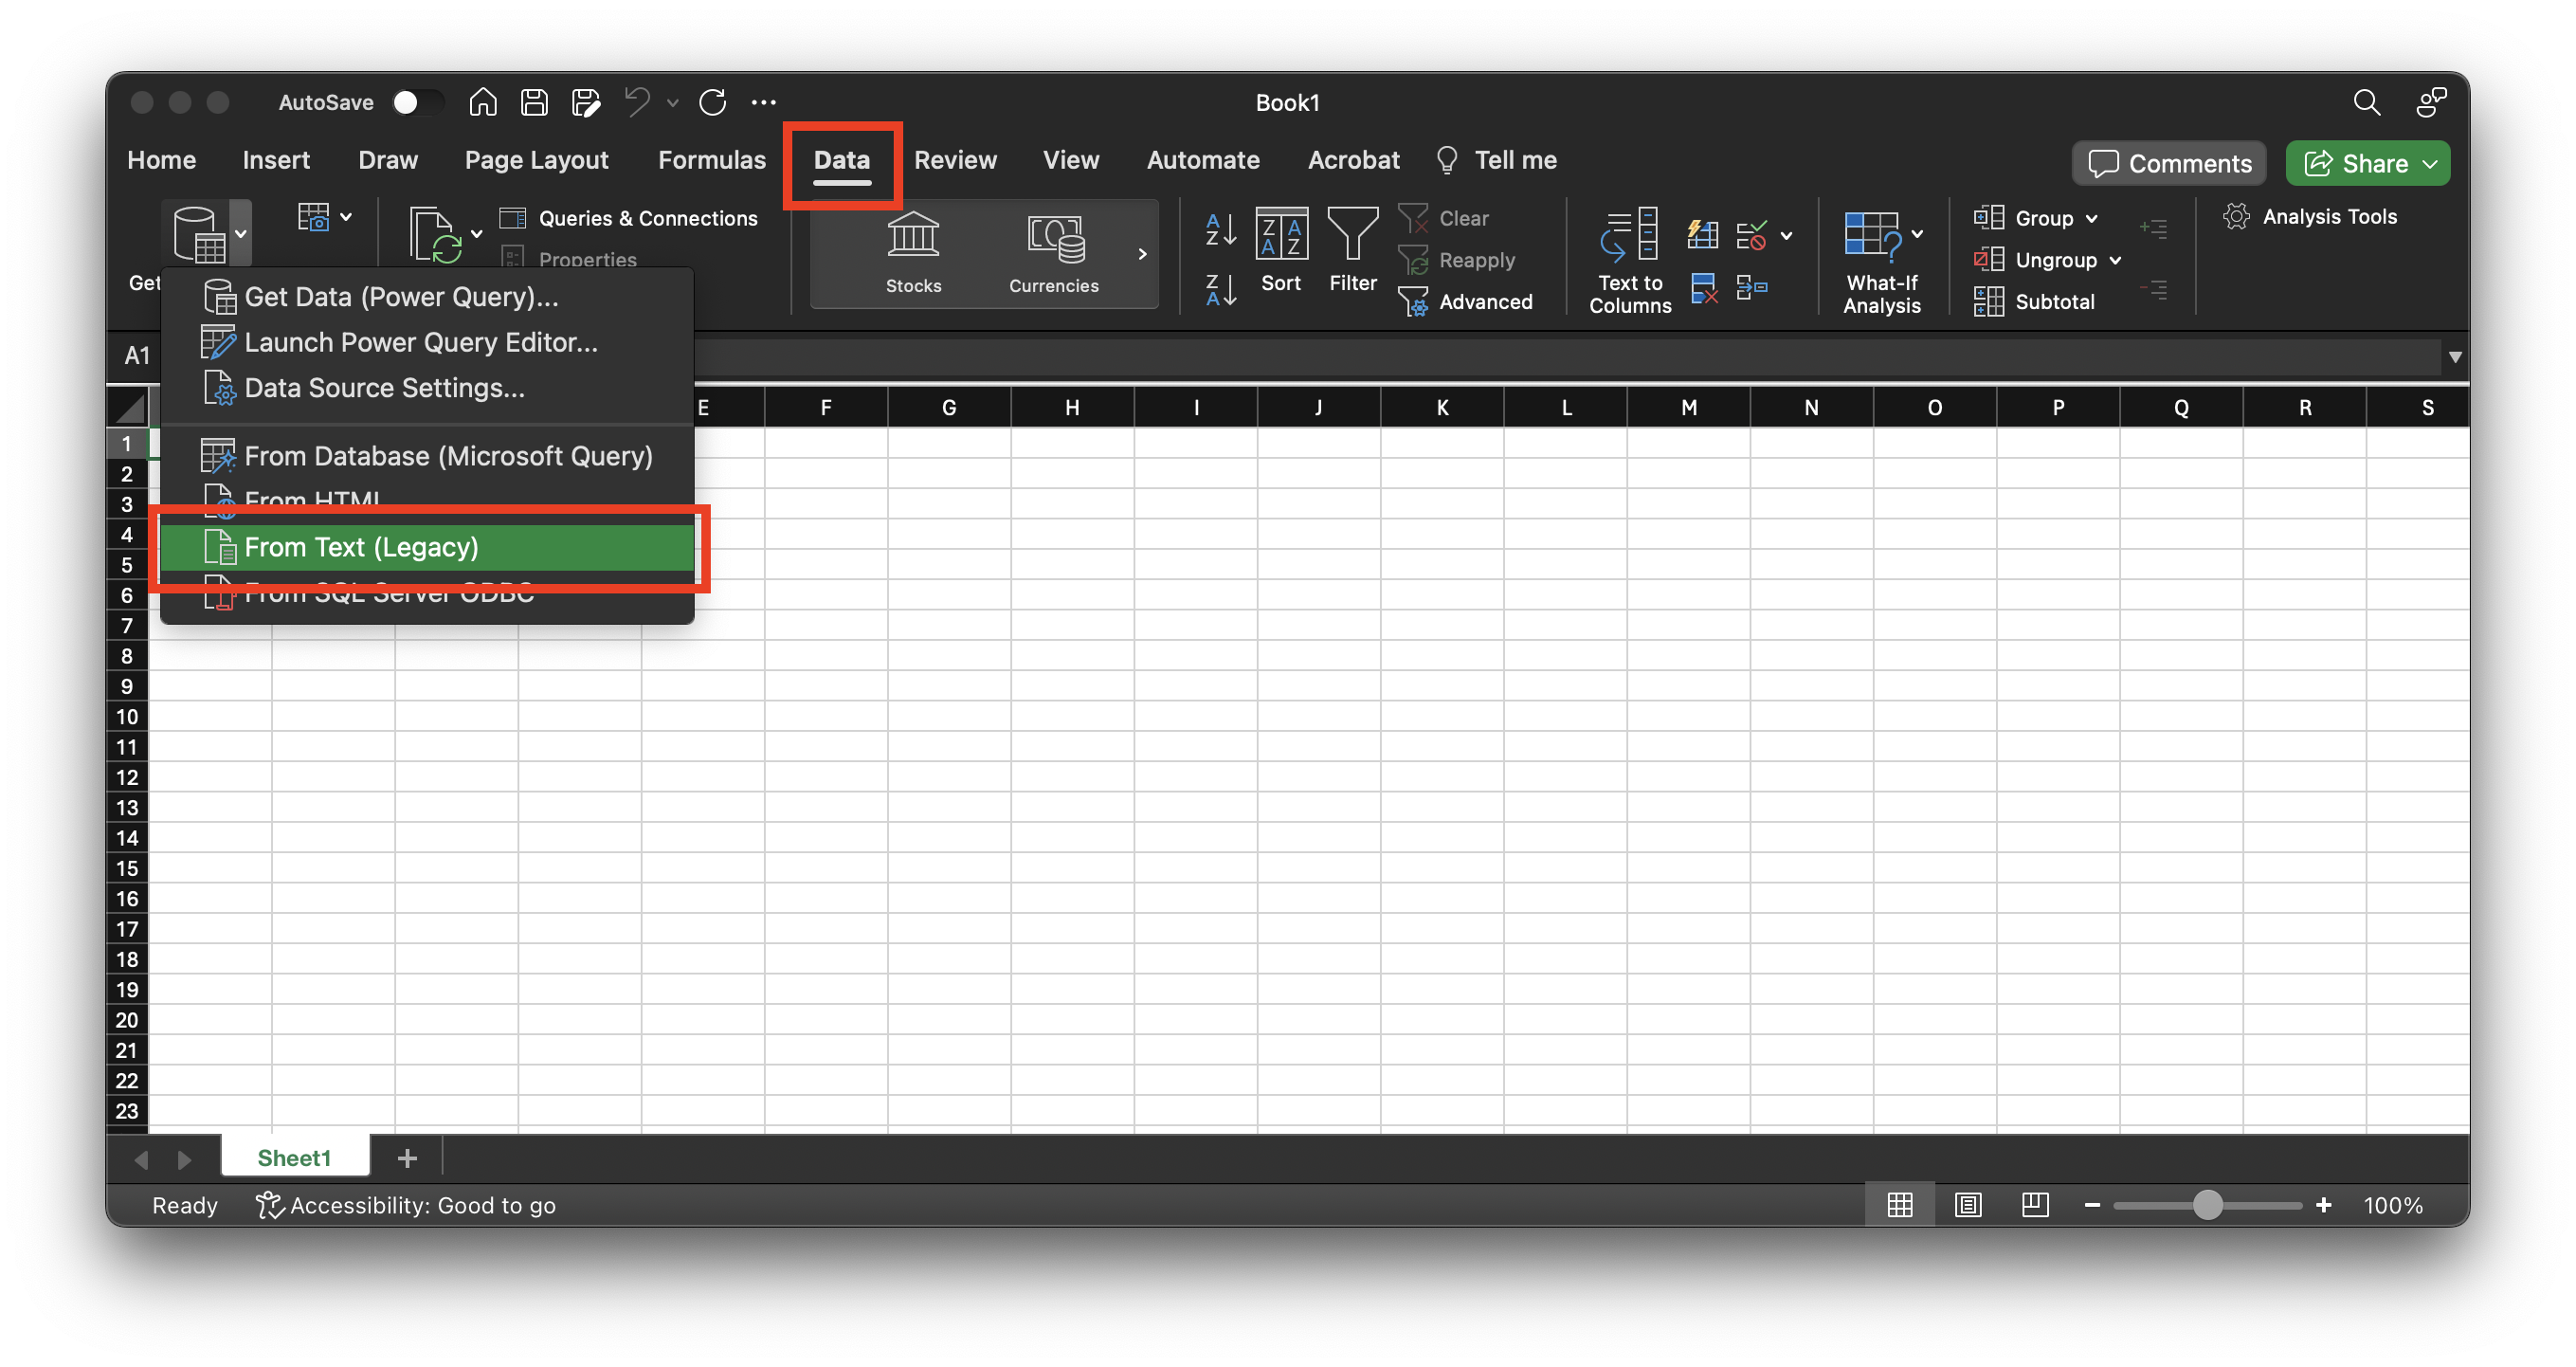
Choose the file to be opened:
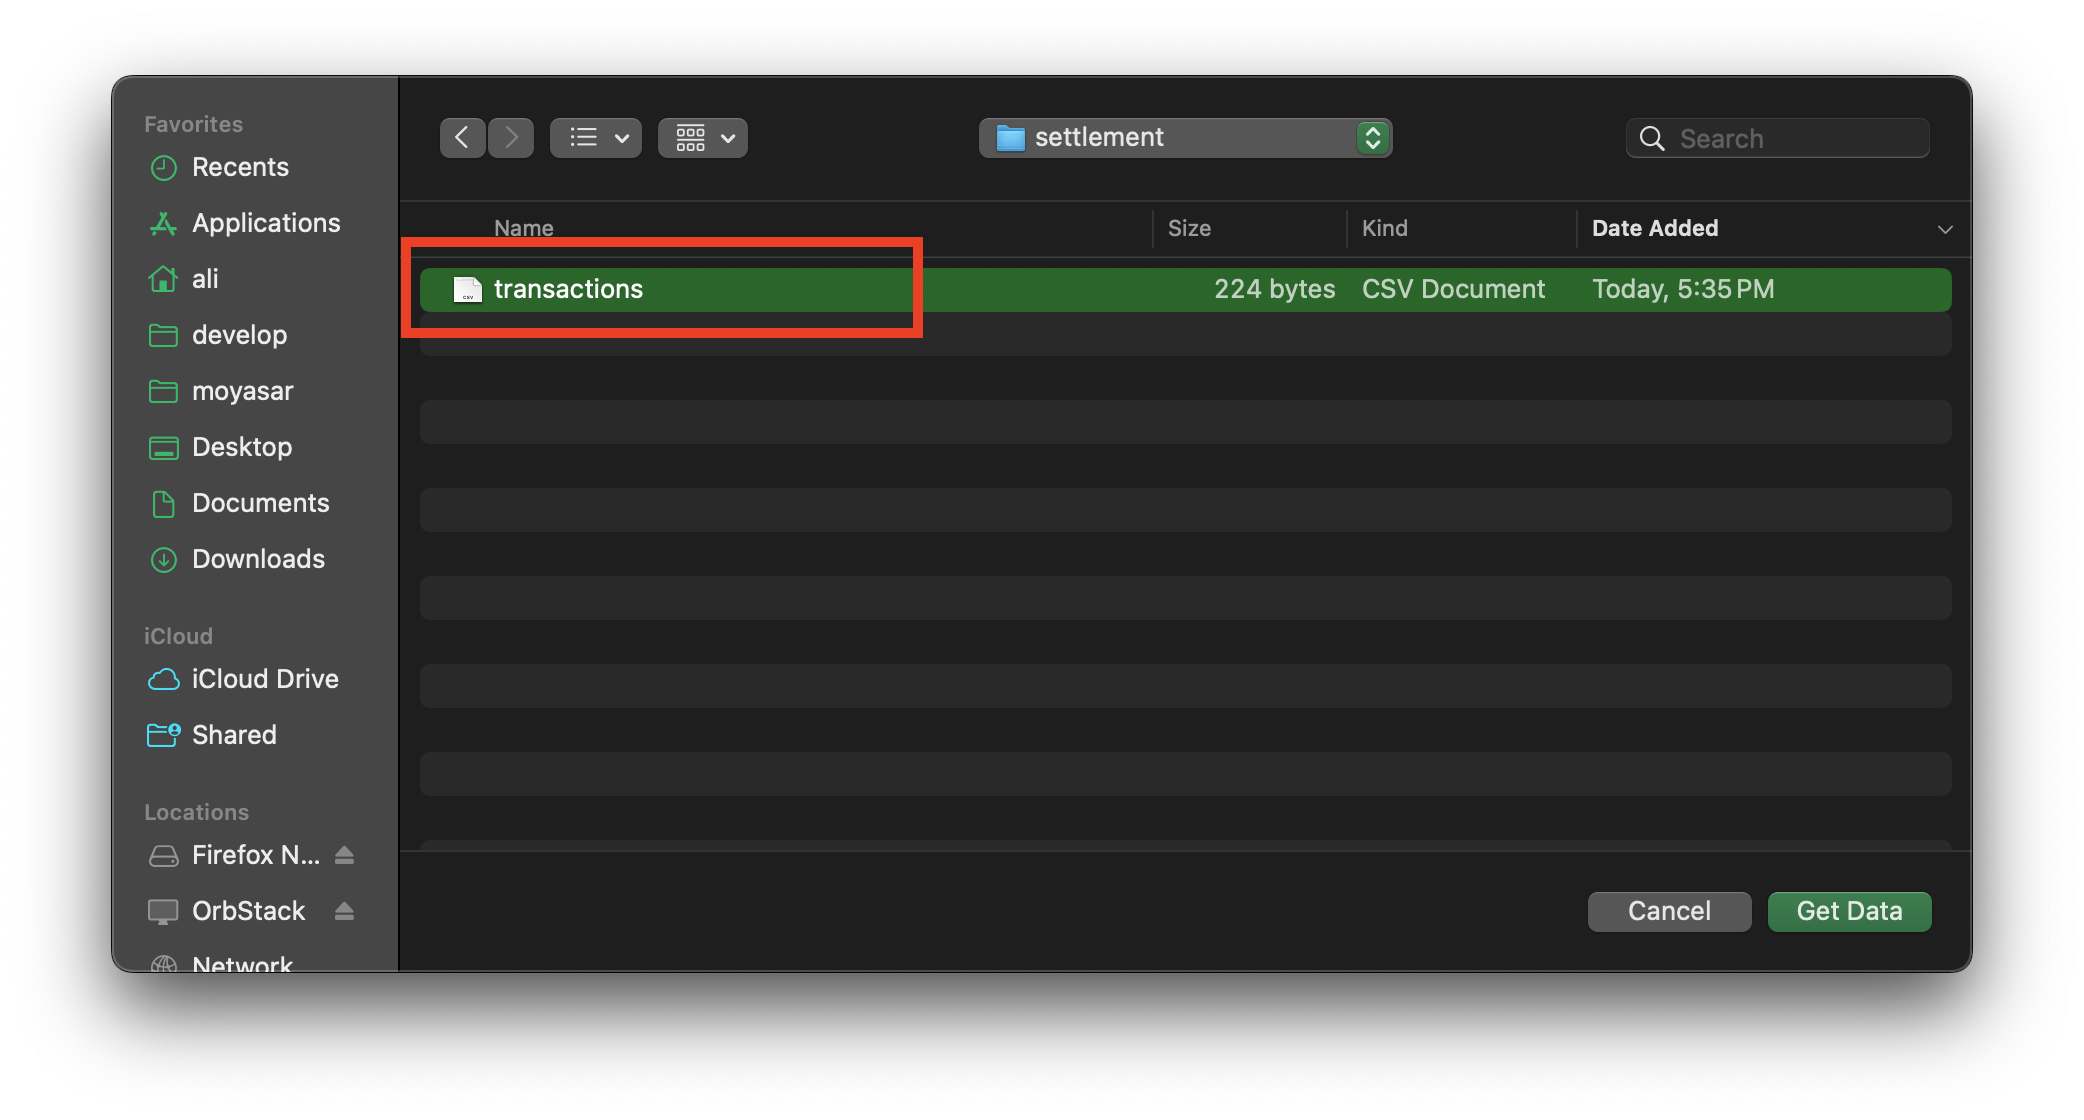
Choose `Delimited` and change `File Origin` to `Unicode (UTF-8)`
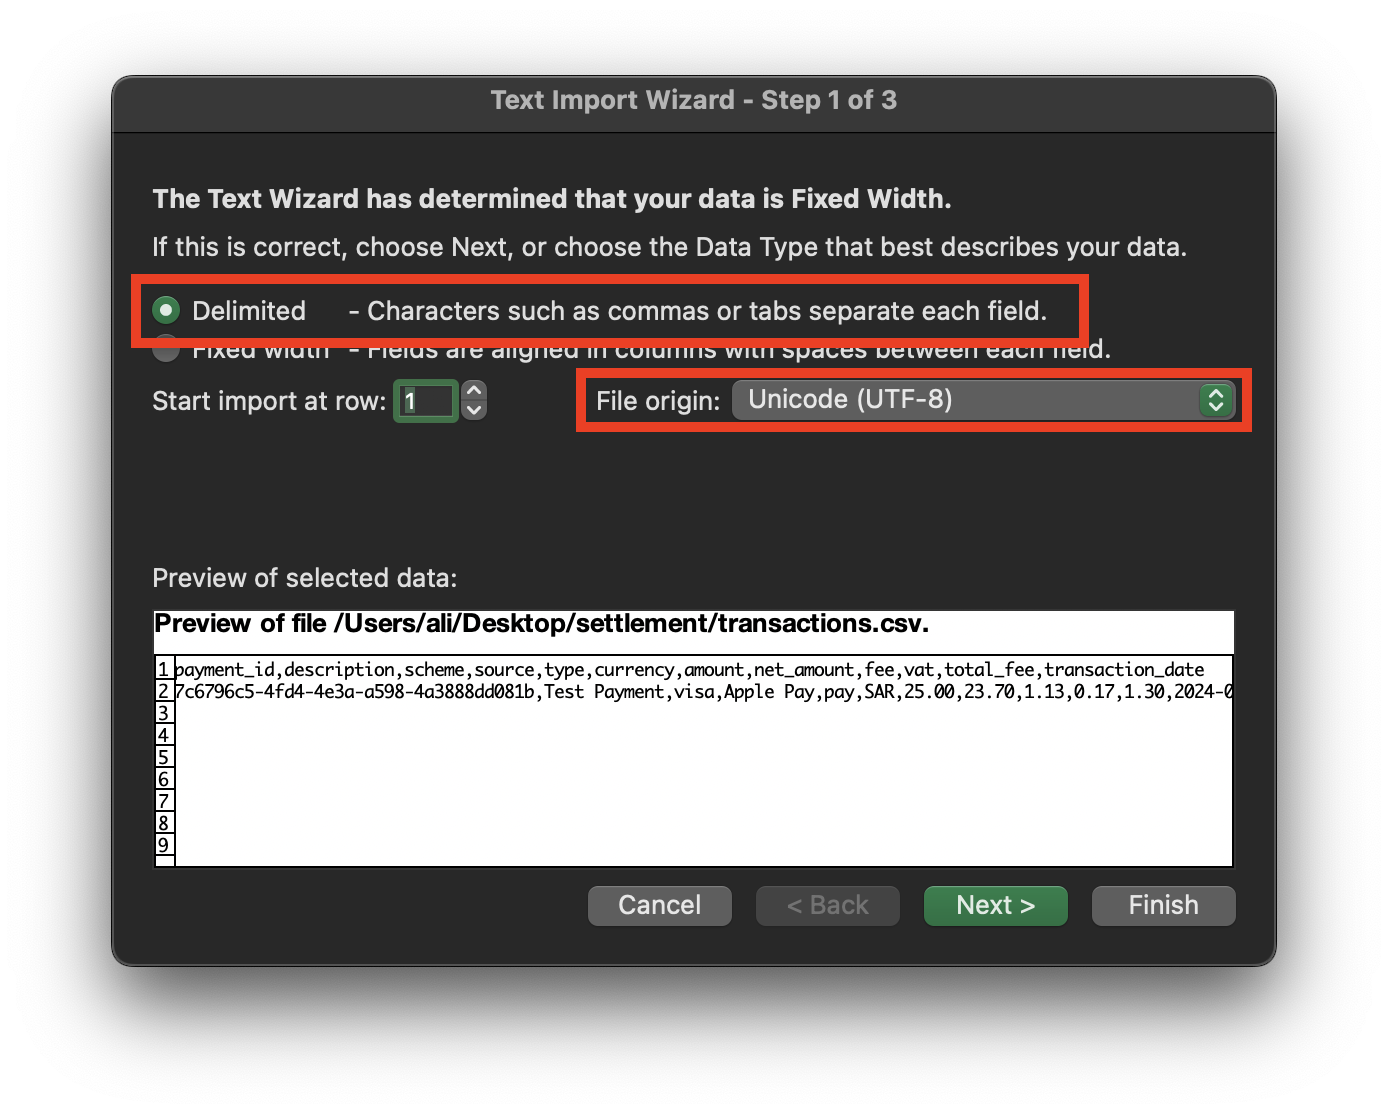
Chnage `Delimiters` to `Comma`and click `Finish`
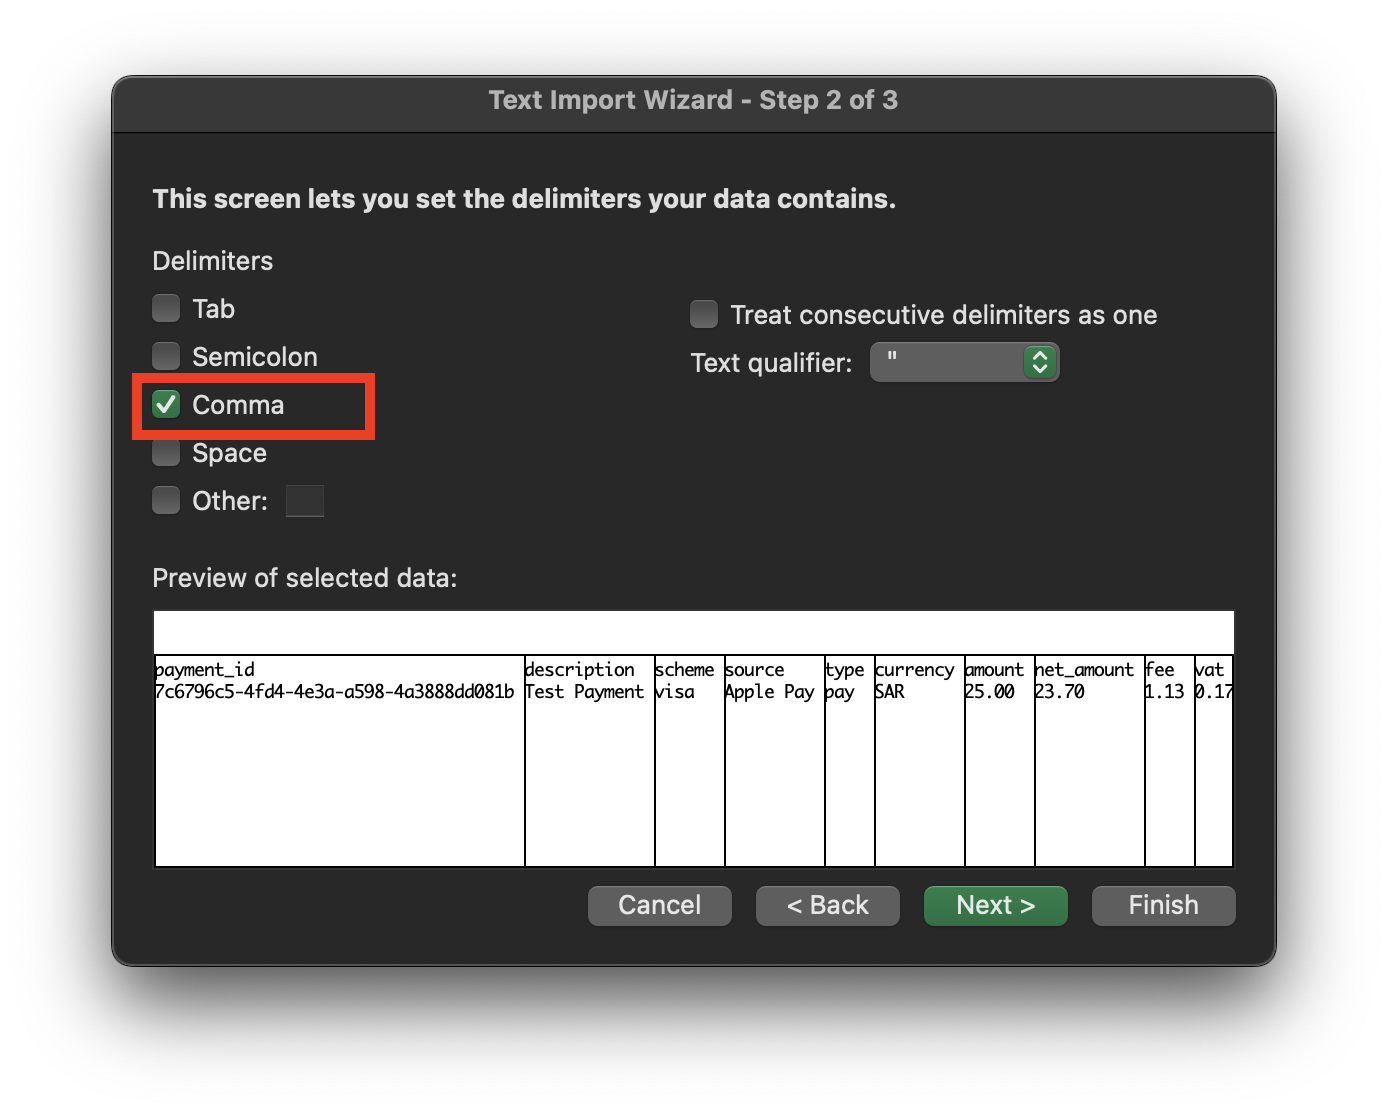
Now click import
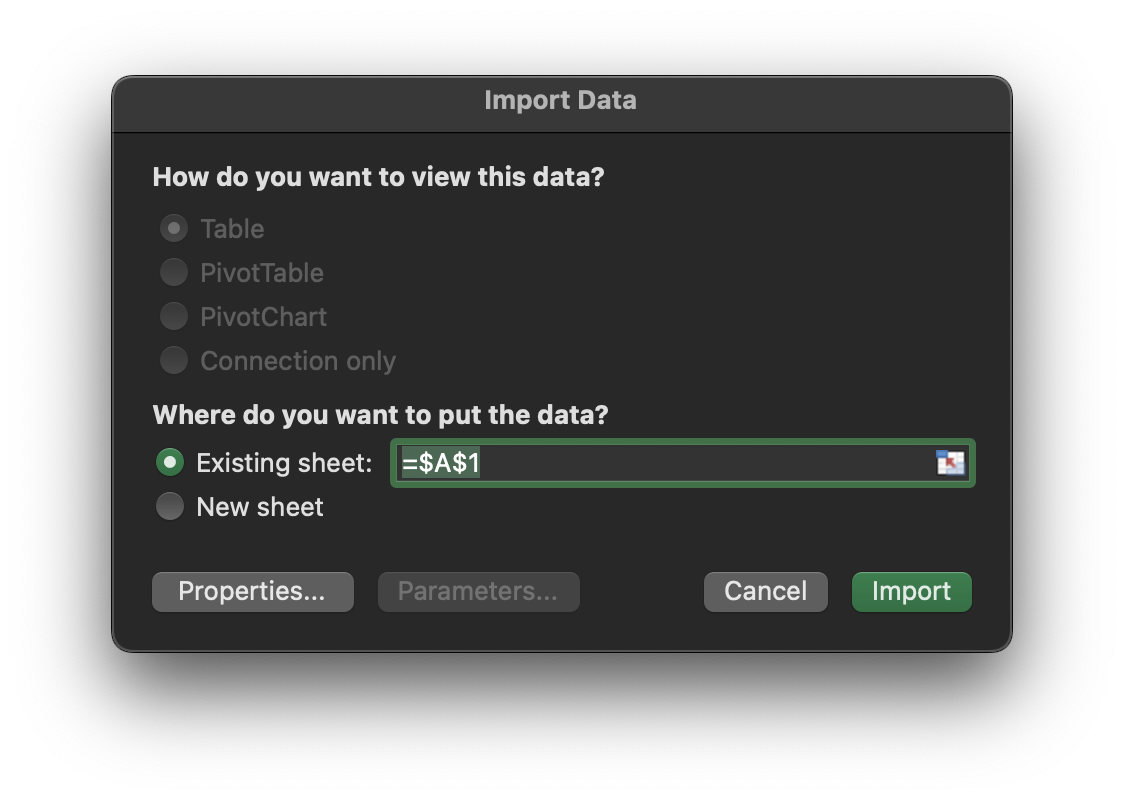
---
## Settlement Introduction
:::warning[Important]
This section is for aggregation merchants only. If you are a bank merchant, please refer to [Facilitation Merchants](facilitation-merchants)
:::
## Overview
Settlement is the process of transferring successful payments to the merchant bank account that was provided during the on-boarding process.
Moyasar settles payment amounts twice a week (Monday and Thursday) for all clients. This schedule can differ based on the agreement between Moyasar and the merchant.
Moyasar will provide the merchant with a detailed report for each settlement showing the payment ID, creation date and any metadata added the client.
Settlement information are delivered through two channels:
- Email
- API
## Email
With each settlement an email is sent out to the registered client email during the on-boarding process, this email will contain a CSV, a PDF and an invoice for the settlement.
The CSV file format is described here: [File Format](file-format)
## API
You can use Moyasar API to get the settlement information about payments. API usage is described here: [Using API](using-api)
:::tip
The API does not provide the invoice or PDF files, it returns all data as JSON.
:::
---
## Settlement Notification
When a settlement is created and sent to the merchant bank account, Moyasar will send a webhook notification to the merchant (if configured).
:::tip
This feature is only available for Moyasar aggregation clients, this is not available for bank mercahnts.
:::
## Configure Settlement Webhooks
To setup the settlement webhook, you will need to do the following steps:
- Login into your live account dashboard
- Navigate to `Settings`
- Navigate to `Webhooks` tab
- Add a new webhook
- Make sure to selected the `balance_transferred` event.
You can learn more about webhooks and how they work here: [Webhook Reference](../../api/other/webhooks/webhook-reference.md)
##
## Message Example
A webhook message for balance transferred will look like the following example:
The transfer ID can be found in the element `data.id`.
```json
{
"id": "762760de-4ac3-44a0-8cec-ba44ebaf670a",
"type": "balance_transferred",
"created_at": "2024-02-18T15:57:27+00:00",
"secret_token": "123",
"account_name": "Test Merchant",
"live": true,
"data": {
"id": "10af7e38-0af8-4c56-be5d-366ee0efcd86",
"recipient_type": "Entity",
"recipient_id": "29153d68-55d9-4afc-b4fe-a68301b468c9",
"currency": "SAR",
"amount": 561743,
"fee": 0,
"tax": 0,
"reference": null,
"transaction_count": 2,
"created_at": "2023-09-06T15:46:35.518Z"
}
}
```
---
## Using API
Moyasar provides an API to fetch the latest settlements or transfers and list all payments involved in said settlement.
## Prerequists
To use the Transfer API, you need to get your secret API key from the dashboard and follow the authenitcation documentation in order to call the API successfully: [Authentication](../../api/authentication.mdx).
## Listing Transfers
To list transfers, you need to use the following API endpoint [List Settlements](../../api/settlements/01-list-settlements.api.mdx)
## Listing Transfer Lines
Each transfer will have multiple lines of payments, these can be listed using [List Settlement Lines](../../api/settlements/03-list-settlement-lines.api.mdx)
---
## Basic Integration(Stc-pay)
# STC Pay Basic Integration
This page will guide you to accept STC Pay wallet payments using our Payment Form Javascript library.
## Before Starting
Before you start accepting credit/debit card payments, make sure you complete these steps first:
1. Sign up for a Moyasar account on our [dashboard.](https://dashboard.moyasar.com/register/new)
2. [Get your publishable API key ](../dashboard/get-your-api-keys.md)to authenticate your form payment requests.
3. Request the STC Pay feature from your account manager or contact us at [care@moyasar.com](mailto:care@moyasar.com).
## Including Moyasar Form
Moyasar Form is a lightweight Javascript library that will take care of creating the payment components within your
website using a modern and responsive design.
You can start the integration by including the following tags within the `` tag of your page:
## Initiating the Payment Form
Once you decide on a good place for the form, add an empty `` tag and then invoke the `init` method on the global `Moyasar` class.
```html title="HTML"
```
## Payment Form
## STC Pay Payment Lifecycle
```mermaid
sequenceDiagram
participant User
participant Merchant
participant Moyasar
participant STC Pay
User->>Moyasar: Start Request Using Mobile Number
Moyasar->>STC Pay: Initiate Payment Request
STC Pay->>Moyasar: Initiate Response
Moyasar->>User: Request Challenge OTP
User->>Moyasar: Send Challenge OTP
Moyasar->>STC Pay: Authorize Payment
STC Pay->>Moyasar: Authorization Response
Moyasar->>User: Payment Response
User->>Merchant: Redirect with Result
Merchant->>Moyasar: Fetch Payment
Moyasar->>Merchant: Payment Response
```
## Save Payment ID
This step is optional but **highly recommended** to save the payment ID, which grants you the ability to verify payment details in case your user's connection drops.
To save the payment ID you can provide the **on_completed** configuration option with an async function.
```javascript title="JS"
Moyasar.init({
element: '.mysr-form',
amount: 1000,
currency: 'SAR',
description: 'Coffee Order #1',
publishable_api_key: 'pk_test_AQpxBV31a29qhkhUYFYUFjhwllaDVrxSq5ydVNui',
methods: ['stcpay'],
on_completed: async function (payment) {
await savePaymentOnBackend(payment);
},
});
```
The method `savePaymentOnBackend` is a placeholder, and you must provide your own custom logic.
## Step 4: Verify Payment
Once the user has completed the payment and got redirected to your website or app using the `callback_url`
you provided earlier, the following HTTP query parameters will be appended:
- `id`
- `status`
- `message`
Here is an example:
```http request title="Callback URL"
https://www.my-store.com/payments_redirect?id=79cced57-9deb-4c4b-8f48-59c124f79688&status=paid&message=Succeeded
```
Now fetch the payment using its **id** through our [fetch API](../../api/payments/02-fetch-payment.api.mdx), and verify
its `status`, `amount`, and `currency` before accepting your user's order or completing any business action.
Next, just show success or failure according to the previous validation.
---
## Custom UI(Stc-pay)
# STC Pay
Moyasar API provides the required facilities for adding STC pay payment methods to your website or system. STC pay is a digital wallet service that will allow users to utilize wallets to pay for Merchants.
## Overview
This guide ensures an easy process for how to integrate STC pay into your system.
The process of making an STC pay payment is composed of the following steps:
1. The user clicks on the
2. OTP form is presented to the user.
3. The user enters the OTP they receive from STC pay and verifies it.
4. Payment details are sent securely to Moyasar servers and then processed.
5. The user is redirected back to the URL specified in callback_url when the payment
## Before Starting
Before you start integrating with Moyasar API, make sure you complete these steps:
1. Sign up for a Moyasar test account at [Moyasar's dashboard](https://dashboard.moyasar.com)
2. [Get your API key](https://help.moyasar.com/en/article/moyasar-dashboard-api-keys-1srfrtb/) to authenticate your API request.
## Specifications
### Step 1: initiate payment
Set up the payment form with an input for mobile number in your website checkout page and send a POST request to Moyasar API to initiate the payment
**Include the endpoint required attributes from your side as a merchant:**
| Parameter | Description |
| ------------------------------- | -------------------------------------------------------------------------------------------------- |
| **amount** | Should be in the smallest currency unit. *eg: 100 Halals to charges 1 Riyal.* |
| **currency** *optional* | 3-letter ISO code for currency. (default: SAR) |
| **publishable_api_key** | To authenticate the payment. |
| **description** *optional* | This may include a description of the merchandise or the service that your customer is billed for. |
| **source\[type]** | The value should be *stcpay*. |
| **source\[cashier]** *optional* | The cashier ID. |
| **source\[branch]** *optional* | The branch ID. |
**The user will provide the mobile number for proceeding to charge:**
| Parameter | Description |
| ------------------- | --------------------------------------------- |
| **source\[mobile]** | Provided by the customer starting with **05** |
```json title="JSON | POST Request"
POST
https://api.moyasar.com/v1/payments
Content-Type: application/json
{
"publishable_api_key": "`your api key here`",
"amount": 5000,
"currency": "SAR",
"description": "Description",
"source": {
"type":"stcpay",
"mobile": "0123456789",
"cashier": "cashier_1_id"
}
}
```
```json title="JSON | POST Response"
{
"id": "760878ec-d1d3-5f72-9056-191683f55872",
"status": "initiated",
"amount": 5000,
"fee": 0,
"currency": "SAR",
"refunded": 0,
"refunded_at": null,
"captured": 0,
"captured_at": null,
"voided_at": null,
"description": "Description",
"amount_format": "50.00 SAR",
"fee_format": "0.00 SAR",
"refunded_format": "0.00 SAR",
"captured_format": "0.00 SAR",
"invoice_id": null,
"ip": null,
"callback_url": null,
"created_at": "2020-07-03T17:04:17.000Z",
"updated_at": "2020-07-03T17:04:17.000Z",
"source": {
"type": "stcpay",
"mobile": "0123456789",
"reference_number": "1017224325884",
"branch": null,
"cashier": null,
"transaction_url": "https://api.moyasar.com/v1/stc_pays/6187b1f9-ihn2-457b-a8bc-e2j5c808ff94/proceed?otp_token=SOQIbUEGsRTLaIoNDUGM",
"message": null
}
}
```
### Step 2: confirm payment
Once the payment is initiated successfully, handle the JSON response and then use `transaction_url` to pass the OTP value entered by the user to proceed with the payment by sending a GET/POST request.
| Parameter | Description |
| :---------- | :--------------------------- |
| `otp_value` | Sent to the customer by SMS. |
```json title="JSON | GET Request"
GET
https://api.moyasar.com/v1/stc_pays/6187b1f9-ihn2-457b-a8bc-e2j5c808ff94/proceed?otp_token=SOQIbUEGsRTLaIoNDUGM
&otp_value=12345
```
```json title="JSON | POST Request"
POST
https://api.moyasar.com/v1/stc_pays/6187b1f9-ihn2-457b-a8bc-e2j5c808ff94/proceed?otp_token=SOQIbUEGsRTLaIoNDUGM
Content-Type: application/json
{
"otp_value": 12345
}
```
On success, it returns the `paid` status payment object. If none of the requirements is met, the status will be `failed`.
```json title="JSON | GET/POST Response"
{
"id": "760878ec-d1d3-5f72-9056-191683f55872",
"status": "paid",
"amount": 5000,
"fee": 0,
"currency": "SAR",
"refunded": 0,
"refunded_at": null,
"captured": 0,
"captured_at": null,
"voided_at": null,
"description": "Description",
"amount_format": "50.00 SAR",
"fee_format": "0.00 SAR",
"refunded_format": "0.00 SAR",
"captured_format": "0.00 SAR",
"invoice_id": null,
"ip": null,
"callback_url": null,
"created_at": "2020-07-03T17:04:17.000Z",
"updated_at": "2020-07-03T17:05:16.547",
"source": {
"type": "stcpay",
"mobile": "0123456789",
"reference_number": "1017224325884",
"branch": "1",
"cashier": "cashier_1_id",
"transaction_url": "https://api.moyasar.com/v1/stc_pays/6187b1f9-ihn2-457b-a8bc-e2j5c808ff94/proceed?otp_token=SOQIbUEGsRTLaIoNDUGM",
"message": "Paid"
}
}
```
---
## Mobile SDKs(Stc-pay)
With Moyasar you can accept Stc Pay payments on many platforms including native and hybrid mobile application.
## Available SDKs
Here is the available list of SDKs that offer Stc Pay support:
- [iOS SDK](../../sdk/ios/stc-pay-integration.md)
- [Android SDK](../../sdk/android/basic-integration.md#2---stc-pay-payments-integration)
- [React Native SDK](../../sdk/react-native/basic-integration.md#configuring-components)
---
## Testing(Stc-pay)
# Testing STC Pay
Moyasar offers a sandbox for STC Pay that allows you to test the service before going live.
## Test Mobile Numbers
STC Pay payment process is composed of two steps: **payment initiation** and **authentication**. During the initiation
process, error might occur resulting in a **failed** payment.
We provide a list of mobile numbers that can be used to simulate different results:
| Mobile Number | Payment Status | Message |
| ------------- | -------------- | ------------------------------------------------------------------------------- |
| 0515555555 | failed | Mobile number is not registered to use the STC Pay service. |
| 0515555556 | failed | Please update your information using the STC Pay app before attempting payment. |
| 0515555557 | failed | The customer account status is invalid, please contact STC Pay support. |
| 0515555558 | failed | You have exhausted your OTP attempts, please wait 15 minutes then try again. |
| 0515555559 | failed | Please wait 60 seconds before attempting a new payment. |
| Other | initiated | - |
## OTP Result
Once the payment is initiated, you can simulate different results based on the OTP used.
| Mobile Number | Payment Status | Message |
| ------------- | -------------- | ------------------------------------------------------------------------------- |
| 123456 | paid | Paid |
| 000000 | paid | Paid |
| 111111 | failed | Insufficient Balance. |
| 222222 | failed | You have exceeded the allowed daily transaction limit for your STC Pay account. |
| 333333 | failed | You have exceeded the maximum allowed transaction amount. |
| 444444 | failed | Connection timed out while waiting for response from STC Pay service. |
| Other | failed | Invalid OTP |
---
## Create Token
The `/v1/tokens` endpoint tokenizes a card without requiring a full payment. There are two flows depending on whether you pass `save_only`.
:::note
This endpoint is for `creditcard` only. To save a card from an Apple Pay or Samsung Pay payment, use [`source.save_card: true`](./save-card-in-payment) instead.
:::
## Default flow {#default-flow}
Creates a token using a 1 SAR card authorization for 3DS verification. The 1 SAR is never captured — it is voided automatically. Once the cardholder completes verification, the token becomes `active` and can be reused for any number of future payments.
### How it works
1. Call `POST /v1/tokens`. The token is returned as `initiated` with a `verification_url`.
2. Redirect the cardholder to `verification_url` to complete 3DS.
3. After 3DS, the cardholder is returned to your `callback_url` and the token becomes `active`.
4. Use the `active` token with `POST /v1/payments` to charge the customer later.
**Endpoint:** `POST /v1/tokens`
**Authentication:** Publishable key
```json title="POST /v1/tokens"
{
"name": "John Doe",
"number": "4111111111111111",
"month": 12,
"year": 30,
"cvc": "123",
"callback_url": "https://merchant.example/token-saved"
}
```
```bash title="POST /v1/tokens"
curl -X POST https://api.moyasar.com/v1/tokens \
-u pk_test_YOUR_PUBLISHABLE_KEY: \
-H "Content-Type: application/json" \
-d '{
"name": "John Doe",
"number": "4111111111111111",
"month": 12,
"year": 30,
"cvc": "123",
"callback_url": "https://merchant.example/token-saved"
}'
```
### Response
```json title="POST /v1/tokens — initiated response"
{
"id": "token_x6okRgkZJrhgDHyqJ9zztW2X1k",
"status": "initiated",
"brand": "visa",
"funding": "credit",
"country": "US",
"month": "12",
"year": "2030",
"name": "John Doe",
"last_four": "1111",
"metadata": null,
"message": null,
"verification_url": "https://api.moyasar.com/v1/...",
"created_at": "2024-01-15T10:00:00.000Z",
"updated_at": "2024-01-15T10:00:00.000Z"
}
```
Redirect the cardholder to `verification_url`. After 3DS, the token status changes to `active`. Always confirm this by [fetching the token](../../api/other/tokens/fetch-token.mdx) before using it for a payment.
---
## Save-only flow {#save-only-flow}
Creates a token without any charge or 3DS at creation time. The token is short-lived and single-use — it can only be passed to `POST /v1/payments` once. When your backend does so, Moyasar automatically runs 3DS for the actual payment amount.
Use this when you want the frontend to collect the card, but the backend to control the payment amount and initiation.
:::warning
Save-only tokens do not produce a recurring active token after the payment. If you need a recurring token, use the [default flow](#default-flow) or [save the card during the payment](./save-card-in-payment).
:::
### How it works
1. Frontend calls `POST /v1/tokens` with `save_only: true`. No charge, no 3DS.
2. Frontend passes the token ID to your backend (e.g. via your own API).
3. Backend calls `POST /v1/payments` with `source.type: "token"` and the token ID. 3DS is automatically triggered.
4. The payment response includes `source.transaction_url`. Redirect the cardholder to complete 3DS.
5. After 3DS, the cardholder is returned to your `callback_url` and the payment completes.
**Endpoint:** `POST /v1/tokens`
**Authentication:** Publishable key
```json title="POST /v1/tokens"
{
"name": "John Doe",
"number": "4111111111111111",
"month": 12,
"year": 30,
"cvc": "123",
"save_only": true
}
```
```bash title="POST /v1/tokens"
curl -X POST https://api.moyasar.com/v1/tokens \
-u pk_test_YOUR_PUBLISHABLE_KEY: \
-H "Content-Type: application/json" \
-d '{
"name": "John Doe",
"number": "4111111111111111",
"month": 12,
"year": 30,
"cvc": "123",
"save_only": true
}'
```
Then your backend initiates the payment:
**Endpoint:** `POST /v1/payments`
**Authentication:** Publishable key
```json title="POST /v1/payments"
{
"amount": 10000,
"currency": "SAR",
"callback_url": "https://merchant.example/return",
"source": {
"type": "token",
"token": "token_x6okRgkZJrhgDHyqJ9zztW2X1k"
}
}
```
```bash title="POST /v1/payments"
curl -X POST https://api.moyasar.com/v1/payments \
-u pk_test_YOUR_PUBLISHABLE_KEY: \
-H "Content-Type: application/json" \
-d '{
"amount": 10000,
"currency": "SAR",
"callback_url": "https://merchant.example/return",
"source": {
"type": "token",
"token": "token_x6okRgkZJrhgDHyqJ9zztW2X1k"
}
}'
```
The payment comes back as `initiated` with a `source.transaction_url`. Redirect the cardholder there to complete 3DS for the actual payment amount.
---
## Request parameters
| Field | Required | Description |
| :------------- | :------------------- | :----------------------------------------------------------------------------------------- |
| `name` | Yes | Cardholder name as it appears on the card |
| `number` | Yes | Card number (digits only) |
| `month` | Yes | Expiry month as an integer (e.g. `12`) |
| `year` | Yes | Expiry year as a 2-digit integer (e.g. `30`) |
| `cvc` | Yes | Card verification code (3–4 digits) |
| `callback_url` | Yes for default flow | URL to redirect the cardholder after 3DS verification. Not required for `save_only` tokens |
| `save_only` | No | Set to `true` to create a short-lived token with no charge. Defaults to `false` |
| `metadata` | No | Custom key-value pairs attached to the token |
---
## Overview(Tokenization)
# Tokenization
A token replaces sensitive payment data with a reusable string, enabling recurring and future charges without asking the customer to re-authenticate. You store the token on your backend and pass it to Moyasar for any subsequent charge.
## Supported cards
Mada, Visa, Mastercard, and UnionPay.
## Ways to get a token
| Approach | How | When to use it |
| :----------------------------------------------------------------- | :--------------------------------------- | :-------------------------------------------------------------------------------- |
| [Save card during a payment](./save-card-in-payment) (recommended) | `source.save_card: true` on any payment | Charge now and save the card in one step |
| [Create token — default](./create-token#default-flow) | `POST /v1/tokens` | Save card without charging; 1 SAR authorization voided automatically |
| [Create token — save only](./create-token#save-only-flow) | `POST /v1/tokens` with `save_only: true` | Collect card on the frontend; backend initiates 3DS payment for the actual amount |
## Token statuses
| Status | Meaning |
| :---------- | :------------------------------------------------------------ |
| `initiated` | Token created — cardholder has not yet completed verification |
| `active` | Verification complete — token is ready for recurring payments |
| `inactive` | Verification failed, or the payment method has expired |
| `expired` | Token has been invalidated due to payment method expiry |
## Charging with an active token
Once a token is `active`, see [Charge with a Token](./tokenized-cards) for how to use it in a payment, display the saved card to your customer, and delete it when the customer removes the card.
---
## Save Card During a Payment
The simplest way to tokenize a card: charge the customer and save the card in one step. Moyasar runs 3DS for the actual payment amount, and the resulting token is immediately `active` for future use.
:::note
`save_card` is supported on `creditcard`, `applepay`, and `samsungpay` sources. Add `"save_card": true` inside the `source` object on any of these payment types.
:::
## How it works
1. Create a payment with `source.save_card: true`.
2. The response includes a `source.token` (the new token ID). For `creditcard`, a `source.transaction_url` is also returned for 3DS. For device payments (Apple Pay, Samsung Pay), authentication happens on the device before the payment reaches Moyasar.
3. For `creditcard`: redirect the cardholder to `source.transaction_url` to complete 3DS.
4. After authentication, the token becomes `active`.
5. Your backend receives the payment at `callback_url` — save the token from `source.token`.
:::tip
Save the token from the initial payment response, before the 3DS redirect. It appears even when the payment status is still `initiated`.
:::
## Via the payment form
The easiest option if you already use [Moyasar's payment form](../references/tokenization.mdx). Add `credit_card.save_card: true` to your `Moyasar.init` config:
```html title="HTML"
```
The `on_completed` callback fires after the payment is created but before the 3DS redirect, giving you a window to persist the token.
## Via the direct API
If you have a custom card input UI, call `POST /v1/payments` directly from the frontend with `source.save_card: true`.
**Endpoint:** `POST /v1/payments`
**Authentication:** Publishable key
```json title="POST /v1/payments"
{
"amount": 10000,
"currency": "SAR",
"callback_url": "https://merchant.example/return",
"source": {
"type": "creditcard",
"name": "John Doe",
"number": "4111111111111111",
"month": "12",
"year": "2030",
"cvc": "123",
"save_card": true
}
}
```
```bash title="POST /v1/payments"
curl -X POST https://api.moyasar.com/v1/payments \
-u pk_test_YOUR_PUBLISHABLE_KEY: \
-H "Content-Type: application/json" \
-d '{
"amount": 10000,
"currency": "SAR",
"callback_url": "https://merchant.example/return",
"source": {
"type": "creditcard",
"name": "John Doe",
"number": "4111111111111111",
"month": "12",
"year": "2030",
"cvc": "123",
"save_card": true
}
}'
```
### Response
The payment is returned as `initiated`. The token ID is already present in `source.token` — save it before redirecting the customer.
```json title="POST /v1/payments — initiated response"
{
"id": "760878ec-d1d3-5f72-9056-191683faa872",
"status": "initiated",
"amount": 10000,
"currency": "SAR",
"callback_url": "https://merchant.example/return",
"source": {
"type": "creditcard",
"company": "visa",
"name": "John Doe",
"number": "XXXX-XXXX-XXXX-1111",
"token": "token_qbmmXzo97AESrZLS6KpWvof6uK2hAKcQGfEcKg",
"transaction_url": "https://api.moyasar.com/v1/transaction_auths/..."
}
}
```
Redirect the cardholder to `source.transaction_url`. After 3DS, they are sent to your `callback_url` with the payment ID. Fetch the payment to confirm it is `paid`, then the saved token is `active` and ready for future charges.
## Using the token
See [Charge with a Token](./tokenized-cards) for how to use an `active` token for recurring payments.
---
## Charge with a Token
Once you have an `active` token — from [saving a payment method during a payment](./save-card-in-payment) or from the [default /tokens flow](./create-token#default-flow) — you can use it to charge the customer again without them re-authenticating.
## Create a payment with a token
Only `active` tokens can be used for payments. If the token is `initiated` or `inactive`, the payment will be rejected.
**Endpoint:** `POST /v1/payments`
```json title="POST /v1/payments"
{
"amount": 10000,
"currency": "SAR",
"callback_url": "https://merchant.example/return",
"source": {
"type": "token",
"token": "token_qbmmXzo97AESrZLS6KpWvof6uK2hAKcQGfEcKg"
}
}
```
```bash title="POST /v1/payments"
curl -X POST https://api.moyasar.com/v1/payments \
-u pk_test_YOUR_PUBLISHABLE_KEY: \
-H "Content-Type: application/json" \
-d '{
"amount": 10000,
"currency": "SAR",
"callback_url": "https://merchant.example/return",
"source": {
"type": "token",
"token": "token_qbmmXzo97AESrZLS6KpWvof6uK2hAKcQGfEcKg"
}
}'
```
By default, 3DS is not triggered for token payments — the payment method was already verified when the token was created or saved. Tokens created via the [save-only flow](./create-token#save-only-flow) always trigger 3DS. To explicitly trigger 3DS on other tokens, add `"3ds": true` inside `source`.
### Source parameters
| Field | Required | Description |
| :------- | :------- | :----------------------------------------------------------------------------- |
| `type` | Yes | Must be `"token"` |
| `token` | Yes | The token ID (e.g. `token_...`) |
| `cvc` | No | Card verification code. Some issuers require it for recurring charges |
| `3ds` | No | Set to `true` to force a 3DS challenge. Defaults to `false` |
| `manual` | No | Set to `true` to place the payment in manual capture mode. Defaults to `false` |
## Show the saved payment method to your customer
Fetch the token to display the payment method details — useful for letting customers confirm what they're being charged with.
```bash title="GET /v1/tokens/:id"
curl https://api.moyasar.com/v1/tokens/token_qbmmXzo97AESrZLS6KpWvof6uK2hAKcQGfEcKg \
-u sk_test_YOUR_SECRET_KEY:
```
```json title="Token response"
{
"id": "token_qbmmXzo97AESrZLS6KpWvof6uK2hAKcQGfEcKg",
"status": "active",
"brand": "visa",
"funding": "credit",
"country": "SA",
"month": "12",
"year": "2030",
"name": "John Doe",
"last_four": "1111",
"metadata": null,
"created_at": "2024-01-15T10:00:00.000Z",
"updated_at": "2024-01-15T10:00:00.000Z"
}
```
## Delete a token
When a customer removes a saved payment method, delete the token so it can no longer be charged.
```bash title="DELETE /v1/tokens/:id"
curl -X DELETE https://api.moyasar.com/v1/tokens/token_qbmmXzo97AESrZLS6KpWvof6uK2hAKcQGfEcKg \
-u sk_test_YOUR_SECRET_KEY:
```
A successful deletion returns an empty `204 No Content` response. Tokens are also automatically invalidated when the underlying payment method expires.
## Related
- [Token Status Reference](../../api/other/tokens/token-status-reference.md)
- [Fetch Token](../../api/other/tokens/fetch-token.mdx)
- [Delete Token](../../api/other/tokens/delete-token.md)
---
## Android Compose
# Use with Android Compose
:::warning[important]
To use SDK in `compose` project you need to follow the same steps in `Installation` section, then proceed with the following steps.
:::
The SDK currently provides two types of payment
We can use any of them by first preparing Moyasar's `PaymentRequest` object as follows:
```kotlin
val paymentRequest = PaymentRequest(
apiKey = "pk_test_vcFUHJDBwiyRu4Bd3hFuPpTnRPY4gp2ssYdNJMY3",
amount = 1000, // Amount in the smallest currency unit For example: 10 SAR = 10 * 100 Halalas
currency = "SAR",
description = "Sample Android SDK Payment",
manual = false,
metadata = mapOf(
"order_id" to "order_123"
),
saveCard = false,
buttonType = MoyasarButtonType.PAY, // [determine button title: Optional]; by default, it's set to `MoyasarButtonType.PAY`.
allowedNetworks = listOf(
CreditCardNetwork.Visa,
CreditCardNetwork.Mastercard,
CreditCardNetwork.Mada
) // [set your supported networks: Optional]
)
```
## Credit Card Payments
Then, we initialize and display Moyasar's `PaymentFragment` as follows:
```kotlin
class PayWithMoyasarActivity : AppCompatActivity() {
companion object {
fun startPaymentWithMoyasar(
context: Context,
getResult: ActivityResultLauncher,
) {
val intent = Intent(context, PayWithMoyasarActivity::class.java)
getResult.launch(intent)
}
}
override fun onCreate(savedInstanceState: Bundle?) {
// Other setup code
val paymentFragment = PaymentFragment.newInstance(this.application, paymentConfig) { this.handlePaymentResult(it) }
this.supportFragmentManager.beginTransaction().apply {
// Id for the payment container view
replace(R.id.paymentSheetFragment, paymentFragment)
commit()
}
}
fun handlePaymentResult(result: PaymentResult) {
// ...
}
fun handleCompletedPayment(payment: Payment) {
// ..
}
}
```
:::info
An error will be thrown if the API key format is incorrect.
:::
:::info
You must create a new activity that contains the Moysar UI logic and ensure it extends from `AppCompatActivity`. Then, navigate to this from any `composable` function
:::
And your `composable` function will be like this
```kotlin
@Composable
fun Pay(payData: Any, modifier: Modifier = Modifier) {
val context = LocalContext.current
val startForResult =
rememberLauncherForActivityResult(ActivityResultContracts.StartActivityForResult()) { result: ActivityResult ->
if (result.resultCode == Activity.RESULT_OK) {
val data = result.data
// ... here you can get the payment result
}
}
PayWithMoyasarActivity.startPaymentWithMoyasar(context, startForResult)
}
```
The payment fragment appears as follows::
|  |  |
| :-----------------------------------------------------------------------------------------------------------------------------------: | :--------------------------------------------------------------------------------------------------------------------------------------: |
| Android SDK Dark Arabic | Android SDK Light English |
## 2 - STC Pay Payments integration
Then, we initialize and display Moyasar's `EnterMobileNumberFragment`:
```kotlin
class MainActivity : AppCompatActivity() {
override fun onCreate(savedInstanceState: Bundle?) {
// Other setup code
val enterMobileNumberFragment = EnterMobileNumberFragment.newInstance(this.application, paymentRequest) { this.handlePaymentResult(it) }
this.supportFragmentManager.beginTransaction().apply {
//ID for the payment container view
replace(R.id.paymentSheetFragment, enterMobileNumberFragment)
commit()
}
}
fun handlePaymentResult(result: PaymentResult) {
// ...
}
fun handleCompletedPayment(payment: Payment) {
// ..
}
}
```
:::info
An error will be thrown if the API key format is incorrect.
:::
## Handling Payment Result for (Credit Card or STC Pay)
Now, we can handle the Credit Card payment result as follows:
```kotlin
fun handlePaymentResult(result: PaymentResult) {
when (result) {
is PaymentResult.Completed -> {
handleCompletedPayment(result.payment);
}
is PaymentResult.Failed -> {
// Handle error
val error = result.error;
}
PaymentResult.Canceled -> {
// User has canceled the payment
}
else -> { /* Handle other statuses */ }
}
}
fun handleCompletedPayment(payment: Payment) {
when (payment.status) {
"paid" -> { /* Handle successful payment */ }
"failed" -> {
val errorMessage = payment.source["message"]
/* Handle failed payment */
}
else -> { /* Handle other statuses */ }
}
}
```
:::warning
- A **Completed** payment does not guarantee success; it indicates that the payment process has been finalized successfully.
- You need to check the payment **status** to ensure the payment is successful.
:::
:::info
[Payment Status Reference](../../api/payments/payment-status-reference.md)
:::
:::warning
Ensure that the payment view is removed after obtaining the result.
:::
## Java interoperability
The SDK is developed in **Kotlin** and supports interoperability with Java.
## Demo Example
You can explore the SDK driver demo in the [moyasar-android-sdk](https://github.com/moyasar/moyasar-android-sdk/tree/main/sdkdriver) repository.
---
## Basic Integration(Android)
The SDK currently provides two types of payment
We can use Any of them by first preparing Moyasar's `PaymentRequest` object as follows:
```kotlin
val paymentRequest = PaymentRequest(
givenID = UUID.randomUUID().toString(), // Optional. The payment ID to be created from your side to apply Idempotency (UUID -- v4 is recommended).
apiKey = "pk_test_vcFUHJDBwiyRu4Bd3hFuPpTnRPY4gp2ssYdNJMY3",
amount = 1000, // Amount in the smallest currency unit For example: 10 SAR = 10 * 100 Halalas
currency = "SAR",
description = "Sample Android SDK Payment",
manual = false,
metadata = mapOf(
"order_id" to "order_123"
),
saveCard = false,
buttonType = MoyasarButtonType.PAY, // [determine button title: optional]; by default, it's set to `MoyasarButtonType.PAY`.
allowedNetworks = listOf(
CreditCardNetwork.Visa,
CreditCardNetwork.Mastercard,
CreditCardNetwork.Mada
) // Optional set your supported networks
)
```
:::info
Use the optional parameter `givenID` when you need to apply Idempotency **Retry Payment Creation** if you encounter any of the following:
- A 5xx server error response.
- A network error.
- A timeout error (open, read, or write).
---
- ⚠️ Note: If you ever send the same `givenID` value for different payments, you will receive a 400 response with the error message `Payment is already created`.
- Read more about [Idempotency](../../api/idempotency.md) to understand the `givenID` parameter and avoid duplicate payments.
:::
## 1 - Credit Card Payments integration
Then, we initialize and display Moyasar's `PaymentFragment`:
```kotlin
class MainActivity : AppCompatActivity() {
override fun onCreate(savedInstanceState: Bundle?) {
// Other setup code
val paymentFragment = PaymentFragment.newInstance(this.application, paymentRequest) { this.handlePaymentResult(it) }
this.supportFragmentManager.beginTransaction().apply {
// Id for the payment container view
replace(R.id.paymentSheetFragment, paymentFragment)
commit()
}
}
fun handlePaymentResult(result: PaymentResult) {
// ...
}
fun handleCompletedPayment(payment: Payment) {
// ..
}
}
```
:::info
An error will be thrown if the API key format is incorrect.
:::
The payment fragment appears as follows:
|  |  |
| :-----------------------------------------------------------------------------------------------------------------------------------: | :--------------------------------------------------------------------------------------------------------------------------------------: |
| Android SDK Dark Arabic | Android SDK Light English |
## 2 - STC Pay Payments integration
Then, we initialize and display Moyasar's `EnterMobileNumberFragment`:
```kotlin
class MainActivity : AppCompatActivity() {
override fun onCreate(savedInstanceState: Bundle?) {
// Other setup code
val enterMobileNumberFragment = EnterMobileNumberFragment.newInstance(this.application, paymentRequest) { this.handlePaymentResult(it) }
this.supportFragmentManager.beginTransaction().apply {
// Id for the payment container view
replace(R.id.paymentSheetFragment, enterMobileNumberFragment)
commit()
}
}
fun handlePaymentResult(result: PaymentResult) {
// ...
}
fun handleCompletedPayment(payment: Payment) {
// ..
}
}
```
:::info
An error will be thrown if the API key format is incorrect.
:::
The payment fragments appear as follows:
|  |  |
| :--------------------------------------------------------------------------------------: | :----------------------------------------------------------------------------------: |
| **Enter Phone Dark English** | **Enter OTP Dark English** |
## Handling Payment Result for (Credit Card or STC Pay)
Now, we can handle the Credit Card payment result or STC Pay payment result as follows:
```kotlin
fun handlePaymentResult(result: PaymentResult) {
when (result) {
is PaymentResult.Completed -> {
handleCompletedPayment(result.payment);
}
is PaymentResult.Failed -> {
// Handle error
val error = result.error;
}
PaymentResult.Canceled -> {
// User has canceled the payment
}
else -> { /* Handle other statuses */ }
}
}
fun handleCompletedPayment(payment: Payment) {
when (payment.status) {
"paid" -> { /* Handle successful payment */ }
"failed" -> {
val errorMessage = payment.source["message"]
/* Handle failed payment */
}
else -> { /* Handle other statuses */ }
}
}
```
:::warning
- A **Completed** payment does not guarantee success; it indicates that the payment process has been finalized successfully.
- You need to check the payment **status** to ensure that the payment is successful.
:::
:::info
[Payment Status Reference](../../api/payments/payment-status-reference.md)
:::
:::warning
Ensure that the payment view is removed after obtaining the result.
:::
## Java interoperability
The SDK is developed in **Kotlin** and supports interoperability with Java.
## Demo Example
You can explore the SDK driver demo provided in the [moyasar-android-sdk](https://github.com/moyasar/moyasar-android-sdk/tree/main/sdkdriver) repository.
---
## Changelog
A comprehensive log of notable changes made to the Android SDK.
---
## Version (Latest): 1.0.12
### What's New
- **Features & Improvements**
- support for samsung pay.
- splits feature.
**Pros:**
- Support for using samsung pay method in the Android SDK with very simple steps.
- Payment splitting allows a merchant or platform to divide the payment amount along multiple recipients programmatically
allowing many business models to conduct business while being compliant with SAMA and ZATCA regulations.
---
## Version: 1.0.11
### What's New
- **Features & Improvements**
- Added `apply_coupon` to `PaymentConfig`.
EX : A real-world use case is when the merchant wants to run a promo for first-time customers only. The merchant can set this flag to false in subsequent purchases of the same customer.
- Apply new UI for payment flows.
- Added ProGuard configuration / support to the SDK.
**Pros:**
- Easier coupon application via `PaymentConfig`.
- Improved UX with the new Apply UI.
- Better compatibility & Security with release builds.
---
## Version: 1.0.10
### What's New
- **Bug Fixes**
- Resolved cache issue When user switch between different payment accounts ex: (adds a payment card to a Bahrain-based account, then switches to a Saudi-based account within the same session and tries to add another card.)
- **Improvements**
- we applied some logic to make API key updated in header.
**Pros:**
- More stable and predictable payment flows.
- Fewer crashes and clearer error messages during failures.
- Better compatibility with current Android build tools.
---
## Version: 1.0.9
### What's New
- **Added Support for Payment Creation Idempotency**
- Introduced the `givenID` parameter to the `PaymentRequest` model as an optional field.
- Enables safe retry of payment creation requests without the risk of duplicate charges in the case of network issues.
**Pros:**
- Ensures idempotent payment creation.
- Prevents duplicate transactions during retries.
---
## Version: 1.0.8
### What's New
- **Custom Payment UI Support**
- Added support for fully customized UI for:
- Credit Card payments
- STC Pay payments
**Pros:**
- Design your own payment screens with full control over fonts, colors, styles ... etc.
- Greater flexibility for branding and UX consistency.
---
## Version: 1.0.7
### What's Changed
---
- **Removed Jetifier**
- Jetifier, which converted legacy Android Support libraries to AndroidX, has been removed.
**Pros:**
- Faster builds – Jetifier adds processing overhead; removing it speeds up Gradle builds.
- Smaller APK/AAB size – Fewer redundant dependencies and mappings.
- Cleaner dependency graph – Avoids messy mix of AndroidX and legacy support libraries.
- Modern ecosystem compatibility – Most libraries have dropped support for legacy Android Support, so Jetifier becomes obsolete.
---
- **Migrated to AndroidX**
- All dependencies have been migrated from the old Android Support libraries to AndroidX.
**Pros:**
- Access to latest APIs – AndroidX continues to evolve with Jetpack libraries.
- Better tooling support – Full integration with Android Studio, Lint, R8, etc.
- Improved testing libraries – Jetpack Test libraries are AndroidX-first.
- Security updates & bug fixes – Only AndroidX receives active maintenance.
- Better interop with modern libraries – Most modern Android libraries are built for AndroidX.
---
- **Removed Kotlin Annotation Processing Tool (like KAPT and KS)**
- KAPT has been removed from the build process.
**Pros:**
- Faster builds – No annotation processing = less compile-time work.
- Fewer dependencies – Reduces the risk of version conflicts and simplifies the build.
- Simpler Gradle configuration – One less plugin to manage.
- Cleaner codebase – Moving away from annotation-heavy libraries (e.g., Dagger) often results in more readable code.
---
- **Removed Data Binding from `sdkDriver`**
- Data Binding has been removed in favor of simpler alternatives like ViewBinding or Jetpack Compose.
**Pros:**
- Better runtime performance – No data binding reflection overhead or XML-to-Java bridging.
- Faster builds – Data Binding generates a lot of code at compile time.
- Easier to debug – Plain old ViewBinding or Compose is easier to trace.
- Fewer bugs due to silent failures – Data Binding silently fails on incorrect variable names or types.
- Smaller SDK size – No Data Binding classes or dependency bloat.
---
## Version: 1.0.6
### What's Changed
- **Currency Symbol Update**
- Replaced `SAR` / `﷼` with the localized Saudi currency symbol .
**Pros:**
- Enhances localization and native user experience.
- Aligns with industry conventions and local expectations.
---
## Version: 1.0.5
### What's Fixed
- **Redirect Issue on Some Devices**
- Fixed an issue where navigating between apps on some devices would reset the transaction URL to `null`, causing redirects to fail.
---
## Version: 1.0.4
### What's Improved
- **UI/UX Enhancements**
- General improvements to interface for a smoother user experience.
---
## Version: 1.0.3
### What's Changed
- **Asset Naming**
- Prefixed all asset names with unique identifiers to avoid naming conflicts with third-party SDKs.
- **Fragment Reuse Fix**
- Resolved an issue where stale data persisted during fragment reuse for multiple transactions by properly cleaning up data during reinitialization.
---
## Version: 1.0.2
### What's Changed
- **View Binding Migration**
- Migrated from `DataBinding` to `ViewBinding`.
- **Pros:**
- Simplifies view management.
- Avoids XML changes and improves performance by eliminating runtime reflection.
- **Applied Clean Architecture**
- **Layer Breakdown:**
1. Presentation/UI
- Handles UI logic with `Activity`, `Fragment`, and `ViewModel`.
2. Domain
- Pure Kotlin module containing use cases and repository interfaces.
3. Data
- Manages data sources and repository implementations.
- **Pros:**
- Improves modularity and separation of concerns.
- Easier to test and scale.
- Accelerates feature development.
- **Testing Strategy**
- **Unit Testing:** Covers entities, use cases, and repository logic.
- **Integration Testing:** Validates full data flow between UI and SDK.
---
## Custom UI(Android)
# Full Custom UI Integration
:::warning[important]
To replace the SDK’s default UI with a custom UI (e.g., using your own XML layout, colors, styles, or error screens), follow these steps:
:::
The SDK currently provides two types of payment. We can use any of them by first preparing Moyasar's `PaymentRequest` object as follows:
```kotlin
val paymentRequest = PaymentRequest(
apiKey = "pk_test_vcFUHJDBwiyRu4Bd3hFuPpTnRPY4gp2ssYdNJMY3",
amount = 1000, // Amount in the smallest currency unit For example: 10 SAR = 10 * 100 Halalas
currency = "SAR",
description = "Sample Android SDK Payment",
manual = false,
metadata = mapOf(
"order_id" to "order_123"
),
saveCard = false,
buttonType = MoyasarButtonType.PAY, // [determine button title: Optional]; by default, it's set to `MoyasarButtonType.PAY`.
allowedNetworks = listOf(
CreditCardNetwork.Visa,
CreditCardNetwork.Mastercard,
CreditCardNetwork.Mada
) // [set your supported networks: Optional]
)
```
:::info
- In our demo, you will find a complete example of Custom UI (Credit Card or STC Pay).
- An error will be thrown if the API key format is incorrect.
:::
## Credit Card Payments (Custom UI)
We need to create a new fragment called `CustomUIPaymentFragment` that encapsulates the Moyasar logic and displays it as illustrated in the snippet below.
After that, you will need to observe two LiveData (`inputFieldsValidatorLiveData`, `creditCardStatus`) to handle manage error handling and UI logic.
```kotlin
class PayWithMoyasarActivity : AppCompatActivity() {
companion object {
fun startPaymentWithMoyasar(
context: Context,
getResult: ActivityResultLauncher,
) {
val intent = Intent(context, PayWithMoyasarActivity::class.java)
getResult.launch(intent)
}
}
override fun onCreate(savedInstanceState: Bundle?) {
// Other setup code
val paymentFragment = CustomUIPaymentFragment.newInstance(this.application, paymentConfig) { this.handlePaymentResult(it) }
this.supportFragmentManager.beginTransaction().apply {
// Id for the payment container view
replace(R.id.paymentSheetFragment, paymentFragment)
commit()
}
}
fun handlePaymentResult(result: PaymentResult) {
// ...
}
fun handleCompletedPayment(payment: Payment) {
// ..
}
}
class CustomUIPaymentFragment : Fragment() {
private lateinit var parentActivity: FragmentActivity
private lateinit var binding: FragmentCustomUIPaymentBinding
companion object {
fun newInstance(
application: Application,
paymentRequest: PaymentRequest,
callback: (PaymentResult) -> Unit,
): CustomUIPaymentFragment {
val configError = paymentRequest.validate()
if (configError.any()) {
throw InvalidConfigException(configError)
}
MoyasarAppContainer.initialize(application, paymentRequest, callback)
return CustomUIPaymentFragment()
}
}
override fun onCreateView(
inflater: LayoutInflater, container: ViewGroup?,
savedInstanceState: Bundle?,
): View {
super.onCreateView(inflater, container, savedInstanceState)
parentActivity = requireActivity()
binding = FragmentCustomUIPaymentBinding.inflate(inflater, container, false)
setupObservers()
binding.setupListeners()
return binding.root
}
private fun setupObservers() {
viewModel.creditCardStatus.observe(viewLifecycleOwner, ::handleOnStatusChanged)
viewModel.inputFieldsValidatorLiveData.observe(viewLifecycleOwner) { inputFieldUIModel ->
showInvalidNameErrorMsg(inputFieldUIModel.errorMessage?.nameErrorMsg)
showInvalidCardNumberErrorMsg(inputFieldUIModel.errorMessage?.numberErrorMsg)
showInvalidExpiryErrorMsg(inputFieldUIModel.errorMessage?.expiryDateErrorMsg)
showInvalidCVVErrorMsg(inputFieldUIModel.errorMessage?.cvcErrorMsg)
handleFormValidationState(inputFieldUIModel.isFormValid)
handleShowAllowedCardTypesIcons(inputFieldUIModel.cardNumber)
}
}
}
```
:::info
`CustomUIPaymentFragment` is a newly created fragment built from scratch to encapsulate Moyasar's payment logic.
:::
## STC Pay Payments integration (Custom UI)
We need to implement a custom fragment `EnterMobileNumberCustomUIFragment`, which encapsulates Moyasar’s logic and handles its display.
Upon successful completion of this screen, we should navigate to another custom screen `EnterOTPCustomUIFragment`.
Thus, we need to observe two LiveData (`inputFieldsValidatorLiveData`, `stcPayStatus`) to manage error handling and UI updates.
```kotlin
class MainActivity : AppCompatActivity() {
override fun onCreate(savedInstanceState: Bundle?) {
// Other setup code
val enterMobileNumberFragment = EnterMobileNumberCustomUIFragment.newInstance(this.application, paymentRequest) { this.handlePaymentResult(it) }
this.supportFragmentManager.beginTransaction().apply {
//ID for the payment container view
replace(R.id.paymentSheetFragment, enterMobileNumberFragment)
commit()
}
}
fun handlePaymentResult(result: PaymentResult) {
// ...
}
fun handleCompletedPayment(payment: Payment) {
// ..
}
}
class EnterMobileNumberCustomUIFragment : Fragment() {
private lateinit var binding: FragmentEnterMobileNumberCustomUIBinding
private lateinit var parentActivity: FragmentActivity
companion object {
fun newInstance(
application: Application,
paymentRequest: PaymentRequest,
callback: (PaymentResult) -> Unit,
): EnterMobileNumberCustomUIFragment {
val configError = paymentRequest.validate()
if (configError.any()) {
throw InvalidConfigException(configError)
}
MoyasarAppContainer.initialize(application, paymentRequest, callback)
return EnterMobileNumberCustomUIFragment()
}
}
override fun onCreateView(
inflater: LayoutInflater, container: ViewGroup?,
savedInstanceState: Bundle?,
): View {
super.onCreateView(inflater, container, savedInstanceState)
parentActivity = requireActivity()
binding = FragmentEnterMobileNumberCustomUIBinding.inflate(inflater, container, false)
initView()
setupObservers()
binding.setupListeners()
return binding.root
}
private fun setupObservers() {
viewModel.stcPayStatus.observe(
viewLifecycleOwner,
::handleOnStatusChanged
)
viewModel.inputFieldsValidatorLiveData.observe(viewLifecycleOwner) { inputFieldUIModel ->
showInvalidPhoneErrorMsg(inputFieldUIModel?.stcPayUIModel?.mobileNumberErrorMsg)
handleFormValidationState(viewModel.inputFieldsValidatorLiveData.value?.stcPayUIModel?.isMobileValid)
}
}
}
class EnterOTPCustomUIFragment : Fragment() {
private lateinit var binding: FragmentEnterOTPCustomUIBinding
private lateinit var parentActivity: FragmentActivity
override fun onCreateView(
inflater: LayoutInflater, container: ViewGroup?,
savedInstanceState: Bundle?,
): View {
super.onCreateView(inflater, container, savedInstanceState)
parentActivity = requireActivity()
binding = FragmentEnterOTPCustomUIBinding.inflate(inflater, container, false)
initView()
return binding.root
}
private fun initView() {
binding.progressBar.isVisible = false
setupListeners()
setupObservers()
}
private fun setupListeners() {
binding.payButton.setOnClickListener {
val transactionURL = arguments?.getString(TRANSACTION_URL).orEmpty()
viewModel.submitSTCPayOTP(
transactionURL = transactionURL,
otp = binding.otpEt.text.toString()
)
}
binding.otpEt.doAfterTextChanged { text ->
viewModel.stcPayOTPChanged(text)
}
}
private fun setupObservers() {
viewModel.stcPayStatus.observe(viewLifecycleOwner, ::handleOnStatusChanged)
viewModel.inputFieldsValidatorLiveData.observe(viewLifecycleOwner) { inputFieldUIModel ->
showInvalidOTPErrorMsg(inputFieldUIModel?.stcPayUIModel?.otpErrorMsg)
handleFormValidationState(viewModel.inputFieldsValidatorLiveData.value?.stcPayUIModel?.isOTPValid)
}
}
}
```
## Handling Payment Result for Credit Card / STC Pay
Now, we can handle the Credit Card payment result as follows:
```kotlin
fun handlePaymentResult(result: PaymentResult) {
when (result) {
is PaymentResult.Completed -> {
handleCompletedPayment(result.payment);
}
is PaymentResult.Failed -> {
// Handle error
val error = result.error;
}
PaymentResult.Canceled -> {
// User has canceled the payment
}
else -> { /* Handle other statuses */ }
}
}
fun handleCompletedPayment(payment: Payment) {
when (payment.status) {
"paid" -> { /* Handle successful payment */ }
"failed" -> {
val errorMessage = payment.source["message"]
/* Handle failed payment */
}
else -> { /* Handle other statuses */ }
}
}
```
:::warning
- A **Completed** payment does not guarantee success; it indicates that the payment process has been finalized successfully.
- You need to check the payment **status** to ensure the payment is successful.
:::
:::info
[Payment Status Reference](../../api/payments/payment-status-reference.md)
:::
:::warning
Ensure that the payment view is removed after obtaining the result.
:::
## Java interoperability
The SDK is developed in **Kotlin** and supports interoperability with Java.
## Demo Example
You can explore the SDK driver demo in the [moyasar-android-sdk](https://github.com/moyasar/moyasar-android-sdk/tree/main/sdkdriver) repository.
---
## Installation
This guide will walk you through a straightforward solution to accept payments within your Android application. The Moyasar Android SDK helps you accept multiple payment methods in your app including **Mada**, **Visa**, **MasterCard**, **Amex**, **UnionPay** and **STC-Pay**.
### Installation
Before we can use the SDK, we have to add a couple of things within the `app` module `build.gradle.kts` and `settings.gradle.kts` files.
Add the SDK's hosting repository by adding the following to your `settings.gradle.kts` file:
````kotlin
dependencyResolutionManagement {
// Other configurations
repositories {
// Other repositories
maven {
url = uri("https://jitpack.io")
}
}
}
Now, we can add the SDK dependency in the `dependencies` block inside `build.gradle.kts` file:
```kotlin
dependencies {
// Other dependencies
implementation("com.github.Moyasar:moyasar-android-sdk:1.0.14")
}
````
### Adding permissions
Make sure you have the following permissions in your **Android Manifest**.
```xml
```
---
## Samsung Pay Integration
# Samsung Pay Integration Guide (Android)
This guide walks you through integrating **Samsung Pay** payments into your Android application using the Moyasar Android SDK. Samsung Pay support is provided by the Android SDK package and depends on Samsung's native Pay SDK.
## Prerequisites
Before you begin, ensure you have:
1. **Moyasar account** — [Sign up](https://dashboard.moyasar.com/register/new) if you haven't already
2. **Publishable API key** — [Get your API keys](../../guides/dashboard/get-your-api-keys.md)
3. **Samsung Developer Account** — Create and configure your Samsung Pay service
4. **Moyasar Android SDK** — the SDK publishes artifact coordinates; see Installation below
5. **Samsung Android device** — Samsung Pay works only on Samsung devices (emulators and non-Samsung devices are not supported)
## Samsung Pay Setup
Before integrating in your app, complete the Samsung Pay setup:
1. [Create a Samsung Developer Account](../../guides/samsung-pay/samsung-pay-account.md) and apply for Samsung Pay service
2. Generate and download the **CSR** from [Moyasar Dashboard](https://dashboard.moyasar.com) → **Settings** → **Samsung Certificate** → **Request CSR**
3. Create an **InApp Online Payment** service in [Samsung Pay Service Management](https://pay.samsung.com/developer/projects/prdnsvc)
4. Register your Android app with the **exact package name** you will publish under
5. Note your **Service ID** — you will need it in the SDK configuration
:::tip
Once you complete integration and perform test payments, your Service ID needs to be approved by Samsung Pay. [Contact Moyasar](https://moyasar.com/support) to assist with activation.
:::
## Installation
The SDK is published with groupId `com.moyasar` and artifactId `android-sdk` (the repository's library module includes Samsung Pay integration). As of this writing the SDK version in the repository is `1.0.12` — confirm the latest version in the Android SDK repository/releases before publishing.
Add the dependency to your app module `build.gradle` (Kotlin DSL shown):
```kotlin
dependencies {
implementation("com.moyasar:android-sdk:1.0.12")
}
```
Note: The Moyasar Android SDK bundles the Samsung Pay SDK JAR inside the library (`libs/samsungpay_2.22.00.jar` in the SDK project). You usually do not need to add the Samsung JAR separately.
## Android Configuration
:::important Required for Samsung Pay
Both steps below are **required** for Samsung Pay to work on Android. Without them, the Samsung Pay button will not appear or the payment flow will fail.
:::
### 1. Set Minimum SDK Version
Samsung Pay and the Moyasar SDK require a minimum SDK level. Ensure your app's `minSdkVersion` is at least 21. In `app/build.gradle`:
```gradle
android {
defaultConfig {
minSdkVersion 21
}
}
```
## Implementation
The Moyasar Android SDK exposes helper classes for Samsung Pay under the package `com.moyasar.android.sdk.samsungpay` (the SDK repository includes `data.SamsungPayConfig`, and presentation helpers such as `SamsungPayFragment` and `SamsungPayManager`). Construct a `SamsungPayConfig` with your Service ID and merchant details and use the SDK's presentation components to start the payment flow.
### 1. Configure SamsungPayConfig
Create the configuration object required by the SDK:
```kotlin
val samsungConfig = SamsungPayConfig(
serviceId = "YOUR_SAMSUNG_SERVICE_ID",
merchantName = "YOUR_STORE_NAME",
orderNumber = "ORDER-1234", // optional: max 36 chars, alphanumeric and hyphen
manual = false // true if you want manual capture (authorize-only)
)
```
Parameter notes:
- `serviceId`: Your Samsung Pay Service ID from the Samsung Developer Portal
- `merchantName`: Display name shown to the user during payment
- `orderNumber`: Optional. Unique alphanumeric transaction ID (max 36 chars). If omitted the SDK generates one.
- `manual`: Set to `true` for manual capture (authorize without charging)
### 2. Start the Samsung Pay Flow
The SDK provides presentation helpers in `com.moyasar.android.sdk.samsungpay.presentation` such as `SamsungPayFragment` and `SamsungPayManager` to start the payment UI and handle callbacks. Usage depends on your app architecture (Activity / Fragment). Example (high-level):
```kotlin
// The Android SDK provides Payment with Samsung-Pay:
Using the ready-made Fragment (SamsungPayFragment)
val fragment = SamsungPayFragment.newInstance(application, paymentRequest) { paymentResult: PaymentResult ->
when (paymentResult) {
is PaymentResult.Success -> {
// Payment succeeded
}
is PaymentResult.Failed -> {
// Handle failure/cancellation
}
}
}
supportFragmentManager.beginTransaction()
.replace(R.id.your_container_id, fragment)
.commit()
```
Important: refer to the Android SDK source in `sdk/src/main/java/com/moyasar/android/sdk/samsungpay/presentation` for the precise API and callback types (the project provides `SamsungPayFragment.kt` and `SamsungPayManager.kt`).
## Testing
### Test Environment
1. Use **sandbox API keys** (`pk_test_...`) for testing
2. Test on a **real Samsung Android device** — emulators and simulators do not support Samsung Pay
3. Add a real card to Samsung Wallet on your test device
### Test Amounts
Samsung Pay testing uses **amount-based simulation**. Different amounts return different results (amounts shown in minor units — halalas for SAR):
| Amount (Minor Unit) | Amount (SAR) | Status | Response |
| ------------------- | ------------------ | ---------- | ---------------------- |
| 20000 to 30000 | 200.00 to 300.00 | **paid** | APPROVED |
| 100000 to 110000 | 1000.00 to 1100.00 | **failed** | UNSPECIFIED FAILURE |
| 110100 to 120000 | 1101.00 to 1200.00 | **failed** | INSUFFICIENT FUNDS |
| 120100 to 130000 | 1201.00 to 1300.00 | **failed** | DECLINED: LOST CARD |
| 130100 to 140000 | 1301.00 to 1400.00 | **failed** | DECLINED |
| 140100 to 150000 | 1401.00 to 1500.00 | **failed** | DECLINED: EXPIRED CARD |
See the full [Samsung Pay Testing](../../guides/samsung-pay/testing.md) guide for all test amounts.
:::tip
Use amounts between **20000–30000** (SAR 200–300) to simulate successful payments in the sandbox.
:::
### Running Example
See the Moyasar Android SDK repository for example apps.
## Production Deployment
Before going live:
1. Replace test API keys with **live keys** (`pk_live_...`)
2. Ensure your **package name** matches the one registered in Samsung Pay
3. Complete Samsung Pay service approval with Samsung
4. Verify payment status on your backend for every transaction
5. Test the full flow on a production Samsung device
## Troubleshooting
| Issue | Solution |
| ---------------------------- | --------------------------------------------------------------------------------------------------------------------- |
| Samsung Pay UI not appearing | Ensure you're running on a Samsung device with Samsung Wallet installed and configured |
| "Service ID invalid" | Verify your Service ID in the Samsung Developer Portal and that your app's package name is registered |
| Payment fails immediately | Check that you're using the correct API key (test vs live) and that the amount is in the minor unit (halalas for SAR) |
| Build fails on Android | Ensure `minSdkVersion` is at least 21 and `spay_sdk_api_level` meta-data is present in AndroidManifest |
| Samsung Pay not available | Ensure you are using a recent version of the Moyasar Android SDK that includes Samsung Pay integration. |
## Support
For integration help or Samsung Pay activation:
- [Moyasar Support](https://moyasar.com/support)
- [Moyasar Android SDK on GitHub](https://github.com/moyasar/moyasar-android-sdk)
```
```
---
## Testing(Android)
### Credit Cards
Moyasar provides a sandbox environment for testing credit card payments without charging any real money. This allows you to test your integration and ensure that everything is working correctly before going live with actual payments. Learn more about our testing cards [here](../../guides/card-payments/test-cards.md).
### STC Pay
- Sandbox OTPs
- `123456`: Success
- `000000`: Success
- `111111`: Insufficient Funds
- `222222`: Daily Limit Exceeded
- `333333`: Transaction Limit Exceeded
- `444444`: Timeout
- Other: Invalid OTP
---
## Apple Pay Integration
# Apple Pay Integration Guide
This guide walks you through integrating **Apple Pay** payments into your Flutter application using the Moyasar Flutter SDK. Apple Pay enables users to pay securely using Face ID or Touch ID on supported iOS devices.
## Prerequisites
Before you begin, ensure you have:
1. **Moyasar account** — [Sign up](https://dashboard.moyasar.com/register/new) if you haven't already
2. **Publishable API key** — [Get your API keys](../../guides/dashboard/get-your-api-keys.md)
3. **Apple Developer Account** — With an active subscription
4. **iOS device or simulator** — Apple Pay requires a real device for testing (simulator has limited support)
5. **macOS with Xcode** — Required for iOS configuration
:::info Platform Support
Apple Pay is **iOS only**. The Apple Pay button will not appear on Android. Use [Samsung Pay](./samsung-pay-integration.md) for Android wallet payments.
:::
## Apple Pay Setup
Before integrating in your app, complete the Apple Pay setup:
1. [Create a Merchant ID](https://developer.apple.com/documentation/apple_pay_on_the_web/configuring_your_environment) in your Apple Developer Account
2. [Configure the Payment Processing Certificate](../../guides/apple-pay/apple-developer-account.mdx) with Moyasar. The flow involves four steps (download → upload → download → upload):
- **Step 1 — Download CSR from Moyasar:** Go to [Moyasar Dashboard](https://dashboard.moyasar.com) → **Settings** → **Apple Pay - Certificate** → **Request CSR** → **Download CSR**. Save the `.csr` file to your computer.
- **Step 2 — Upload CSR to Apple:** In [Apple Developer](https://developer.apple.com/account) → your **Merchant ID** → **Apple Pay Payment Processing Certificate** → **Create Certificate** → upload the `.csr` file you downloaded. When asked about China Mainland, select **No**.
- **Step 3 — Download signed certificate from Apple:** After Apple signs it, **Download** the `.cer` file to your computer.
- **Step 4 — Upload to Moyasar:** Go back to Moyasar Dashboard → **Apple Pay - Certificate** → **Upload File** → select the `apple_pay.cer` file → **Upload**. Once it matches, the certificate will be active.
3. [Enable Apple Pay in Xcode](https://help.apple.com/xcode/mac/current/#/dev44ce8ef13) for your app:
- Add the **Apple Pay** capability to your app
- Select your Merchant ID
- Ensure your App ID has Apple Pay enabled in the Apple Developer Portal
4. Note your **Merchant ID** — you will need it for `ApplePayConfig`
:::warning China Mainland
When creating the Payment Processing Certificate in Apple Developer, if asked whether the merchant is in **China Mainland**, select **No**. Moyasar does not support the RSA algorithm used for China.
:::
## Installation
Add the `moyasar` package to your `pubspec.yaml`:
```yaml
dependencies:
moyasar: ^3.0.0 # or the latest version
```
Then run:
```bash
flutter pub get
```
## iOS Configuration
:::important Required for Apple Pay
Apple Pay will not work without the following configuration. The Apple Pay button will not appear if the capability is not enabled.
:::
### Enable Apple Pay Capability in Xcode
1. Open your Flutter project in Xcode: `ios/Runner.xcworkspace`
2. Select the **Runner** target → **Signing & Capabilities**
3. Click **+ Capability** and add **Apple Pay**
4. Under **Merchant IDs**, add your Merchant ID (e.g. `merchant.com.yourapp`)
5. Ensure the Merchant ID matches the one configured in [Moyasar Dashboard](https://dashboard.moyasar.com) and your Apple Developer Account
### Verify Entitlements
Your `ios/Runner/Runner.entitlements` file should include:
```xml
com.apple.developer.in-app-payments
merchant.com.yourapp
```
Replace `merchant.com.yourapp` with your actual Merchant ID.
## Implementation
### 1. Configure ApplePayConfig
Add `ApplePayConfig` to your `PaymentConfig`:
```dart
final paymentConfig = PaymentConfig(
publishableApiKey: 'YOUR_PUBLISHABLE_API_KEY',
amount: 25758, // SAR 257.58 (amount in minor unit: halalas)
description: 'Order #1324',
metadata: {'size': '250g'},
applePay: ApplePayConfig(
merchantId: 'merchant.com.yourapp',
label: 'YOUR_STORE_NAME',
manual: false,
saveCard: false,
),
);
```
| Parameter | Description |
| ---------------------- | ------------------------------------------------------------------------------------------------------------------ |
| `merchantId` | Your Apple Pay Merchant ID (must match Xcode and Apple Developer) |
| `label` | Store name displayed in the Apple Pay sheet |
| `manual` | Set to `true` for [manual payment capture](../../guides/payment-operations/index.mdx) (authorize without charging) |
| `saveCard` | Set to `true` to tokenize the card for later use |
| `merchantCapabilities` | Optional. Default: `["3DS", "debit", "credit"]` |
| `supportedCountries` | Optional. Default: `["SA"]`. ISO 3166 country codes. |
### 2. Add the ApplePay Widget
Use the built-in `ApplePay` widget to display the Apple Pay button:
```dart
class PaymentMethods extends StatelessWidget {
PaymentMethods({super.key});
final paymentConfig = PaymentConfig(
publishableApiKey: 'YOUR_PUBLISHABLE_API_KEY',
amount: 25758,
description: 'Order #1324',
metadata: {'size': '250g'},
applePay: ApplePayConfig(
merchantId: 'merchant.com.yourapp',
label: 'YOUR_STORE_NAME',
manual: false,
saveCard: false,
),
);
void onPaymentResult(result) {
if (result is PaymentResponse) {
switch (result.status) {
case PaymentStatus.paid:
// Payment successful — verify on your backend
break;
case PaymentStatus.failed:
// Payment failed
break;
}
}
}
@override
Widget build(BuildContext context) {
return Column(
children: [
ApplePay(
config: paymentConfig,
onPaymentResult: onPaymentResult,
),
const Text("or"),
CreditCard(
config: paymentConfig,
onPaymentResult: onPaymentResult,
),
],
);
}
}
```
:::info
Always verify the payment on your backend using the [Fetch Payment API](../../api/payments/02-fetch-payment.api.mdx) before fulfilling the order. Never rely solely on the client-side result.
:::
### Custom Apple Pay UI
If you need a custom UI instead of the built-in button, use `Moyasar.pay` with `ApplePayPaymentRequestSource`. See [UI Customizations](./ui_customizations.md) for details.
## Testing
### Test Environment
1. Use **sandbox API keys** (`pk_test_...`) for testing
2. Test on a **real iOS device** — Apple Pay has limited support on simulators
3. Add a real card to Apple Wallet on your test device (or use a sandbox Apple ID with test cards)
### Test Amounts
Apple Pay testing uses **amount-based simulation**. Different amounts return different results:
| Amount (Minor Unit) | Amount (SAR) | Status | Response |
| ------------------- | ------------------ | ---------- | ---------------------- |
| 20000 to 30000 | 200.00 to 300.00 | **paid** | APPROVED |
| 100000 to 110000 | 1000.00 to 1100.00 | **failed** | UNSPECIFIED FAILURE |
| 110100 to 120000 | 1101.00 to 1200.00 | **failed** | INSUFFICIENT FUNDS |
| 120100 to 130000 | 1201.00 to 1300.00 | **failed** | DECLINED: LOST CARD |
| 130100 to 140000 | 1301.00 to 1400.00 | **failed** | DECLINED |
| 140100 to 150000 | 1401.00 to 1500.00 | **failed** | DECLINED: EXPIRED CARD |
See the full [Apple Pay Testing](../../guides/apple-pay/testing.md) guide for all test amounts.
:::tip
Use amounts between **20000–30000** (SAR 200–300) to simulate successful payments in the sandbox.
:::
### Running the Example App
The [moyasar-flutter](https://github.com/moyasar/moyasar-flutter) example app uses product flavors. For Apple Pay:
```bash
flutter run --flavor default_
```
See the [example CONFIGURATION_GUIDE](https://github.com/moyasar/moyasar-flutter/blob/main/example/CONFIGURATION_GUIDE.md) for details.
## Production Deployment
Before going live:
1. Replace test API keys with **live keys** (`pk_live_...`)
2. Ensure your **Merchant ID** in Xcode matches the one in Moyasar Dashboard and Apple Developer
3. Verify the Payment Processing Certificate is active in Moyasar Dashboard
4. Verify payment status on your backend for every transaction
5. Test the full flow on a production device
## Troubleshooting
| Issue | Solution |
| ------------------------------------ | ----------------------------------------------------------------------------------------------------------------- |
| Apple Pay button not showing | Ensure Apple Pay capability is enabled in Xcode, Merchant ID is correct, and you're running on a supported device |
| "Invalid merchant" error | Verify Merchant ID matches across Xcode, Apple Developer Portal, and Moyasar Dashboard |
| Payment fails immediately | Check that the Payment Processing Certificate is uploaded and active in Moyasar Dashboard |
| Certificate errors | Re-upload the signed certificate from Apple Developer to Moyasar. Ensure you selected "No" for China Mainland. |
| Apple Pay not available on simulator | Use a real device for full Apple Pay testing |
## Support
For integration help or Apple Pay setup:
- [Moyasar Support](https://moyasar.com/support)
- [moyasar-flutter GitHub](https://github.com/moyasar/moyasar-flutter)
- [Apple Pay Developer Documentation](https://developer.apple.com/documentation/passkit/apple_pay)
---
## Basic Integration(Flutter)
This guide illustrates the basic integration of Moyasar's Flutter SDK to accept **Credit Card** payments in your Flutter app. For Apple Pay, see the [Apple Pay Integration Guide](./apple-pay-integration.md).
## Configuring a Payment Request
```js
class PaymentMethods extends StatelessWidget {
PaymentMethods({super.key});
final paymentConfig = PaymentConfig(
publishableApiKey: 'YOUR_API_KEY',
amount: 20001, // SAR 200.01
description: 'order #1324',
metadata: {'size': '250g'},
givenID: Uuid().v4(), // Optional. The payment ID to be created from your side to apply Idempotency (UUID -- v4 is recommended).
// Note: The total of all splits must equal the payment amount.
/* splits: [
PaymentSplit(
recipientId: "7d2d0797-a2be-40fe-bb1b-1fdec9824c95",
amount: 8000),
PaymentSplit(
recipientId: "327680bb-d790-4643-8e10-31455a1ab3a6",
amount: 2000,
reference: "optional-reference-for-split-1fcfcbe9-ba75-4eed",
description: "Platform processing fee",
feeSource: true,
refundable: false
)
], */
);
void onPaymentResult(result) {
if (result is PaymentResponse) {
switch (result.status) {
case PaymentStatus.paid:
// handle success.
break;
case PaymentStatus.failed:
// handle failure.
break;
}
}
}
@override
Widget build(BuildContext context) {
return CreditCard(
config: paymentConfig,
onPaymentResult: onPaymentResult,
);
}
}
```
:::info
Use the optional parameter `givenID` when you need to apply Idempotency **Retry Payment Creation** if you encounter any of the following:
- A 5xx server error response.
- A network error.
- A timeout error (open, read, or write).
---
- ⚠️ Note: If you ever send the same `givenID` value for different payments, you will receive a 400 response with the error message `Payment is already created`.
- Read more about [Idempotency](../../api/idempotency.md) to understand the `givenID` parameter and avoid duplicate payments.
:::
## Demo Example
You can explore the demo provided in the [moyasar-flutter](https://github.com/moyasar/moyasar-flutter) repository ( `example` dir ).
---
## Installation(Flutter)
Easily accept payments through **Apple Pay** or **Credit Card** (with managed **3DS** step) in your Flutter app with Moyasar.
## Features
Use this plugin to support:
- **Apple Pay:** Quickly and safely accept Apple Pay payments.
- **Credit Card:** Easily accept many card companies while not worrying about managing the required 3DS step.
## Getting Started
### Prerequisites
#### Accepting Apple Pay Payments on iOS
Complete the following steps to easily accept Apple Pay payments:
- Follow [Apple Pay Using Developer Account](../../guides/apple-pay/apple-developer-account.mdx) to set up your Apple developer account and integrate it with Moyasar.
- Follow [this guide](https://help.apple.com/xcode/mac/9.3/#/deva43983eb7?sub=dev44ce8ef13) to enable accepting Apple Pay in your application using Xcode.
#### Accepting Credit Card Payments on Android
Due to depending on the `flutter_webview` package to manage the 3DS step, make sure to set the correct `minSdkVersion` in `android/app/build.gradle` if it was previously lower than 21:
```gradle
android {
defaultConfig {
minSdkVersion 21
}
}
```
## Installation
```bash
flutter pub get moyasar
```
---
## Samsung Pay Integration(Flutter)
# Samsung Pay Integration Guide
This guide walks you through integrating **Samsung Pay** payments into your Flutter application using the Moyasar Flutter SDK. Samsung Pay support was added in **moyasar v3.0.0** and enables users to pay securely using their Samsung Wallet on supported Samsung Android devices.
## Prerequisites
Before you begin, ensure you have:
1. **Moyasar account** — [Sign up](https://dashboard.moyasar.com/register/new) if you haven't already
2. **Publishable API key** — [Get your API keys](../../guides/dashboard/get-your-api-keys.md)
3. **Samsung Developer Account** — Create and configure your Samsung Pay service
4. **Moyasar Flutter SDK** — v3.0.0 or later (Samsung Pay was added in v3.0.0)
5. **Samsung Android device** — Samsung Pay works only on Samsung devices (emulators and non-Samsung devices are not supported)
## Samsung Pay Setup
Before integrating in your app, complete the Samsung Pay setup:
1. [Create a Samsung Developer Account](../../guides/samsung-pay/samsung-pay-account.md) and apply for Samsung Pay service
2. Generate and download the **CSR** from [Moyasar Dashboard](https://dashboard.moyasar.com) → **Settings** → **Samsung Certificate** → **Request CSR**
3. Create an **InApp Online Payment** service in [Samsung Pay Service Management](https://pay.samsung.com/developer/projects/prdnsvc)
4. Register your Android app with the **exact package name** you will publish under
5. Note your **Service ID** — you will need it for `SamsungPayConfig`
:::tip
Once you complete integration and perform test payments, your Service ID needs to be approved by Samsung Pay. [Contact Moyasar](https://moyasar.com/support) to assist with activation.
:::
## Installation
Samsung Pay is available in **moyasar v3.0.0 and later**. Add the package to your `pubspec.yaml`:
```yaml
dependencies:
moyasar: ^3.0.0 # Samsung Pay requires v3.0.0 or later
```
Then run:
```bash
flutter pub get
```
## Android Configuration
:::important Required for Samsung Pay
Both steps below are **required** for Samsung Pay to work on Android. Without them, the Samsung Pay button will not appear or the payment flow will fail.
:::
### 1. Set Minimum SDK Version
The Moyasar Flutter SDK depends on the `pay` package, which requires `minSdkVersion` 21 or higher. In `android/app/build.gradle`:
```gradle
android {
defaultConfig {
minSdkVersion 21
}
}
```
### 2. Add Samsung Pay Meta-Data
The Samsung Pay SDK requires the `spay_sdk_api_level` meta-data. Add it inside the `` tag in `android/app/src/main/AndroidManifest.xml`:
```xml
```
:::note
The `android:value` should match the Samsung Pay SDK API level. Samsung recommends `2.22` for the latest APIs. For Russia, use `2.17`. See [Samsung Pay SDK Overview](https://developer.samsung.com/pay/native/sdk-overview.html) for details.
:::
## Implementation
### 1. Configure SamsungPayConfig
Add `SamsungPayConfig` to your `PaymentConfig`:
```dart
final paymentConfig = PaymentConfig(
publishableApiKey: 'YOUR_PUBLISHABLE_API_KEY',
amount: 25758, // SAR 257.58 (amount in minor unit: halalas)
description: 'Order #1324',
metadata: {'size': '250g'},
samsungPay: SamsungPayConfig(
serviceId: 'YOUR_SAMSUNG_SERVICE_ID',
merchantName: 'YOUR_STORE_NAME',
manual: false,
),
);
```
| Parameter | Description |
| -------------- | ----------------------------------------------------------------------------------------------------------------------------------- |
| `serviceId` | Your Samsung Pay Service ID from the Samsung Developer Portal |
| `merchantName` | Display name shown to the user during payment |
| `orderNumber` | Optional. Unique alphanumeric transaction ID (max 36 chars). If omitted, SDK generates one. Required for refunds and Visa payments. |
| `manual` | Set to `true` for [manual payment capture](../../guides/payment-operations/index.mdx) (authorize without charging) |
### 2. Add the SamsungPay Widget
Use the built-in `SamsungPay` widget to display the Samsung Pay button:
```dart
class PaymentMethods extends StatelessWidget {
PaymentMethods({super.key});
final paymentConfig = PaymentConfig(
publishableApiKey: 'YOUR_PUBLISHABLE_API_KEY',
amount: 25758,
description: 'Order #1324',
metadata: {'size': '250g'},
samsungPay: SamsungPayConfig(
serviceId: 'YOUR_SAMSUNG_SERVICE_ID',
merchantName: 'YOUR_STORE_NAME',
manual: false,
),
);
void onPaymentResult(result) {
if (result is PaymentResponse) {
switch (result.status) {
case PaymentStatus.paid:
// Payment successful — verify on your backend
break;
case PaymentStatus.failed:
// Payment failed
break;
}
}
}
@override
Widget build(BuildContext context) {
return Column(
children: [
SamsungPay(
config: paymentConfig,
onPaymentResult: onPaymentResult,
),
const Text("or"),
CreditCard(
config: paymentConfig,
onPaymentResult: onPaymentResult,
),
],
);
}
}
```
:::info
Always verify the payment on your backend using the [Fetch Payment API](../../api/payments/02-fetch-payment.api.mdx) before fulfilling the order. Never rely solely on the client-side result.
:::
## Testing
### Test Environment
1. Use **sandbox API keys** (`pk_test_...`) for testing
2. Test on a **real Samsung Android device** — emulators and simulators do not support Samsung Pay
3. Add a real card to Samsung Wallet on your test device
### Test Amounts
Samsung Pay testing uses **amount-based simulation**. Different amounts return different results:
| Amount (Minor Unit) | Amount (SAR) | Status | Response |
| ------------------- | ------------------ | ---------- | ---------------------- |
| 20000 to 30000 | 200.00 to 300.00 | **paid** | APPROVED |
| 100000 to 110000 | 1000.00 to 1100.00 | **failed** | UNSPECIFIED FAILURE |
| 110100 to 120000 | 1101.00 to 1200.00 | **failed** | INSUFFICIENT FUNDS |
| 120100 to 130000 | 1201.00 to 1300.00 | **failed** | DECLINED: LOST CARD |
| 130100 to 140000 | 1301.00 to 1400.00 | **failed** | DECLINED |
| 140100 to 150000 | 1401.00 to 1500.00 | **failed** | DECLINED: EXPIRED CARD |
See the full [Samsung Pay Testing](../../guides/samsung-pay/testing.md) guide for all test amounts.
:::tip
Use amounts between **20000–30000** (SAR 200–300) to simulate successful payments in the sandbox.
:::
### Running the Example App
The [moyasar-flutter](https://github.com/moyasar/moyasar-flutter) example app uses product flavors:
- **Apple Pay / default:** `flutter run --flavor default_`
- **Samsung Pay:** `flutter run --flavor spay`
See the [example CONFIGURATION_GUIDE](https://github.com/moyasar/moyasar-flutter/blob/main/example/CONFIGURATION_GUIDE.md) for details.
## Production Deployment
Before going live:
1. Replace test API keys with **live keys** (`pk_live_...`)
2. Ensure your **package name** matches the one registered in Samsung Pay
3. Complete Samsung Pay service approval with Samsung
4. Verify payment status on your backend for every transaction
5. Test the full flow on a production Samsung device
## Troubleshooting
| Issue | Solution |
| ------------------------------ | --------------------------------------------------------------------------------------------------------------------- |
| Samsung Pay button not showing | Ensure you're running on a Samsung device with Samsung Wallet installed and configured |
| "Service ID invalid" | Verify your Service ID in the Samsung Developer Portal and that your app's package name is registered |
| Payment fails immediately | Check that you're using the correct API key (test vs live) and that the amount is in the minor unit (halalas for SAR) |
| Build fails on Android | Ensure `minSdkVersion` is at least 21 and `spay_sdk_api_level` meta-data is present in AndroidManifest |
| Samsung Pay not available | Ensure you are using **moyasar v3.0.0 or later**. Samsung Pay was not supported in earlier versions. |
## Support
For integration help or Samsung Pay activation:
- [Moyasar Support](https://moyasar.com/support)
- [moyasar-flutter GitHub](https://github.com/moyasar/moyasar-flutter)
---
## STC Pay Integration
# STC Pay Integration Guide
This guide will walk you through integrating STC Pay payments into your Flutter application using the Moyasar Flutter SDK.
## Prerequisites
Before you begin, ensure you have:
1. A Moyasar account with STC Pay enabled
2. Your Moyasar publishable API key
3. Flutter SDK installed (v2.0.17 or later)
## Installation
Add the latest version of the `moyasar` package to your `pubspec.yaml`:
```yaml
dependencies:
moyasar: ^2.1.2 # or the latest version
```
Then run:
```bash
flutter pub get
```
## Implementation
### 1. Add STC Pay Component
```js
// Initialize payment config
final paymentConfig = PaymentConfig(
publishableApiKey: 'YOUR_PUBLISHABLE_API_KEY',
amount: 10000, // 100.00 SAR
description: 'Order #12345',
metadata: {'order_id': '12345'},
);
// In your widget
STCPaymentComponent(
config: paymentConfig,
onPaymentResult: onPaymentResult,
)
// Payment result handler
void onPaymentResult(PaymentResult result) {
if (result is PaymentResponse) {
switch (result.status) {
case PaymentStatus.paid:
print('Payment successful: ${result.id}');
break;
case PaymentStatus.failed:
print('Payment failed: ${result.message}');
break;
case PaymentStatus.initiated:
print('Payment initiated: ${result.id}');
break;
}
}
}
```
## Testing
### Test Environment
1. Use the sandbox environment for testing
2. Enter a valid Saudi mobile number starting with 05
3. For testing OTP:
- Use `123456` for successful payment
- Use `000000` for failed payment
## Error Handling
Handle different payment statuses in your `onPaymentResult` callback:
```js
void onPaymentResult(PaymentResult result) {
if (result is PaymentResponse) {
switch (result.status) {
case PaymentStatus.paid:
// Handle successful payment
ScaffoldMessenger.of(context).showSnackBar(
const SnackBar(content: Text('Payment successful!')),
);
break;
case PaymentStatus.failed:
// Handle failed payment
ScaffoldMessenger.of(context).showSnackBar(
SnackBar(content: Text('Payment failed: ${result.message}')),
);
break;
case PaymentStatus.initiated:
// Handle initiated state (waiting for OTP)
break;
}
} else if (result is PaymentError) {
// Handle errors
ScaffoldMessenger.of(context).showSnackBar(
SnackBar(content: Text('Error: ${result.message}')),
);
}
}
```
## Production Deployment
Before going live:
1. Replace the test API key with your live publishable API key
2. Test the complete payment flow with real STC Pay accounts
3. Ensure you have proper error handling in place
## Support
For any issues or questions, please contact [Moyasar Support](https://moyasar.com/support).
---
## UI Customization
# Custom Payment UI Implementation
:::info
- View [Custom example](https://github.com/moyasar/moyasar-flutter/blob/main/example/lib/widgets/stc_ui_customization.dart) for the full example
:::
## Unified config for Moyasar API
```js
final paymentConfig = PaymentConfig(
publishableApiKey: 'YOUR_API_KEY',
amount: 25758, // SAR 257.58
description: 'order #1324',
metadata: {'size': '250g'},
creditCard: CreditCardConfig(saveCard: true, manual: false),
applePay: ApplePayConfig(
merchantId: 'YOUR_MERCHANT_ID',
label: 'YOUR_STORE_NAME',
manual: false),
);
```
### 1. Custom applePay UI
- Callback once the user clicks on the custom Apple Pay widget
```js
void onSubmitApplePay(applePay) async {
final source = ApplePayPaymentRequestSource(
applePay['token'], (paymentConfig.applePay as ApplePayConfig).manual);
final paymentRequest = PaymentRequest(paymentConfig, source);
final result = await Moyasar.pay(
apiKey: paymentConfig.publishableApiKey,
paymentRequest: paymentRequest);
onPaymentResult(result);
}
```
### 2. Custom Credit Card UI
- Callback once the user fills & submit their CC information using the custom form widget
```js
void onSubmitCcForm() async {
final source = CardPaymentRequestSource(
creditCardData: CardFormModel(
name: 'John Doe',
number: '4111111111111111',
month: '05',
year: '2025'),
tokenizeCard: (paymentConfig.creditCard as CreditCardConfig).saveCard,
manualPayment: (paymentConfig.creditCard as CreditCardConfig).manual);
final paymentRequest = PaymentRequest(paymentConfig, source);
final result = await Moyasar.pay(
apiKey: paymentConfig.publishableApiKey,
paymentRequest: paymentRequest);
onPaymentResult(result);
}
```
### 2. Custom STC UI
```js
// STC Pay Implementation
String? transactionUrl; // Store this as a class variable
final phoneController = TextEditingController();
final otpController = TextEditingController();
// Callback when user submits their mobile number for STC Pay
void onSubmitStcPay() async {
final source = StcRequestSource(
mobile: phoneController.text,
);
final paymentRequest = PaymentRequest(paymentConfig, source);
final result = await Moyasar.pay(
apiKey: paymentConfig.publishableApiKey,
paymentRequest: paymentRequest,
);
if (result is PaymentResponse && result.status == PaymentStatus.initiated) {
final stcResponse = result.source as StcResponseSource;
setState(() {
transactionUrl = stcResponse.transactionUrl;
});
} else {
// Handle error
}
}
// Callback when user submits OTP for STC Pay
void onSubmitStcOtp() async {
if (transactionUrl == null) return;
final otpRequest = OtpRequestSource(
otpValue: otpController.text,
);
final result = await Moyasar.verifyOTP(
transactionURL: transactionUrl!,
otpRequest: otpRequest,
);
onPaymentResult(result);
}
```
## Handling onPaymentResult
- Unified payment result processor
```js
void onPaymentResult(result) {
if (result is PaymentResponse) {
switch (result.status) {
case PaymentStatus.initiated:
// handle 3DS redirection.
break;
case PaymentStatus.paid:
// handle success.
break;
case PaymentStatus.failed:
// handle failure.
break;
}
}
}
```
---
## 1.0 => 2.0
# 1.0 to 2.0
This page will help you upgrade your **Flutter SDK** from v1 to v2.
## Migration Guides
### From 1.0 to 2.0
This upgrade changes how Apple Pay is configured. Do the following changes to complete the upgrade:
- Delete the `default_payment_profile_apple_pay.json` file under your assets file.
- Update the `paymentConfig` instance to include the new `applePay` configuration.
---
## Apple Pay Payments Integration
# Apple Pay Integration
Enable Apple Pay payments for a seamless checkout experience using Face ID or Touch ID.
---
## Prerequisites
- **Moyasar account** — [Sign up](https://dashboard.moyasar.com/register/new)
- **Publishable API key** — [Get your API keys](../../guides/dashboard/get-your-api-keys.md)
- **Apple Developer Account** — With an active membership
- **Physical iOS device** — Apple Pay requires a real device (simulator not supported)
- **Xcode** — For configuring capabilities
---
## Step 1: Configure Apple Pay in Apple Developer Account
### 1.1 Create a Merchant ID
1. Sign in to your [Apple Developer Account](https://developer.apple.com/account)
2. Navigate to **Certificates, Identifiers & Profiles**
3. Select **Identifiers** from the left sidebar
4. Click the **+** button to create a new identifier
5. Select **Merchant IDs** and click **Continue**
6. Enter a description (e.g., "Your App Name Apple Pay")
7. Enter an identifier in the format `merchant.com.yourcompany.yourapp`
8. Click **Continue** then **Register**
### 1.2 Enable Apple Pay Capability for Your App ID
1. In **Certificates, Identifiers & Profiles**, select **Identifiers**
2. Find and select your app's Bundle ID
3. Scroll down to **Capabilities** section
4. Check the box for **Apple Pay**
5. Click **Save**
### 1.3 Create Apple Pay Payment Processing Certificate
1. In your Apple Developer Account, go to **Certificates, Identifiers & Profiles**
2. Select **Merchant IDs** from the left sidebar
3. Click on your Merchant ID
4. Under **Apple Pay Payment Processing Certificate**, click **Create Certificate**
5. You will be asked: "Will payments be processed in China Mainland?" — Select **No** (unless applicable)
6. Download the CSR (Certificate Signing Request) file from Moyasar Dashboard (see Step 2)
7. Upload the CSR file to Apple
8. Download the generated `.cer` certificate file
### 1.4 Add Apple Pay Capability in Xcode
1. Open your project in Xcode
2. Select your app target
3. Go to **Signing & Capabilities** tab
4. Click **+ Capability** and select **Apple Pay**
5. Check the box next to your Merchant ID (`merchant.com.yourcompany.yourapp`)
6. Ensure your team is selected for code signing
---
## Step 2: Configure Apple Pay in Moyasar Dashboard
### 2.1 Download CSR from Moyasar
1. Log in to your [Moyasar Dashboard](https://dashboard.moyasar.com)
2. Navigate to **Settings** → **Apple Pay**
3. Under the **Certificate** section, click **Request CSR**
4. Click **Download CSR** to save the `.csr` file to your computer
### 2.2 Upload CSR to Apple Developer Account
1. Go to [Apple Developer Account](https://developer.apple.com/account) → **Certificates, Identifiers & Profiles**
2. Select **Merchant IDs** and click on your Merchant ID
3. Under **Apple Pay Payment Processing Certificate**, click **Create Certificate**
4. Click **Continue** on the instructions page
5. Upload the `.csr` file you downloaded from Moyasar
6. Click **Continue** then **Download** to get the `.cer` file
### 2.3 Upload Certificate to Moyasar
1. Return to [Moyasar Dashboard](https://dashboard.moyasar.com) → **Settings** → **Apple Pay**
2. Under the **Certificate** section, click **Upload File**
3. Select the `.cer` file you downloaded from Apple
4. Click **Upload** to complete the certificate exchange
### 2.4 Verify Configuration
1. Ensure the certificate status shows as **Active** in Moyasar Dashboard
2. Verify your Merchant ID matches the one configured in Xcode
3. Test with a sandbox card to confirm the integration works
---
## Step 3: Create the Payment Handler
Create a class that conforms to `PKPaymentAuthorizationControllerDelegate`. This handler manages the entire Apple Pay payment flow.
```swift
class ApplePayPaymentHandler: NSObject, PKPaymentAuthorizationControllerDelegate {
private var applePayService: ApplePayService?
private var controller: PKPaymentAuthorizationController?
private let paymentRequest: PaymentRequest
init(paymentRequest: PaymentRequest) throws {
self.paymentRequest = paymentRequest
self.applePayService = try ApplePayService(
apiKey: paymentRequest.apiKey,
baseUrl: paymentRequest.baseUrl
)
}
}
```
---
## Step 4: Present the Apple Pay Sheet
Configure and present the `PKPaymentAuthorizationController`:
```swift
func present() {
let request = PKPaymentRequest()
request.paymentSummaryItems = [
PKPaymentSummaryItem(label: "Your App Name", amount: 200.00, type: .final)
]
request.merchantIdentifier = "merchant.com.yourapp"
request.countryCode = "SA"
request.currencyCode = "SAR"
request.supportedNetworks = [.visa, .mastercard, .mada, .amex, .unionPay]
request.merchantCapabilities = [.capability3DS, .capabilityCredit, .capabilityDebit]
controller = PKPaymentAuthorizationController(paymentRequest: request)
controller?.delegate = self
controller?.present { presented in
print("Apple Pay presented: \(presented)")
}
}
```
---
## Step 5: Handle Payment Authorization
Process the authorized payment through Moyasar:
```swift
/// This delegate method is called when the user authorizes the payment using Face ID, Touch ID, or passcode.
/// It is the most critical part of the integration — you must:
/// 1. Send the Apple Pay token to Moyasar for payment processing
/// 2. Call the completion handler with success or failure status
/// 3. Never leave this method without calling the completion handler (causes Apple Pay sheet to hang)
func paymentAuthorizationController(
_ controller: PKPaymentAuthorizationController,
didAuthorizePayment payment: PKPayment,
handler completion: @escaping (PKPaymentAuthorizationResult) -> Void
) {
Task {
do {
// Ensure the service is initialized before proceeding
guard let applePayService else {
let error = NSError(
domain: "ApplePayError",
code: -1,
userInfo: [NSLocalizedDescriptionKey: "Apple Pay service not initialized"]
)
completion(PKPaymentAuthorizationResult(status: .failure, errors: [error]))
return
}
// Send the Apple Pay token to Moyasar to process and confirm the payment
// The payment.token contains the encrypted payment data from Apple
let result = try await applePayService.authorizePayment(
request: paymentRequest,
token: payment.token
)
switch result.status {
case .paid:
// Payment was successfully processed — dismiss Apple Pay with success animation
if case let .applePay(source) = result.source {
// If you enabled Apple Pay tokenization (saveCard = true in PaymentRequest),
// you can access the tokenized card reference here.
// Contact Moyasar support to enable this feature.
print(source.token ?? "")
}
completion(PKPaymentAuthorizationResult(status: .success, errors: []))
case .failed:
// Payment failed — show error to user
if case let .applePay(source) = result.source {
let error = NSError(
domain: "ApplePayError",
code: -1,
userInfo: [NSLocalizedDescriptionKey: source.message ?? "Payment failed"]
)
completion(PKPaymentAuthorizationResult(status: .failure, errors: [error]))
}
default:
// Unexpected payment status — log and show error
let error = NSError(
domain: "ApplePayError",
code: -1,
userInfo: [NSLocalizedDescriptionKey: "Unexpected payment status"]
)
completion(PKPaymentAuthorizationResult(status: .failure, errors: [error]))
}
} catch {
// Network or API error — show error to user
completion(PKPaymentAuthorizationResult(status: .failure, errors: [error]))
}
}
}
```
> **Note on Tokenization:** If you set `saveCard = true` in your `PaymentRequest` and have Apple Pay tokenization enabled on your Moyasar account, the `source.token` field will contain the tokenized card reference. Contact Moyasar support to enable this feature.
---
## Step 6: Dismiss the Apple Pay Sheet
```swift
func paymentAuthorizationControllerDidFinish(_ controller: PKPaymentAuthorizationController) {
controller.dismiss(completion: nil)
}
```
---
## Step 7: Use the Handler in Your App
First, create the `ApplePayButton` wrapper — a SwiftUI wrapper around Apple's `PKPaymentButton`:
```swift
struct ApplePayButton: UIViewRepresentable {
var action: UIAction
func makeUIView(context: Context) -> PKPaymentButton {
let button = PKPaymentButton(paymentButtonType: .checkout, paymentButtonStyle: .black)
button.addAction(action, for: .touchUpInside)
return button
}
func updateUIView(_ uiView: PKPaymentButton, context: Context) {
// No updates needed for this simple wrapper
}
}
```
Then use it in your view:
```swift
struct ContentView: View {
@State private var handler: ApplePayPaymentHandler?
var body: some View {
ApplePayButton(action: UIAction { _ in
presentApplePay()
})
.frame(height: 50)
}
func presentApplePay() {
do {
// createPaymentRequest() is defined in the Basic Integration guide
handler = try ApplePayPaymentHandler(paymentRequest: createPaymentRequest())
handler?.present()
} catch {
print("Failed to initialize ApplePay: \(error)")
}
}
}
```
```swift
class PaymentViewController: UIViewController {
var handler: ApplePayPaymentHandler?
override func viewDidLoad() {
super.viewDidLoad()
setupApplePayButton()
}
func setupApplePayButton() {
let applePayButton = PKPaymentButton(
paymentButtonType: .checkout,
paymentButtonStyle: .black
)
applePayButton.addAction(UIAction { [weak self] _ in
self?.presentApplePay()
}, for: .touchUpInside)
view.addSubview(applePayButton)
// Add constraints...
}
func presentApplePay() {
do {
// createPaymentRequest() is defined in the Basic Integration guide
handler = try ApplePayPaymentHandler(paymentRequest: createPaymentRequest())
handler?.present()
} catch {
print("Failed to initialize ApplePay: \(error)")
}
}
}
```
---
## Important Notes
- **Always call the completion handler** in `didAuthorizePayment` — failing to do so will cause the Apple Pay sheet to hang
- **Import PassKit** — Required for all Apple Pay functionality
- **Test on a physical device** — Apple Pay does not work in the simulator
- **Use test API keys** — Use `pk_test_` keys for sandbox testing
- **Merchant ID must match** — The Merchant ID in your code must match the one configured in Xcode and Apple Developer Account
---
## Troubleshooting
| Issue | Solution |
| ------------------------------------ | ---------------------------------------------------------------------------- |
| Apple Pay button not showing | Ensure Apple Pay capability is enabled in Xcode and Merchant ID is selected |
| Payment fails with certificate error | Verify the Apple Pay certificate is uploaded and active in Moyasar Dashboard |
| "Merchant ID not found" error | Check that the Merchant ID in code matches Xcode configuration |
| Apple Pay not available on device | Ensure device supports Apple Pay and has a card added to Wallet |
---
## Next Steps
- [Testing Apple Pay](./testing.md) — Test with real cards in sandbox
- [STC Pay Integration](./stc-pay-integration.md) — Add STC Pay support
- [Payment Status Reference](../../api/payments/payment-status-reference.md) — Understand payment statuses
---
## Basic Integration(Ios)
Accept credit card payments using the SDK's built-in `CreditCardView`.
---
## Step 1: Create a Payment Request
Create a `PaymentRequest` with your API key and payment details.
```swift
func createPaymentRequest() -> PaymentRequest {
do {
return try PaymentRequest(
apiKey: "pk_test_YOUR_API_KEY",
amount: 1000, // 10.00 SAR (amount in smallest currency unit)
currency: "SAR",
description: "Order #12345",
metadata: [
"order_id": .stringValue("ios_order_3214124"),
"user_id": .integerValue(12345)
],
manual: false, // Auto-capture (set true to authorize only)
saveCard: false, // Set true to tokenize for recurring payments
givenID: UUID().uuidString, // Optional: for idempotency
// Note: The sum of all split amounts must equal the total payment amount (1000 = 800 + 200)
splits: [ // Optional: payment splitting for marketplace
PaymentSplit(
recipientId: "7d2d0797-a2be-40fe-bb1b-1fdec9824c95",
amount: 800
),
PaymentSplit(
recipientId: "327680bb-d790-4643-8e10-31455a1ab3a6",
amount: 200,
reference: "optional-reference-for-split-1fcfcbe9-ba75-4eed",
description: "Platform processing fee",
feeSource: true,
refundable: false
)
]
)
} catch {
fatalError("Invalid API key: \(error)")
}
}
```
### PaymentRequest Parameters
| Parameter | Type | Required | Description |
| ----------------- | ----------------------- | -------- | ------------------------------------------------------------------------- |
| `apiKey` | String | Yes | Your publishable API key (starts with `pk_test_` or `pk_live_`) |
| `amount` | Int | Yes | Amount in smallest currency unit (e.g., 10 SAR = 1000 Halalas) |
| `currency` | String | Yes | Three-letter ISO currency code (e.g., `"SAR"`) |
| `description` | String | Yes | Payment description shown on the payment page |
| `metadata` | [String: MetadataValue] | No | Custom key-value pairs for tracking |
| `manual` | Bool | No | `true` = authorize only, `false` = authorize + capture (default: `false`) |
| `saveCard` | Bool | No | `true` = generate token for recurring payments (default: `false`) |
| `givenID` | String | No | Unique ID for idempotency (prevents duplicate payments) |
| `allowedNetworks` | [PKPaymentNetwork] | No | Restrict card networks (default: all supported) |
| `payButtonType` | ButtonType | No | Button text style (default: `.pay`) |
| `splits` | [PaymentSplit] | No | Payment splitting for marketplaces (see below) |
### PaymentSplit Parameters
| Parameter | Type | Required | Description |
| ------------- | ------ | -------- | ------------------------------------------------------------------- |
| `recipientId` | String | Yes | The recipient's ID (merchant or platform account) |
| `amount` | Int | Yes | Amount in smallest currency unit to split |
| `reference` | String | No | Custom reference for the split transaction |
| `description` | String | No | Description of the split (e.g., "Platform fee") |
| `feeSource` | Bool | No | `true` = this recipient pays the processing fees (default: `false`) |
| `refundable` | Bool | No | `true` = this split is refundable (default: `true`) |
> **Important:** The sum of all split amounts must equal the total payment amount. For example, if the payment amount is `10000` (100.00 SAR), the splits must add up to exactly `10000`.
---
## Step 2: Add the Credit Card View
```swift
struct ContentView: View {
var body: some View {
CreditCardView(
request: createPaymentRequest()
) { result in
handlePaymentResult(result)
}
}
func handlePaymentResult(_ result: PaymentResult) {
switch result {
case .completed(let payment):
handleCompletedPayment(payment)
case .failed(let error):
handlePaymentError(error)
case .canceled:
print("Payment canceled")
@unknown default:
break
}
}
}
```
```swift
class PaymentViewController: UIViewController {
override func viewDidLoad() {
super.viewDidLoad()
setupCreditCardView()
}
func setupCreditCardView() {
let creditCardView = CreditCardView(
request: createPaymentRequest()
) { result in
self.handlePaymentResult(result)
}
let hostingController = UIHostingController(rootView: creditCardView)
hostingController.view.translatesAutoresizingMaskIntoConstraints = false
addChild(hostingController)
view.addSubview(hostingController.view)
hostingController.didMove(toParent: self)
NSLayoutConstraint.activate([
hostingController.view.topAnchor.constraint(equalTo: view.safeAreaLayoutGuide.topAnchor),
hostingController.view.leadingAnchor.constraint(equalTo: view.leadingAnchor),
hostingController.view.trailingAnchor.constraint(equalTo: view.trailingAnchor),
hostingController.view.bottomAnchor.constraint(equalTo: view.bottomAnchor)
])
}
func handlePaymentResult(_ result: PaymentResult) {
switch result {
case .completed(let payment):
handleCompletedPayment(payment)
case .failed(let error):
handlePaymentError(error)
case .canceled:
print("Payment canceled")
@unknown default:
break
}
}
}
```
---
## Step 3: Handle the Payment Result
```swift
func handleCompletedPayment(_ payment: ApiPayment) {
switch payment.status {
case .paid:
print("Payment successful: \(payment.id)")
// Navigate to success screen
case .failed:
print("Payment failed")
// Show error to user
case .authorized:
print("Payment authorized (not captured)")
// Capture later via API
default:
print("Payment status: \(payment.status)")
}
}
func handlePaymentError(_ error: MoyasarError) {
switch error {
case .apiError(let apiError):
print("API error: \(apiError.message ?? "Unknown")")
case .apiKeyNotSet:
print("API key not configured")
case .networkError:
print("Network connection failed")
case .webviewTimedOut:
print("3DS authentication timed out")
case .webviewUnexpectedError(_, let webError):
print("3DS error: \(webError.localizedDescription)")
default:
print("Unexpected error: \(error)")
}
}
```
### PaymentResult Cases
| Case | Description |
| -------------------------- | ------------------------------------------------ |
| `.completed(ApiPayment)` | Payment flow finished successfully |
| `.failed(MoyasarError)` | Payment failed with an error |
| `.canceled` | User canceled the payment |
| `.saveOnlyToken(ApiToken)` | Token created when `createSaveOnlyToken` is true |
---
## Handling 3DS Authentication Errors
If payment fails during 3DS authentication, the result will be `.failed` with a `webview...` error. The payment may still be `paid` on the server.
```swift
func handlePaymentError(_ error: MoyasarError) {
// Check for 3DS-related errors
switch error {
case .webviewNotConnectedToInternet(let payment),
.webviewTimedOut(let payment),
.webviewUnexpectedError(let payment, _):
// Fetch payment status from API to confirm
fetchPaymentStatus(payment.id)
default:
handlePaymentError(error)
}
}
```
---
## Set Custom Language
The SDK follows the system language by default. Override it to force Arabic or English.
```swift
// Call in AppDelegate (UIKit) or App init (SwiftUI)
MoyasarLanguageManager.shared.setLanguage(.ar) // or .en
```
---
## Next Steps
- [Apple Pay Integration](./apple-pay-payments-integration.mdx) — Add wallet payments
- [STC Pay Integration](./stc-pay-integration.md) — Add STC Pay support
- [Custom Credit Card UI](./custom-credit-card-view.md) — Build your own card form
- [Testing Guide](./testing.md) — Test with sandbox cards
---
## Customizing Credit Card View
# Custom Credit Card UI
Build your own credit card form while using Moyasar's payment processing APIs.
---
## Overview
To create a custom credit card form:
1. Collect card details with your own UI
2. Create an `ApiCreditCardSource` with the card data
3. Submit the payment via `PaymentService`
4. Handle 3DS authentication with a web view
---
## Step 1: Create the Payment Service
```swift
class CustomPaymentViewModel: ObservableObject {
private let paymentService: PaymentService
init() {
paymentService = PaymentService(apiKey: "pk_test_YOUR_API_KEY")
}
}
```
---
## Step 2: Create the Card Source and Payment Request
```swift
// Create the card source from your form inputs
let cardSource = ApiCreditCardSource(
name: "John Doe",
number: "4111111111111111",
month: "09",
year: "25",
cvc: "456",
manual: "false",
saveCard: "false"
)
// Create the payment request
let paymentRequest = try PaymentRequest(
apiKey: "pk_test_YOUR_API_KEY",
amount: 1000,
currency: "SAR",
description: "Order #12345"
)
// Wrap it in an ApiPaymentRequest
let apiPaymentRequest = ApiPaymentRequest(
paymentRequest: paymentRequest,
callbackUrl: "https://sdk.moyasar.com/return",
source: ApiPaymentSource.creditCard(cardSource)
)
```
:::info
Include `"sdk": "ios"` in the `ApiPaymentRequest` metadata when using a custom UI.
:::
---
## Step 3: Submit the Payment
```swift
func submitPayment() async {
do {
let payment = try await paymentService.createPayment(apiPaymentRequest)
await MainActor.run {
start3DSAuthentication(payment)
}
} catch let error as MoyasarError {
print("Payment creation failed: \(error)")
} catch {
print("Unexpected error: \(error)")
}
}
```
---
## Step 4: Handle 3DS Authentication
If the payment requires 3DS authentication, redirect to the transaction URL:
```swift
func start3DSAuthentication(_ payment: ApiPayment) {
// Check if payment is still in initiated state
guard payment.isInitiated() else {
// Payment already completed (paid, failed, authorized, etc.)
return
}
// Extract the transaction URL
guard case let .creditCard(source) = payment.source,
let transactionUrl = source.transactionUrl,
let url = URL(string: transactionUrl) else {
return
}
// Present your web view with the 3DS URL
present3DSWebView(url)
}
```
---
## Step 5: Present the 3DS Web View
Create a web view to handle the 3DS authentication flow:
```swift
struct PaymentAuthView: UIViewRepresentable {
let url: URL
let onResult: (WebViewResult) -> Void
func makeUIView(context: Context) -> WKWebView {
let webView = WKWebView()
webView.navigationDelegate = context.coordinator
webView.load(URLRequest(url: url))
return webView
}
func updateUIView(_ uiView: WKWebView, context: Context) {}
func makeCoordinator() -> Coordinator {
Coordinator(onResult: onResult)
}
class Coordinator: NSObject, WKNavigationDelegate {
let onResult: (WebViewResult) -> Void
init(onResult: @escaping (WebViewResult) -> Void) {
self.onResult = onResult
}
func webView(_ webView: WKWebView, didFinish navigation: WKNavigation!) {
// Check if URL matches callback URL to detect completion
if let url = webView.url, url.absoluteString.contains("sdk.moyasar.com/return") {
// Parse the result from URL parameters
// Call onResult with the appropriate WebViewResult
}
}
}
}
```
---
## Step 6: Handle the Web View Result
```swift
func handleWebViewResult(_ result: WebViewResult) {
switch result {
case .completed(let info):
// Update your payment object with the result
currentPayment?.status = ApiPaymentStatus(rawValue: info.status)
if currentPayment?.status == .paid {
print("Payment successful: \(currentPayment!.id)")
} else if case let .creditCard(source) = currentPayment?.source {
print("Payment failed: \(source.message ?? "Unknown")")
}
case .failed(let error):
print("3DS authentication failed: \(error.localizedDescription)")
}
}
```
---
## Complete Example
See the full implementation in the demo projects:
- [SwiftUI Custom View Example](https://github.com/moyasar/moyasar-ios-sdk/tree/master/SwiftUiDemo/SwiftUiDemo/Custom%20View)
- [UIKit Custom View Example](https://github.com/moyasar/moyasar-ios-sdk/tree/master/UIKitDemo/UIKitDemo)
---
## Next Steps
- [Testing Guide](./testing.md) — Test with sandbox cards
- [Payment Status Reference](../../api/payments/payment-status-reference.md) — Understand payment statuses
---
## Customizing STC Pay
# Custom STC Pay UI
Build your own STC Pay form while using the SDK's `STCPayViewModel` for payment processing.
---
## Overview
The `STCPayViewModel` exposes all the logic you need for STC Pay payments. Your custom view only needs to:
1. Display the appropriate step (mobile number or OTP)
2. Call the view model's methods
3. Listen to published state changes
---
## Step 1: Create a Payment Request
```swift
func createSTCPaymentRequest() -> PaymentRequest {
do {
return try PaymentRequest(
apiKey: "pk_test_YOUR_API_KEY",
amount: 1000,
currency: "SAR",
description: "Order #12345",
metadata: [
"order_id": .stringValue("ios_order_3214124")
]
)
} catch {
fatalError("Invalid API key: \(error)")
}
}
```
---
## Step 2: Create Your Custom View
Initialize your view with a `PaymentRequest` and a result callback:
```swift
struct MyCustomSTCPayView: View {
@ObservedObject var viewModel: STCPayViewModel
init(paymentRequest: PaymentRequest, callback: @escaping STCResultCallback) {
self._viewModel = ObservedObject(
wrappedValue: STCPayViewModel(
paymentRequest: paymentRequest,
resultCallback: callback
)
)
}
var body: some View {
VStack(spacing: 16) {
switch viewModel.screenStep {
case .mobileNumber:
phoneStep
case .otp:
otpStep
}
}
.padding()
}
}
```
---
## Step 3: Build the Mobile Number Step
```swift
private var phoneStep: some View {
VStack(alignment: .leading, spacing: 12) {
Text("Mobile Number")
.font(.headline)
TextField("05XXXXXXXX", text: $viewModel.mobileNumber)
.keyboardType(.phonePad)
.textFieldStyle(.roundedBorder)
if !viewModel.isValidPhoneNumber && viewModel.showErrorHintView.value {
Text("Invalid phone number")
.foregroundColor(.red)
.font(.caption)
}
Button(action: {
Task {
await viewModel.initiatePayment()
}
}) {
if viewModel.isLoading {
ProgressView()
} else {
Text("Pay")
.frame(maxWidth: .infinity)
}
}
.disabled(!viewModel.isValidPhoneNumber)
.buttonStyle(.borderedProminent)
}
}
```
---
## Step 4: Build the OTP Step
```swift
private var otpStep: some View {
VStack(alignment: .leading, spacing: 12) {
Text("Enter OTP")
.font(.headline)
TextField("XXXXXX", text: $viewModel.otp)
.keyboardType(.numberPad)
.textFieldStyle(.roundedBorder)
if !viewModel.isValidOtp && viewModel.showErrorHintView.value {
Text("Invalid OTP")
.foregroundColor(.red)
.font(.caption)
}
Button(action: {
Task {
await viewModel.submitOtp()
}
}) {
if viewModel.isLoading {
ProgressView()
} else {
Text("Confirm")
.frame(maxWidth: .infinity)
}
}
.disabled(!viewModel.isValidOtp)
.buttonStyle(.borderedProminent)
}
}
```
---
## STCPayViewModel Properties
### Published Properties
| Property | Type | Description |
| -------------------- | ------- | --------------------------------------------- |
| `mobileNumber` | String | User's phone number (bind to your text field) |
| `otp` | String | User's OTP code (bind to your text field) |
| `screenStep` | STCStep | Current step: `.mobileNumber` or `.otp` |
| `isLoading` | Bool | True while a network request is in progress |
| `isValidPhoneNumber` | Bool | True if phone number passes validation |
| `isValidOtp` | Bool | True if OTP passes validation |
| `showErrorHintView` | Bool | Whether to show error hints |
### Methods
| Method | Description |
| ------------------- | ---------------------------------------------------- |
| `initiatePayment()` | Submit the mobile number to initiate STC Pay payment |
| `submitOtp()` | Submit the OTP to complete the payment |
---
## Step 5: Handle the Payment Result
```swift
func handleSTCResult(_ result: Result) {
switch result {
case .success(let payment):
switch payment.status {
case .paid:
print("STC Pay successful: \(payment.id)")
case .failed:
print("STC Pay failed")
default:
print("STC Pay status: \(payment.status)")
}
case .failure(let error):
print("STC Pay error: \(error)")
}
}
```
---
## Complete Examples
See the full implementations in the demo projects:
- [SwiftUI Custom STC Pay Example](https://github.com/moyasar/moyasar-ios-sdk/blob/master/SwiftUiDemo/SwiftUiDemo/Custom%20View/CustomSTCPayView.swift)
- [UIKit Custom STC Pay Example](https://github.com/moyasar/moyasar-ios-sdk/blob/master/UIKitDemo/UIKitDemo/CustomSTCPayView.swift)
---
## Next Steps
- [Testing Guide](./testing.md) — Test with sandbox OTP codes
- [Payment Status Reference](../../api/payments/payment-status-reference.md) — Understand payment statuses
---
## Installation(Ios)
Install the Moyasar iOS SDK using **CocoaPods** or **Swift Package Manager (SPM)**.
## Requirements
- iOS 13.0+
- Xcode 16+
- Swift 5.7+
---
## Option 1: CocoaPods
### Step 1: Install CocoaPods (if not already installed)
```shell brew install cocoapods ```
```shell gem install cocoapods ```
### Step 2: Initialize CocoaPods in your project
```shell
pod init
```
### Step 3: Add the Moyasar SDK to your `Podfile`
```ruby
use_frameworks!
pod 'MoyasarSdk', git: 'https://github.com/moyasar/moyasar-ios-pod.git'
```
### Step 4: Install the pod
```shell
pod install
```
---
## Option 2: Swift Package Manager (SPM)
### Step 1: Add the package
In Xcode, navigate to **File > Add Packages...** and enter the repository URL:
```
https://github.com/moyasar/moyasar-ios-sdk
```
### Step 2: Add the dependency to your target
Select the **MoyasarSdk** package and add it to your app target.
---
## Verify Installation
Import the SDK in your Swift file:
```swift
```
---
## Next Steps
- [Basic Integration](./basic-integration.mdx) — Accept your first payment
- [Apple Pay](./apple-pay-payments-integration.mdx) — Add wallet payments
- [STC Pay](./stc-pay-integration.md) — Add STC Pay support
---
## STC Pay Integration(Ios)
Accept payments via STC Pay using the SDK's built-in `STCPayView`.
---
## Step 1: Create a Payment Request
Create a `PaymentRequest` configured for STC Pay:
```swift
func createSTCPaymentRequest() -> PaymentRequest {
do {
return try PaymentRequest(
apiKey: "pk_test_YOUR_API_KEY",
amount: 1000, // 10.00 SAR (amount in smallest currency unit)
currency: "SAR",
description: "Order #12345",
metadata: [
"order_id": .stringValue("ios_order_3214124"),
"user_id": .integerValue(12345)
],
manual: false,
saveCard: false
)
} catch {
fatalError("Invalid API key: \(error)")
}
}
```
---
## Step 2: Add the STC Pay View
```swift
struct STCPayScreen: View {
var body: some View {
STCPayView(
paymentRequest: createSTCPaymentRequest()
) { result in
handleSTCResult(result)
}
}
func handleSTCResult(_ result: Result) {
switch result {
case .success(let payment):
handleSTCPayment(payment)
case .failure(let error):
handleSTCError(error)
}
}
}
```
```swift
class STCPayViewController: UIViewController {
override func viewDidLoad() {
super.viewDidLoad()
setupSTCPayView()
}
func setupSTCPayView() {
let stcPayView = STCPayView(
paymentRequest: createSTCPaymentRequest()
) { result in
self.handleSTCResult(result)
}
let hostingController = UIHostingController(rootView: stcPayView)
hostingController.view.translatesAutoresizingMaskIntoConstraints = false
addChild(hostingController)
view.addSubview(hostingController.view)
hostingController.didMove(toParent: self)
NSLayoutConstraint.activate([
hostingController.view.topAnchor.constraint(equalTo: view.safeAreaLayoutGuide.topAnchor),
hostingController.view.leadingAnchor.constraint(equalTo: view.leadingAnchor),
hostingController.view.trailingAnchor.constraint(equalTo: view.trailingAnchor),
hostingController.view.bottomAnchor.constraint(equalTo: view.bottomAnchor)
])
}
func handleSTCResult(_ result: Result) {
switch result {
case .success(let payment):
handleSTCPayment(payment)
case .failure(let error):
handleSTCError(error)
}
}
}
```
---
## Step 3: Handle the Payment Result
```swift
func handleSTCPayment(_ payment: ApiPayment) {
switch payment.status {
case .paid:
print("STC Pay successful: \(payment.id)")
// Navigate to success screen
case .failed:
print("STC Pay failed")
// Show error to user
default:
print("STC Pay status: \(payment.status)")
}
}
func handleSTCError(_ error: MoyasarError) {
switch error {
case .apiError(let apiError):
print("API error: \(apiError.message ?? "Unknown")")
case .networkError:
print("Network connection failed")
default:
print("STC Pay error: \(error)")
}
}
```
---
## STC Pay Flow
The STC Pay payment flow consists of two steps:
1. **Mobile Number Entry** — User enters their STC Pay registered phone number
2. **OTP Verification** — User enters the OTP received via SMS
The `STCPayView` handles this flow automatically. For custom UI implementation, see [Customizing STC Pay](./custom-stc-pay.md).
---
## Next Steps
- [Customizing STC Pay](./custom-stc-pay.md) — Build your own STC Pay UI
- [Testing Guide](./testing.md) — Test with sandbox OTP codes
- [Payment Status Reference](../../api/payments/payment-status-reference.md) — Understand payment statuses
---
## Testing(Ios)
Test your integration using Moyasar's sandbox environment. No real money is charged.
---
## Test API Key
Use your test API key (starts with `pk_test_`) for sandbox testing:
```swift
apiKey: "pk_test_YOUR_TEST_KEY"
```
[Get your API keys](../../guides/dashboard/get-your-api-keys.md)
---
## Credit Card Testing
Use the [Moyasar test cards](../../guides/card-payments/test-cards.md) for sandbox credit card payments.
### Common Test Cards
| Card Number | Expected Result |
| --------------------- | --------------------------- |
| `4111 1111 1111 1111` | Success |
| `4000 0000 0000 0002` | Requires 3DS authentication |
| `5555 5555 5555 4444` | Success (Mastercard) |
### Test Card Details
When using test cards, you can use any:
- **Expiry date** in the future
- **CVV** (3 digits)
- **Cardholder name**
---
## Apple Pay Testing
:::warning
Apple Pay testing **requires a physical device**. The simulator does not support Apple Pay.
:::
### Setup for Testing
1. Use a **test API key** (`pk_test_`)
2. Add your **actual card** to the device's Wallet app
3. No real charges will be processed in the test environment
### Why Apple Pay Requires a Physical Device
| Limitation | Description |
| ---------------------------- | ------------------------------------------------------------------ |
| **Secure Element** | Apple Pay uses a hardware component not available in the simulator |
| **Card Provisioning** | Real cards must be added to Wallet, which the simulator cannot do |
| **Biometric Authentication** | Face ID / Touch ID require physical hardware |
| **NFC** | Contactless payment simulation is not supported in the simulator |
See [Apple Pay Testing Guide](../../guides/apple-pay/testing.md) for detailed testing steps.
---
## STC Pay Testing
Use the sandbox OTP codes to test different STC Pay scenarios:
| OTP | Result |
| --------- | -------------------------- |
| `123456` | Success |
| `000000` | Success |
| `111111` | Insufficient Funds |
| `222222` | Daily Limit Exceeded |
| `333333` | Transaction Limit Exceeded |
| `444444` | Timeout |
| Any other | Invalid OTP |
---
## Next Steps
- [Basic Integration](./basic-integration.mdx) — Accept your first payment
- [Apple Pay Integration](./apple-pay-payments-integration.mdx) — Add wallet payments
- [STC Pay Integration](./stc-pay-integration.md) — Add STC Pay support
---
## Basic Integration(React-native)
We will walk you through the basic integration of Moyasar's React Native SDK to accept payments through **Apple Pay**, **Credit Card**, **Stc Pay** or **Samsung Pay** in your React Native app.
## Configuring a Payment
We need to prepare a `PaymentConfig` object:
```typescript
ApplePay,
ApplePayConfig,
CreditCard,
CreditCardConfig,
GeneralError,
NetworkEndpointError,
NetworkError,
PaymentConfig,
PaymentResponse,
PaymentStatus,
StcPay,
SamsungPay,
SamsungPayConfig,
TokenResponse,
PaymentResult,
UnexpectedError,
PaymentSplit,
} from 'react-native-moyasar-sdk';
const paymentConfig = new PaymentConfig({
givenId: 'PAYMENT_UNIQUE_ID', // Optional. A UUID for the payment provided by you to support Idempotency, UUID v4 is recommended
publishableApiKey: 'YOUR_PUBLISHABLE_API_KEY', // Your Moyasar public API key
// Amount in the smallest currency unit.
// For example:
// 10 SAR = 10 * 100 Halalas which will be 1000 in the amount field
// 10 KWD = 10 * 1000 Fils which will be 10000 in the amount field
// 10 JPY = 10 JPY (Japanese Yen does not have fractions) which will be 10 in the amount field
baseUrl: 'MOYASAR_BASE_URL', // Optional. When you need to use a different Moyasar environment (e.g. Staging)
amount: 20000, // 20000 Halalas = 200.00 SAR
currency: 'SAR', // Optional (default: SAR)
merchantCountryCode: 'SA', // Optional. Specify your merchant's principle place of business for Apple Pay and Samsung Pay (default: SA)
description: 'order #1324',
metadata: { size: '250 g' }, // Optional
supportedNetworks: ['mada', 'visa', 'mastercard', 'amex', 'unionpay'], // Optional
creditCard: new CreditCardConfig({ saveCard: false, manual: false }), // Optional
applePay: new ApplePayConfig({
// Required for Apple Pay payments
merchantId: 'YOUR_MERCHANT_ID',
label: 'YOUR_STORE_NAME',
manual: false, // Optional (default: false)
saveCard: false, // Optional. For card tokenization (default: false)
}),
createSaveOnlyToken: false, // Optional. For save only token flow
samsungPay: new SamsungPayConfig({
// Required for Samsung Pay payments
serviceId: 'YOUR_SERVICE_ID', // Your Samsung Pay service ID in the Samsung Pay Merchant dashboard
merchantName: 'YOUR_STORE_NAME',
orderNumber: 'TRANSACTION_ORDER_NUMBER', // Optional (default: random UUID)
manual: false, // Optional (default: false)
saveCard: false, // Optional. For card tokenization (default: false)
}),
applyCoupon: true, // Control the coupon application (based on the BIN). This key is required only if you don't want to apply the coupon. Defaults to true
splits: [
// Optional array of `PaymentSplit` object used to distribute the charged amount (in the smallest currency unit) among multiple recipients or to collect a platform fee
new PaymentSplit({
recipientId: 'RECIPIENT_ID', // Required
amount: 10000, // Required
reference: 'REFERENCE_STRING', // Optional
description: 'Platform processing fee', // Optional
feeSource: true, // Optional. To mark the split as a fee/commission taken by the platform
refundable: true, // Optional. To control whether a split amount is refundable (`true`/`false`). Leave it to use the backend's default
}),
new PaymentSplit({
recipientId: 'RECIPIENT_ID',
amount: 10000,
}),
],
});
```
:::info
- The `orderNumber` for Samsung Pay is needed for refunds, chargebacks, and Visa card payments. If you do not provide it, a random UUID will be generated. It will appear in the response's `metadata` in a `samsungpay_order_id` field upon a successful payment (e.g. paymentResult.metadata.samsungpay_order_id).
- When `saveCard` (tokenization) is enabled, the response includes a `token` field in the `source` object (e.g., paymentResult.source.token).
- Use the optional parameter `givenId` when you need to apply Idempotency **Retry Payment Creation** if you encounter any of the following:
- A 5xx server error response.
- A network error.
- A timeout error (open, read, or write).
---
- ⚠️ Note: If you ever send the same `givenId` value for different payments, you will receive a 400 response with the error message `Payment is already created`.
- Read more about [Idempotency](../../api/idempotency.md) to understand the `givenId` parameter and avoid duplicate payments.
:::
## Configuring Components
You can now configure the Credit Card, Apple Pay, Samsung Pay and Stc Pay components in your view as shown in the following example:
```typescript
function onPaymentResult(paymentResult: PaymentResult) {
// ...
}
function PaymentView() {
return (
);
}
```
:::info
- You can customize the Credit Card, Apple Pay and Stc Pay components by utlizing the `style` parameter. [Learn more](customize-ui)
- If you want to support Samsung Pay, make sure you have [configured it](installation#samsung-pay-configuration).
:::
## Handling Payment Result
Now, we can handle Credit Card, Apple Pay, Samsung Pay and Stc Pay payments result as follows:
```typescript
function onPaymentResult(paymentResult: PaymentResult) {
if (paymentResult instanceof PaymentResponse) {
switch (paymentResult.status) {
case PaymentStatus.paid:
// Handle success
break;
case PaymentStatus.failed:
// Handle failure
break;
// Handle other statuses if needed
}
} else if (paymentResult instanceof TokenResponse) {
// Not needed if not utilizing 'createSaveOnlyToken' flow
// Handle token response
} else {
// Handle error
if (paymentResult instanceof NetworkEndpointError) {
} else if (paymentResult instanceof NetworkError) {
} else if (paymentResult instanceof GeneralError) {
} else if (paymentResult instanceof UnexpectedError) {
}
}
}
```
:::info
- Make sure to dismiss Moyasar’s components after getting the result.
- You can find payment statuses here: [Payment Status Reference](../../api/payments/payment-status-reference.md)
:::
### Migration guide
Visit [changelog](changelog) page for migration guide from previous versions.
---
## Build Your Own UI
We provide the flexibility to build your own UI for accepting payments in your React Native app.
:::important
Make sure you have visited both [Installation & Configuration](installation) and [Basic Integration](basic-integration) documents before proceeding with building your own UI.
:::
:::info
- You can checkout payment and errors handling here: [Payment Handling](./basic-integration.md#handling-payment-result)
- You can checkout Moyasar's APIs for all kinds of below payments [here](/category/payments-api) and [here](/category/other-apis).
- Learn more about [Idempotency](../../api/idempotency.md) to avoid duplicate payments.
:::
## Build Your Own Credit Card UI
We need to prepare the `CreditCardRequestSource` and `PaymentRequest` objects as follows:
```typescript
createPayment,
CreditCardRequestSource,
PaymentRequest,
PaymentResponse,
CreditCardResponseSource,
PaymentStatus,
} from 'react-native-moyasar-sdk';
const ccSource = new CreditCardRequestSource({
name: 'John Doe',
number: '4111111111111111',
cvc: '123',
month: '12',
year: '28',
tokenizeCard: false, // Set to true if you want to save (tokenize) the card after a successful payment.
manualPayment: false,
});
const ccPaymentRequest = new PaymentRequest({
givenId: 'UUID_V4', // Optional. A UUID for the payment provided by you to support Idempotency, UUID v4 is recommended. It is going be the ID of the created payment.
baseUrl: 'MOYASAR_BASE_URL', // Optional. When you need to use a different Moyasar environment (e.g. Staging).
amount: 1000,
currency: 'SAR',
description: 'Test payment',
metadata: { size: '250 g' },
source: ccSource,
callbackUrl: 'https://example.com/callback', // Replace with the URL to be redirected to after a 3D secure transaction.
applyCoupon: true, // Control the coupon application (based on the BIN). This key is required only if you don't want to apply the coupon. Defaults to true.
splits: [], // Optional array of `PaymentSplit` object used to distribute the charged amount (in the smallest currency unit) among multiple recipients or to collect a platform fee.
});
```
Next, call the `createPayment` function with the `ccPaymentRequest` object and your public API key, then handle the response:
```typescript
const paymentResponse = await createPayment(ccPaymentRequest, 'YOUR_PUBLISHABLE_API_KEY');
if (paymentResponse instanceof PaymentResponse) {
if (paymentResponse.status != PaymentStatus.initiated) {
// Handle cases where payment status could be paid, failed, authorized, etc...
return;
}
// Start the 3D secure webview process
startCcPaymentAuthProcess(paymentResponse);
} else {
// Handle MoyasarError cases
}
async function startCcPaymentAuthProcess(paymentResponse: PaymentResponse) {
if (paymentResponse.source instanceof CreditCardResponseSource) {
// Show the 3D secure webview using the URL in `paymentResponse.source.transactionUrl`
} else {
// Handle unexpected Credit Card payment error
}
}
```
After showing the 3D secure webview, listen for a redirection to your provided callback URL above and extract the following values:
```typescript
if (url.host === callbackUrlHost) {
const id = url.searchParams.get('id') ?? '';
const status = url.searchParams.get('status') ?? '';
const message = url.searchParams.get('message') ?? '';
// Handle the new payment status where it could be paid, failed, authorized, etc...
}
```
:::info
- You can utilize our `WebviewPaymentAuth` component for handling the 3D Secure webview.
- Refer to [this document](../../guides/card-payments/basic-integration.mdx#step-4-verify-payment) to verify the payment after the 3D secure flow.
:::
## Build Your Own Apple Pay Button
We need to prepare the `ApplePayRequestSource` and `PaymentRequest` objects as follows:
```typescript
ApplePayRequestSource,
createPayment,
PaymentRequest,
PaymentResponse,
} from 'react-native-moyasar-sdk';
const applePaySource = new ApplePayRequestSource({
applePayToken: 'APPLE_PAY_PAYMENT_TOKEN', // Replace with actual Apple Pay payment token from Apple Pay APIs.
manualPayment: false,
saveCard: false, // Set to true if you want to save (tokenize) the card after a successful payment.
});
const applePayPaymentRequest = new PaymentRequest({
givenId: 'UUID_V4', // Optional. A UUID for the payment provided by you to support Idempotency, UUID v4 is recommended. It is going be the ID of the created payment.
baseUrl: 'MOYASAR_BASE_URL', // Optional. When you need to use a different Moyasar environment (e.g. Staging).
amount: 20000,
currency: 'SAR',
description: 'Test payment',
metadata: { size: '250 g' },
source: applePaySource,
applyCoupon: true, // Control the coupon application (based on the BIN). This key is required only if you don't want to apply the coupon. Defaults to true.
splits: [], // Optional array of `PaymentSplit` object used to distribute the charged amount (in the smallest currency unit) among multiple recipients or to collect a platform fee.
});
```
Next, call the `createPayment` function with the `applePayPaymentRequest` object and your public API key, then handle the response:
```typescript
const paymentResponse = await createPayment(applePayPaymentRequest, 'YOUR_PUBLISHABLE_API_KEY');
```
:::info
- Checkout how to extract the Apple Pay payment token from the Apple Pay APIs [here](../../guides/apple-pay/apple-pay-ios.md#payment-authorization).
:::
## Build Your Own Samsung Pay Button
We need to prepare the `SamsungPayRequestSource` and `PaymentRequest` objects as follows:
```typescript
createPayment,
SamsungPayRequestSource,
PaymentRequest,
PaymentResponse,
} from 'react-native-moyasar-sdk';
const samsungPaySource = new SamsungPayRequestSource({
samsungPayToken: 'SAMSUNG_PAY_PAYMENT_TOKEN', // Replace with actual Samsung Pay payment token from Samsung Pay APIs.
manualPayment: false,
saveCard: false, // Set to true if you want to save (tokenize) the card after a successful payment.
});
const samsungPayPaymentRequest = new PaymentRequest({
givenId: 'UUID_V4', // Optional. A UUID for the payment provided by you to support Idempotency, UUID v4 is recommended. It is going be the ID of the created payment.
baseUrl: 'MOYASAR_BASE_URL', // Optional. When you need to use a different Moyasar environment (e.g. Staging).
amount: 20000,
currency: 'SAR',
description: 'Test payment',
metadata: { size: '250 g' },
source: samsungPaySource,
applyCoupon: true, // Control the coupon application (based on the BIN). This key is required only if you don't want to apply the coupon. Defaults to true.
splits: [], // Optional array of `PaymentSplit` object used to distribute the charged amount (in the smallest currency unit) among multiple recipients or to collect a platform fee.
});
```
Next, call the `createPayment` function with the `samsungPayPaymentRequest` object and your public API key, then handle the response:
```typescript
const paymentResponse = await createPayment(samsungPayPaymentRequest, 'YOUR_PUBLISHABLE_API_KEY');
```
## Build Your Own Stc Pay UI
We need to prepare the `StcPayRequestSource` and `PaymentRequest` objects as follows:
```typescript
createPayment,
StcPayRequestSource,
PaymentRequest,
PaymentResponse,
StcPayResponseSource,
PaymentStatus,
sendOtp,
} from 'react-native-moyasar-sdk';
const stcPaySource = new StcPayRequestSource({
mobile: '0512345678',
});
const stcPayPaymentRequest = new PaymentRequest({
givenId: 'UUID_V4', // Optional. A UUID for the payment provided by you to support Idempotency, UUID v4 is recommended. It is going be the ID of the created payment.
baseUrl: 'MOYASAR_BASE_URL', // Optional. When you need to use a different Moyasar environment (e.g. Staging).
amount: 1000,
currency: 'SAR',
description: 'Test payment',
metadata: { size: '250 g' },
source: stcPaySource,
applyCoupon: true, // Control the coupon application (based on the BIN). This key is required only if you don't want to apply the coupon. Defaults to true.
splits: [], // Optional array of `PaymentSplit` object used to distribute the charged amount (in the smallest currency unit) among multiple recipients or to collect a platform fee.
});
```
Next, call the `createPayment` function with the `stcPayPaymentRequest` object and your public API key, then handle the response:
```typescript
const paymentResponse = await createPayment(stcPayPaymentRequest, 'YOUR_PUBLISHABLE_API_KEY');
if (paymentResponse instanceof PaymentResponse) {
if (paymentResponse.status != PaymentStatus.initiated) {
// Handle cases where payment status could be paid, failed, authorized, etc...
return;
}
if (!(paymentResponse.source instanceof StcPayResponseSource)) {
// Handle unexpected Stc Pay payment error
return;
}
// After the user enters the OTP, send it to Moyasar using the `sendOtp` function
const paymentResponse = await sendOtp('123456', paymentResponse.source.transactionUrl);
// Handle the result
if (paymentResponse instanceof PaymentResponse) {
// Handle cases where payment status could be paid, failed, etc...
} else {
// Handle MoyasarError cases
}
} else {
// Handle MoyasarError cases
}
```
## Build Your Own Credit Card Token UI
We need to prepare the `TokenRequest` object as follows:
```typescript
const tokenRequest = new TokenRequest({
name: 'John Doe',
number: '4111111111111111',
cvc: '123',
month: '12',
year: '28',
baseUrl: 'MOYASAR_BASE_URL', // Optional. When you need to use a different Moyasar environment (e.g. Staging).
callbackUrl: 'https://example.com/callback', // Replace with the URL to be redirected to after a 3D secure transaction.
metadata: { size: '250 g' }, // Optional. Adds searchable key/value pairs.
});
```
Next, call the `createToken` function with the `tokenRequest` object and your public API key, then handle the response:
```typescript
const tokenResponse = await createToken(tokenRequest, 'YOUR_PUBLISHABLE_API_KEY');
```
---
## Changelog(React-native)
A log or record of all notable changes made.
- [General] Support UnionPay network.
### Required:
- Update native code for iOS by running the following command in the `ios/` directory:
```sh
pod install
```
- [Samsung Pay] Support Samsung Pay button style customization (`buttonType` field).
- [Samsung Pay] Support Samsung Pay tokenization (`saveCard` field).
- [General] Enhancements and fixes.
- [General] Support payment splitting between recipients.
- [General] Support configuring Moyasar's base url (`baseUrl` parameter). When you need to use a different Moyasar environment (e.g. Staging).
- [General] Update dependencies to patch security vulnerabilities.
### Required:
- Update native code for iOS by running the following command in the `ios/` directory:
```sh
pod install
```
- [General] Moyasar new design.
- [General Feature] Support controlling coupons applicability.
- [Fix Android UI] Fix Android text input formatting in Arabic language.
If you encounter any issues, make sure to fully clean your project and rebuild it.
### Required:
- Update native code for iOS by running the following command in the `ios/` directory:
```sh
pod install
```
- [Samsung Pay Style] Support custom styling of the [Samsung Pay button component](customize-ui#customize-the-samsung-pay-button).
- [Apple Pay Style Fix] Fix height and width styles to receive `DimensionValue` type.
- [General] Enhancements.
If you encounter any issues, make sure to fully clean your project and rebuild it.
### Needs attention:
If you have used the `style` property for the Apple Pay component and supplied either the `height` or `width` properties, you may need to update them to the new `DimensionValue` type instead of the old type.
- [General] Support older React Native versions.
- [General] Enhancements.
If you encounter any issues, make sure to fully clean your project and rebuild it.
### Needs attention:
- Make sure you have one of the following Node.js versions installed:
- v20.19 or higher
- v22.12 or higher
- v23.4 or higher
- If you are using [Jest](https://jestjs.io) and encountering issues, update your Jest configuration (likely found in your package.json or any jest.config.\* file) with the following:
```js
module.exports = {
// ... The rest of your configuration
transformIgnorePatterns: ['node_modules/(?!((@)?react-native|react-native-moyasar-sdk)/)'],
};
```
:::info
- If you previously had the `transformIgnorePatterns` field make sure to not override it with the above, instead add the `react-native-moyasar-sdk` part to it.
:::
- [Apple Pay] Support Apple Pay tokenization (`saveCard` field).
- [Samsung Pay] Support Samsung Pay feature.
- [General] Support customizing merchant's country code.
- [General] Support `givenId` feature.
- [Credit Card Token Fix] Always enforce the `saveOnly` field as `true` in the `TokenRequest` class, and remove it from the public SDK API.
- [General] Enhancements.
If you encounter any issues, make sure to clean your project and rebuild it.
### Required changes (only if consuming the `TokenRequest` class directly):
If you are utilizing the `TokenRequest` class directly, change the following:
- If you supplied `saveOnly` parameter as `true`. Remove it since now it will be always true in this context.
- If you didn't supply the `saveOnly` parameter (or made it `false`). Switch to using the `PaymentRequest` class with the `CreditCardRequestSource` class and set the `tokenizeCard` option to `true`. It will achieve the same result.
### Needs attention:
- Supply the `merchantCountryCode` field in the `PaymentConfig` to indicate your merchant’s principle place of business. Previously, this was based on the currency, which was less precise. Now, you should explicitly set this code for accurate payment processing (defaults to SA).
- Supply the `givenId` field in the `PaymentConfig` object to support [Idempotency](../../api/idempotency.md).
- Check [Installation & Configuration](installation) and [Basic Integration](basic-integration) documents to support and configure Samsung Pay.
- [General] Update dependencies and tooling.
### Required changes:
- Update native code for iOS by running the following command in the `ios/` directory:
```sh
pod install
```
- Set react-native-svg version package to '^15.11.2'.
- Set react-native-webview version package to '^13.13.4'.
- [Fix] Fix the Saudi Riyal symbol color
- [General] Add the Saudi Riyal symbol
- [Credit Card & Stc Pay] Support customizing placeholder text color and more styles.
- [Stc Pay] Support Stc Pay feature.
- [General Fix] Fix issue with New Architecture.
### Required changes:
Update native code for iOS by running the following command in the `ios/` directory:
```sh
pod install
```
- [Fix] Isolate SDK's localization.
- [API] `metadata` parameter type fix.
- [General] Support customizing the components' style to align with your app's design.
- [General] Support building your own UI.
- [General] Enhancements.
- [Credit Card] Support create save only token.
- [Apple Pay] Fix Apple Pay.
### Required changes:
Change the `paymentResponse` parameter type from `PaymentResponse | MoyasarError` to `PaymentResult` in the `onPaymentResult` callback of the CreditCard and ApplePay components.
- [Credit Card] Add arabic number mapper.
- [General] Support dark mode.
- [General] Enhance UI.
- [General] Enhance error handling.
### Optional changes:
Change the `paymentResponse` parameter type from `any` to `PaymentResponse | MoyasarError` in the `onPaymentResult` callback.
- [Credit Card] Add input formatting.
- [Credit Card] Add card network detection.
- [Credit Card] Fix Amex card validation.
- [General] Enhancements.
### Required changes:
Add 'react-native-svg' library to your project.
```sh
npm install react-native-svg
```
```sh
yarn add react-native-svg
```
Link native code for iOS by running the following command in the `ios/` directory:
```sh
pod install
```
- [API] Modify callback type.
- Initial release.
- Add Apple Pay with button view.
- Add Credit Card view with managed 3DS step.
---
## Customize the UI
You can tailor the appearance of the Credit Card, Apple Pay and Stc Pay components to align with your app's design by using the `style` parameter.
:::important
Make sure you have visited both [Installation & Configuration](installation) and [Basic Integration](basic-integration) documents before proceeding with customizing your UI.
:::
## Customize the Credit Card Component
Pass the `style` parameter to the `CreditCard` component like the following example:
```typescript
```
You can use the following style properties:
```typescript
style={{
container: { backgroundColor: 'white' }, // Customize the component's container
textInputs: { borderWidth: 1.25 }, // Customize the Credit Card text fields
textInputsPlaceholderColor: "red", // Customize the Credit Card placeholders text color
paymentButton: { borderRadius: 10 }, // Customize the payment button component
paymentButtonText: { fontSize: 20 }, // Customize the payment button text style
errorText: { fontSize: 12 }, // Customize the error message style
activityIndicatorColor: "green", // Customize the loading activity indicator color
webviewActivityIndicatorColor: "blue", // Customize the loading activity indicator color for 3DS webview
}}
```
## Customize the Apple Pay Button
Pass the `style` parameter to the `ApplePay` component like the following example:
```typescript
```
You can use the following style properties:
```typescript
// Height and width can accept relative values (e.g. '100%') or absolute values (e.g. 50).
style={{
buttonType: 'buy', // 'plain', 'buy', 'inStore', 'donate' or 'setUp'
buttonStyle: 'black', // 'black' | 'white' | 'whiteOutline'
height: 50,
width: '90%',
cornerRadius: 11,
}}
```
## Customize the Samsung Pay Button
Pass the `style` parameter to the `SamsungPay` component like the following example:
```typescript
```
You can use the following style properties:
```typescript
// Height and width can accept relative values (e.g. '100%') or absolute values (e.g. 50).
style={{
buttonType: SamsungPayButtonType.samsungPayLogoOnly, // payWithSamsungPay | samsungPayLogoOnly
height: 50,
width: '90%',
cornerRadius: 11,
}}
```
## Customize the Stc Pay Component
Pass the `style` parameter to the `StcPay` component like the following example:
```typescript
```
You can use the following style properties:
```typescript
style={{
container: { backgroundColor: 'white' }, // Customize the component's container
title: { fontSize: 20 }, // Customize the title's style
textInputs: { borderWidth: 1.25 }, // Customize the Stc Pay text fields
textInputsPlaceholderColor: "red", // Customize the Credit Card placeholders text color
paymentButton: { borderRadius: 10 }, // Customize the payment button component
paymentButtonText: { fontSize: 20 }, // Customize the payment button text style
errorText: { fontSize: 12 }, // Customize the error message style
activityIndicatorColor: "green", // Customize the loading activity indicator color
}}
```
:::info
- If you need further customization, checkout [Build Your Own UI](build-your-own-ui)
:::
---
## Installation & Configuration
Easily accept payments through **Apple Pay**, **Samsung Pay**, **Stc Pay** or **Credit Card** (with managed **3DS** step) in your React Native app with Moyasar in iOS and Android.
## Prerequisites
### **NodeJS Compatible Versions**
Make sure you have one of the following Node.js versions installed:
- v20.19 or higher
- v22.12 or higher
- v23.4 or higher
### **Accepting Apple Pay Payments in iOS**
Complete the following steps to easily accept Apple Pay payments:
- Follow [this guide](../../guides/apple-pay/apple-developer-account.mdx) to setup your Apple developer account and integrate it with Moyasar.
- Follow [this guide](https://help.apple.com/xcode/mac/9.3/#/deva43983eb7?sub=dev44ce8ef13) to enable accepting Apple Pay in your application using Xcode.
### **Accepting Samsung Pay Payments**
- Follow [this guide](../../guides/samsung-pay/samsung-pay-account.md) to setup your Samsung developer account and integrate it with Moyasar.
- Set your app’s `applicationId` to match with your registered service in the Samsung Pay Merchant dashboard.
### **Accepting Stc Pay Payments**
Follow [this guide](../../guides/stc-pay/basic-integration.mdx#before-starting) to setup Stc Pay integration.
## Installation Commands
```sh
npm install react-native-moyasar-sdk react-native-webview react-native-svg
```
```sh
yarn add react-native-moyasar-sdk react-native-webview react-native-svg
```
> **'react-native-webview'** and **'react-native-svg'** packages are required peer dependencies for Moyasar's SDK functionality.
### iOS Setup
Link native dependencies for iOS by running the following command in the `ios/` directory:
```sh
pod install
```
## Samsung Pay Configuration
Enable `dataBinding` in your app's `build.gradle` like the following:
```groovy
android {
// ... The rest of your code
buildFeatures {
dataBinding true
// ...
}
// ...
}
```
:::info
- Most likely you will find the right `build.gradle` file in (android/app/build.gradle).
:::
## Troubleshooting
If you are using [Jest](https://jestjs.io) and encountering issues, update your Jest configuration (likely found in your package.json or any jest.config.\* file) with the following:
```js
module.exports = {
// ... The rest of your configuration
transformIgnorePatterns: ['node_modules/(?!((@)?react-native|react-native-moyasar-sdk)/)'],
};
```
:::info
- If you previously had the `transformIgnorePatterns` field make sure to not override it with the above, instead add the `react-native-moyasar-sdk` part to it.
:::
### Migration guide
Visit [changelog](changelog) page for migration guide from previous versions.
---
## Testing(React-native)
### Credit Cards
Moyasar provides a sandbox environment for testing credit card payments without charging any real money. This allows you to test your integration and ensure that everything is working correctly before going live with actual payments. Learn more about our testing cards [here](../../guides/card-payments/test-cards.md).
### Apple Pay
Testing using a simulator will not work! Learn more about Apple Pay testing [here](../../guides/apple-pay/testing.md).
### Samsung Pay
Testing using an emulator/simulator will not work! Check supported Samsung devices [here](https://www.samsung.com/my/samsung-pay/supported-devices) and learn more about Samsung Pay testing [here](../../guides/samsung-pay/testing.md).
### Stc Pay
Learn more about Stc Pay testing [here](../../guides/stc-pay/testing.md).
---
## Introduction(Ecommerce)
Moyasar E-Commerce Plugins simplify payment integrations for your online store. They handle secure transaction flows, reduce setup time. Once installed, you can configure payment methods and start accepting payments with ease.
Proceed to the supported platform to learn more.
---
## Installation(Magento2)
# Magento2
Use Moyasar's plugin for the **Magento2** platform to accept e-Payments.
---
## Requirements
Moyasar plugin needs the following requirements to run:
- **Magento 2. x.**
- **PHP >= 7.1.**
- **Composer >= 2.x.**
---
## Installation
Install the plugin using Composer (version 5).
```shell
composer require moyasar-fintech/magento2
```
Enable the **Moyasar** module.
```shell
php bin/magento module:enable Moyasar_Magento2
```
Register the extension:
```shell
php bin/magento setup:upgrade
```
Deploy Magento Static Content:
```shell
php bin/magento setup:static-content:deploy
```
---
## Configuration
- Login inside the _Admin Panel_ and go to **Stores** ➡️ **Configuration** ➡️ **Sales** ➡️ **Payment Methods**.
- Find `Moyasar Gateway` payment in the list of payment methods.
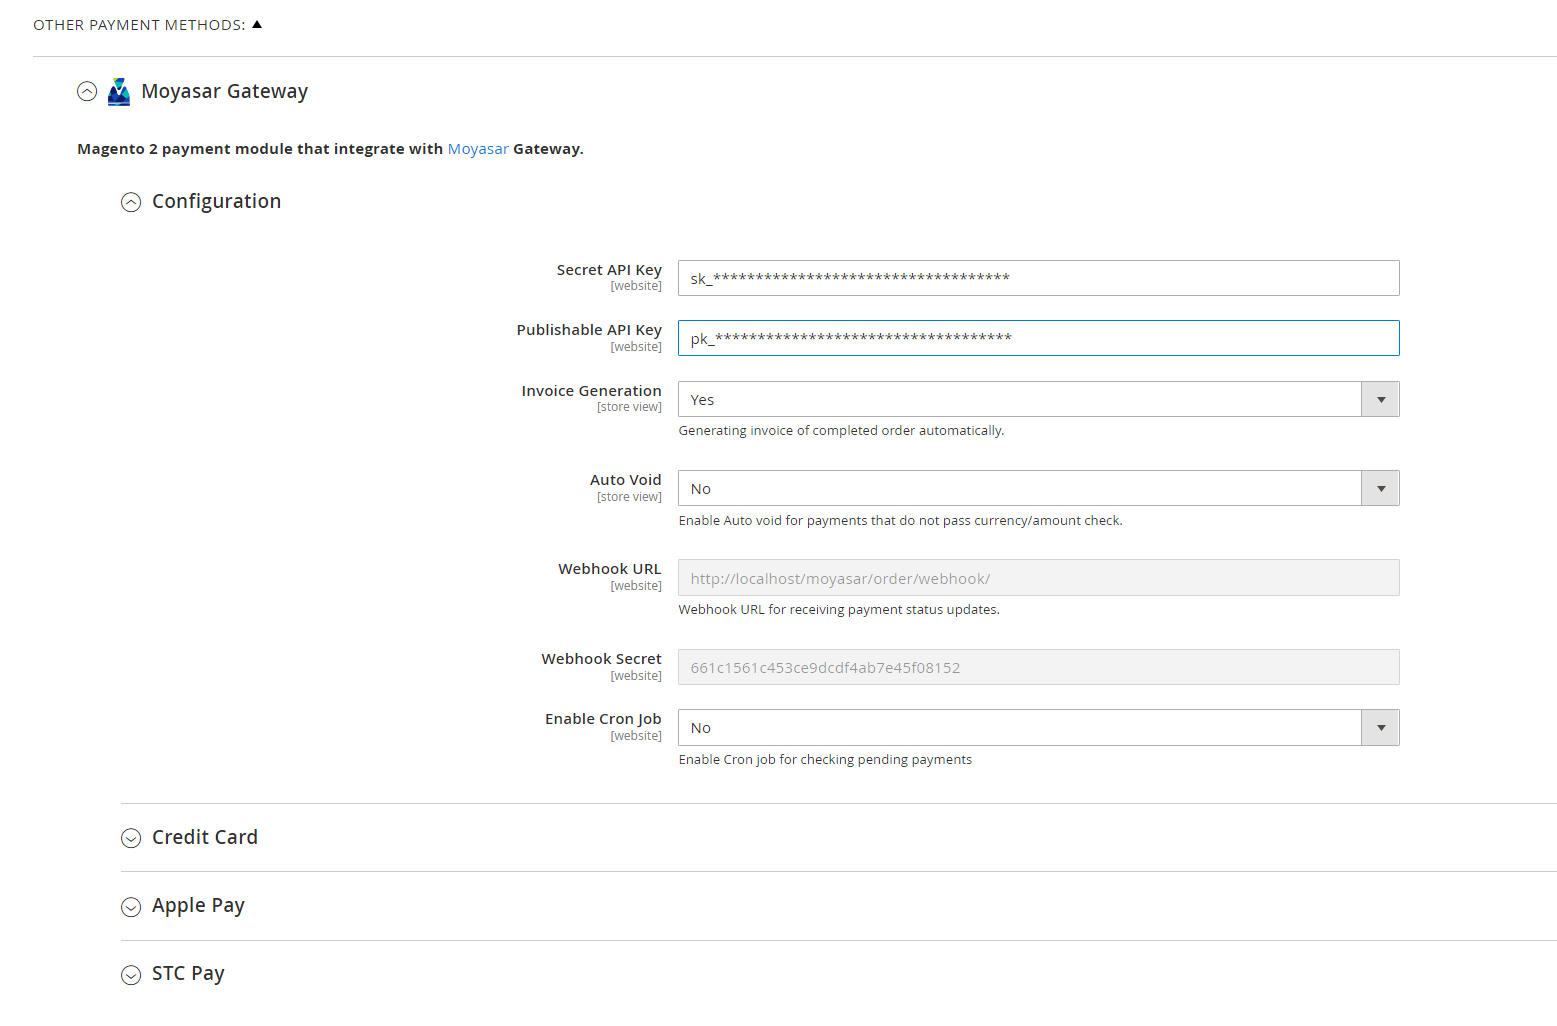
- Put your **Secret API Key** (which you have stored it in a safe place) & **Publishable API Key** found in [Moyasar Dashboard](https://dashboard.moyasar.com)
---
### Invoice Generation
Generating invoices of completed orders automatically.
---
### Auto Void
If an error occurs after payment, we will refund the amount and cancel the order.
---
### Webhooks
Moyasar uses webhooks to notify your store whenever a payment changes its state. The notification is an asynchronous request.
To configure the webhook option, follow these steps:
1. Login to the [Moyasar Dashboard](https://dashboard.moyasar.com/)
2. Go to **Settings ➡️ Webhooks**
3. Click on **Add Webhook**
4. Put the **Webhook URL** & **Webhook Secret** and keep the other settings as is
---
### Cron Job
This is another option to retrieve the payment state of the pending orders.
:::warning[Important]
**Webhooks** & **Cron Job** ensure order continuity in case of payment disruption.
:::
---
## Methods
# Magento2
**Moyasar** plugin supports three payment methods: **Credit Card**, **Apple Pay**, and **STC Pay**.
Each payment can be enabled individually, and the title can be customized.
### Credit card
Enable the **Credit Card** method by setting `Enabled` to Yes and selecting the required schemas.
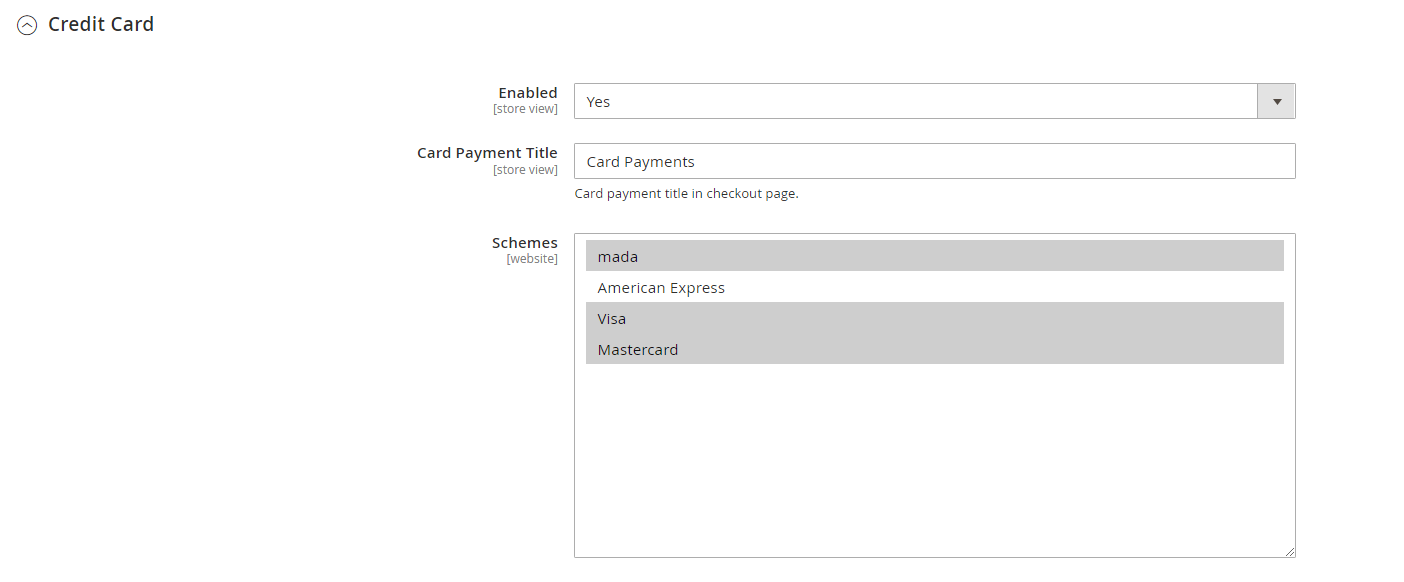
### Apple pay
Enable the **Apple Pay** method by setting `Enabled` to Yes, and ensure that your store's domain is activated.
:::tip
**Apple Pay** method will use the same schemas as the credit card method.
:::
To activate Apple Pay, register your domain in [Moyasar's dashboard](https://dashboard.moyasar.com/).
For more details follow [this guide](../../guides/apple-pay/web-registration.mdx).
### STC Pay
Enable the STC Pay method by setting `Enabled` to Yes,
:::warning[Important]
**Apple Pay** or **STC Pay** methods won't work if you are using **Testing Environment Keys.**
:::
### Samsung pay
Enable the **Samsung Pay** method by setting `Enabled` to Yes, and ensure that your service account is configured in the Samsung developer account.
:::info
To activate **Samsung Pay**, Please follow the instructions in [Samsung Developer Account](../../guides/samsung-pay/samsung-pay-account.md).
:::
---
## Migration
# Magento2
## From 3 Or 4 → 5
To migrate from 3 or 4 to 5, delete the old plugin and follow the installation section.
---
## From 3 → 4
To get to migrate the plugin from 3 to 4, you need to follow these steps:
1. Delete the old plugin
2. Download the plugin [Moyasar Magento Plugin 4.3.0](https://moyasarfin-my.sharepoint.com/:u:/g/personal/a_hoshaiyan_moyasar_com/ER_E-N4E5IBFuCXybrZcNCUBw82MIhLYcpLiHun9Nn7X3A?e=f4bMCN).
3. Unpack it and upload Moyasar contents to `/app/code/Moyasar/Mysr`
4. Clear Magento cache
```shell
php bin/magento cache:clean
```
5. Compile DI (Dependency Injection) again
```shell
php bin/magento setup:di:compile
```
---
## Installation(Nop-commerce)
# NopCommerce
Use Moyasar's plugin to accept e-Payments in your NopCommerce store.
---
## Requirements
Plugin needs the following requirements to run:
- **NopCommerce 4.40 or 4.50.**
- **.NET 5 runtime or .NET 6 runtime.**
---
## Plugin Download
To get the plugin, download the last version from below the links:
- [Moyasar NopCommerce Plugin 4.40](https://moyasarfin-my.sharepoint.com/:u:/g/personal/s_qirnas_moyasar_com/EVtUVALhX_FJvc1KeoLHnA8BPCNgdmT1AqDYB5gYiY2zrA?e=uw2O2a).
- [Moyasar NopCommerce Plugin 4.50](https://moyasarfin-my.sharepoint.com/:u:/g/personal/s_qirnas_moyasar_com/EWVZ9cUa5HtOuydhAksZKdsB_5iY25q31DeVBSsV-mNpMw?e=1Dsc1t).
---
# Installation
### There are two options for uploading the plugin:
1. Upload the plugin to the **/plugins** folder in your nopCommerce directory. And restart your application (or click Reload list of plugins button).
Click on **Install** the plugin then click on the **Restart application to apply changes** button on the top panel to finish the installation process.
---
## Configuration
1. Go to **Configuration → Local Plugins → Payment Methods** will find the **Moyasar Payment** plugin.

2. Click on **Configure** to complete settings.
3. Put your `API keys` found in [**Moyasar Dashboard**](https://dashboard.moyasar.com) and enable the methods you want then **Save**.
:::warning[Important]
You cannot use **Apple Pay** or **STC Pay** while using the test environment keys
:::
---
### Apple Pay Configuration
To configure Apple Pay, you will need to register your domain in [Moyasar's dashboard](https://dashboard.moyasar.com/). For more details follow [this guide](../../guides/apple-pay/web-registration.mdx).
---
---
## Installation(Opencart)
OP 2.3 - Version 2.3.4
OP 3.0 - Version 3.4.2
OP 4.0 - Version 4.0.0
# OpenCart
Use Moyasar's plugin for the Opencart platform to offer payments online.
---
## Plugin Page
Visit the official [Moyasar Plugin Page](https://www.opencart.com/index.php?route=marketplace/extension/info&extension_id=46482&filter_member=Moyasar) for more details, updates, and support resources related to the plugin.
---
#$ Installation
There are two options for uploading a plugin:
### Installation by copying the files
- Copy the content of each folder, to your OpenCart installation keeping the folder structure.
- Login to the Open Cart admin section and go to **Extensions -> Extensions -> Payments**.
- Find the **Moyasar Payment Method** in the list of extensions.
- Click **Install**.

Install Moyasar's oc plugin
---
### Directly from the admin section
- Log in to **Admin -> Extensions -> Installer**
- Click the **Upload** button, then select `moyasar.ocmod.zip`
- Go to **Extensions -> Extensions -> Payments**
- Find the **Moyasar Payment Method** in the list of extensions
- Click **Install**
---
## Configuration
1. Click **Edit** the payment module settings.

Plugins Page
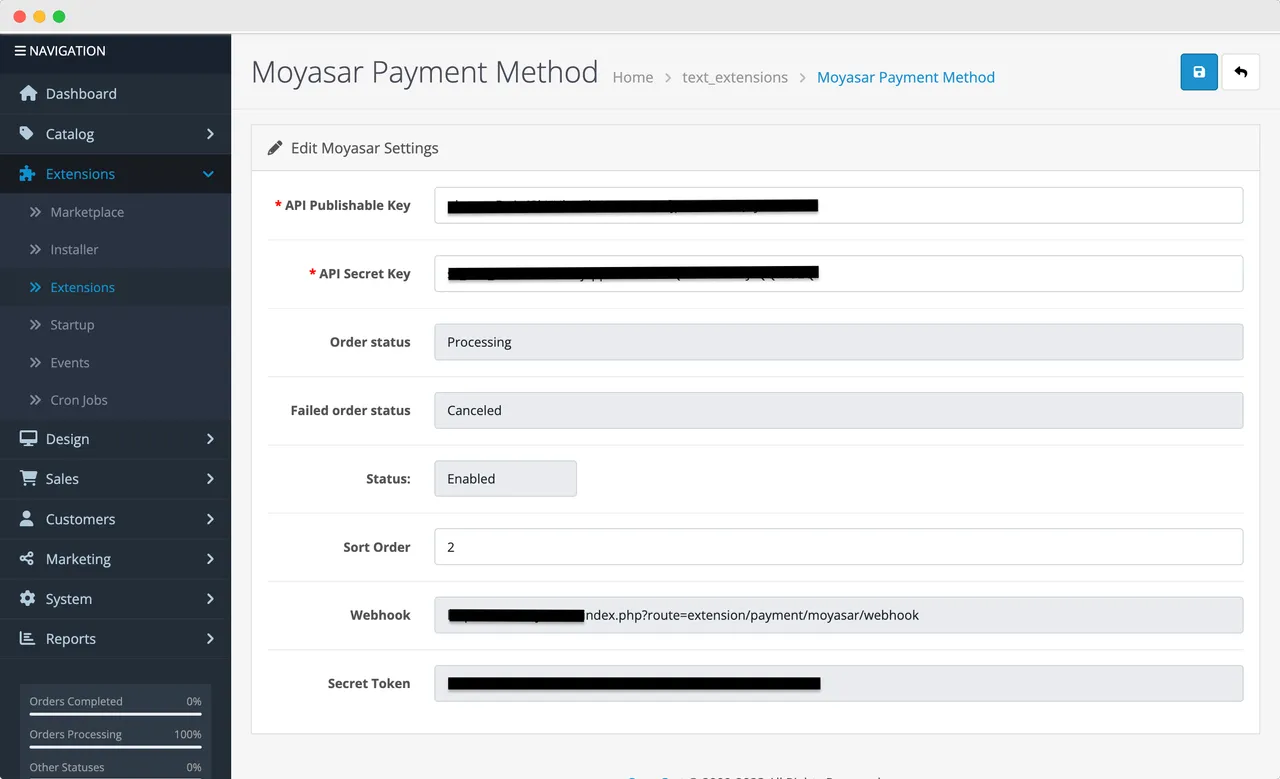
Configuration Page
2. Set **Extension Status** to **Enable** and put your API keys found in Moyasar's dashboard then click on **Save**.

Status Option
:::warning
You cannot use **Apple Pay** or **STC Pay** while using the test environment keys
:::
3. Go to **Extensions -> Modifications**, and click the **Refresh Button**.

Refersh modifications
4. Go to **Dashboard -> Developer Settings** then clear cache.
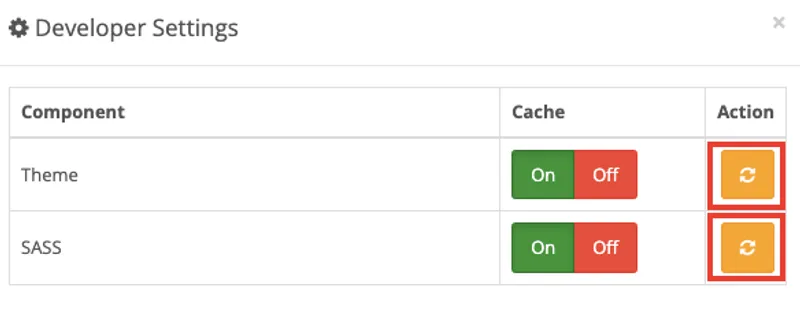
Clear Cache
---
### Webhooks
Moyasar uses webhooks to notify your store whenever a payment changes its state. The notification is an asynchronous request.
To configure the webhook option, follow these steps:
1. Login to the **Moyasar Dashboard**
2. Go to **Settings -> Webhooks**
3. Click on **Add Webhook**
4. Put the **Webhook URL & Webhook Secret** and keep the other settings as is
:::success
You take the Webhook URL & Webhook Secret from any method.
:::
:::info
Webhooks ensure order continuity in case of payment disruption.
:::
---
## Apple Pay Configuration
To configure Apple Pay, you will need to register your domain in [Moyasar's dashboard](https://dashboard.moyasar.com/). For more details follow [this guide](https://docs.moyasar.com/apple-pay-using-web-registration).
---
---
## Installation(Presta-shop)
# PrestaShop
Use Moyasar's plugin to accept in your PrestaShop store.
### Requirements
Plugin needs the following requirements to run:
- **PrestaShop >= 1.7.x.**
- **PHP >= 5.4.**
---
### Plugin Download
To get the plugin, Download the latest version from [Moyasar PrestaShop Plugin 2.0.1](https://moyasarfin-my.sharepoint.com/:u:/g/personal/s_qirnas_moyasar_com/EfDgXRd6Qu5Dp0Uvozi8zdsBNz0IJj7LRqmzfzHEMAFPOw?e=yyrEJ7)
---
### Installation
1. Download the plugin from **previous step .**
2. Login to your PrestaShop administration then go to
3. Click on **Upload a module**.

4\. Drop the module `.zip` file.
---
### Configuration
1. From the **Module Manager** go to **the Payment** section.
2. Find `Moyasar` then click **Configure**.

3\. Put your `API keys` found in Settings > [API Keys](../../guides/dashboard/get-your-api-keys.md) and enable the methods you want then
:::warning[Important]
You cannot use **Apple Pay** or **STC Pay** while using the test environment keys
:::
---
### Apple Pay Configuration
To configure Apple Pay, register your domain in [Moyasar's dashboard](https://dashboard.moyasar.com/). For more details, please follow follow [this guide](../../guides/apple-pay/web-registration.mdx).
---
### Webhooks
To set a webhook endpoint follow these steps:
1. Go to the admin panel
2. Go to Moyasar settings.
3. Find a field called Webhook URL and secret token, and **take note of these.**
4. Login to the Moyasar dashboard
5. Go to **settings → Webhooks**
6. Click on **Add Webhook**
7. Paste the URL and secret token that you got from **Step 3, and keep the other settings as is**
---
---
## Support
If you need any assistance, please contact us via [support@moyasar.com](mailto:support@moyasar.com) or through live chat at [Moyasar Helpdesk](https://help.moyasar.com) and provide us with the following information:
- **Platform:** (Magento2, WooCommerce, etc.)
- **Platform Version**
- **Plugin Version**
---
## Configuration
Before accepting payments, you must configure your API keys and webhook settings in WooCommerce.
## Access Settings
1. Go to **WooCommerce** -> **Settings**.
2. Click on the **Payments** tab.
3. Locate **Moyasar** and click **Manage**.
>
>
> 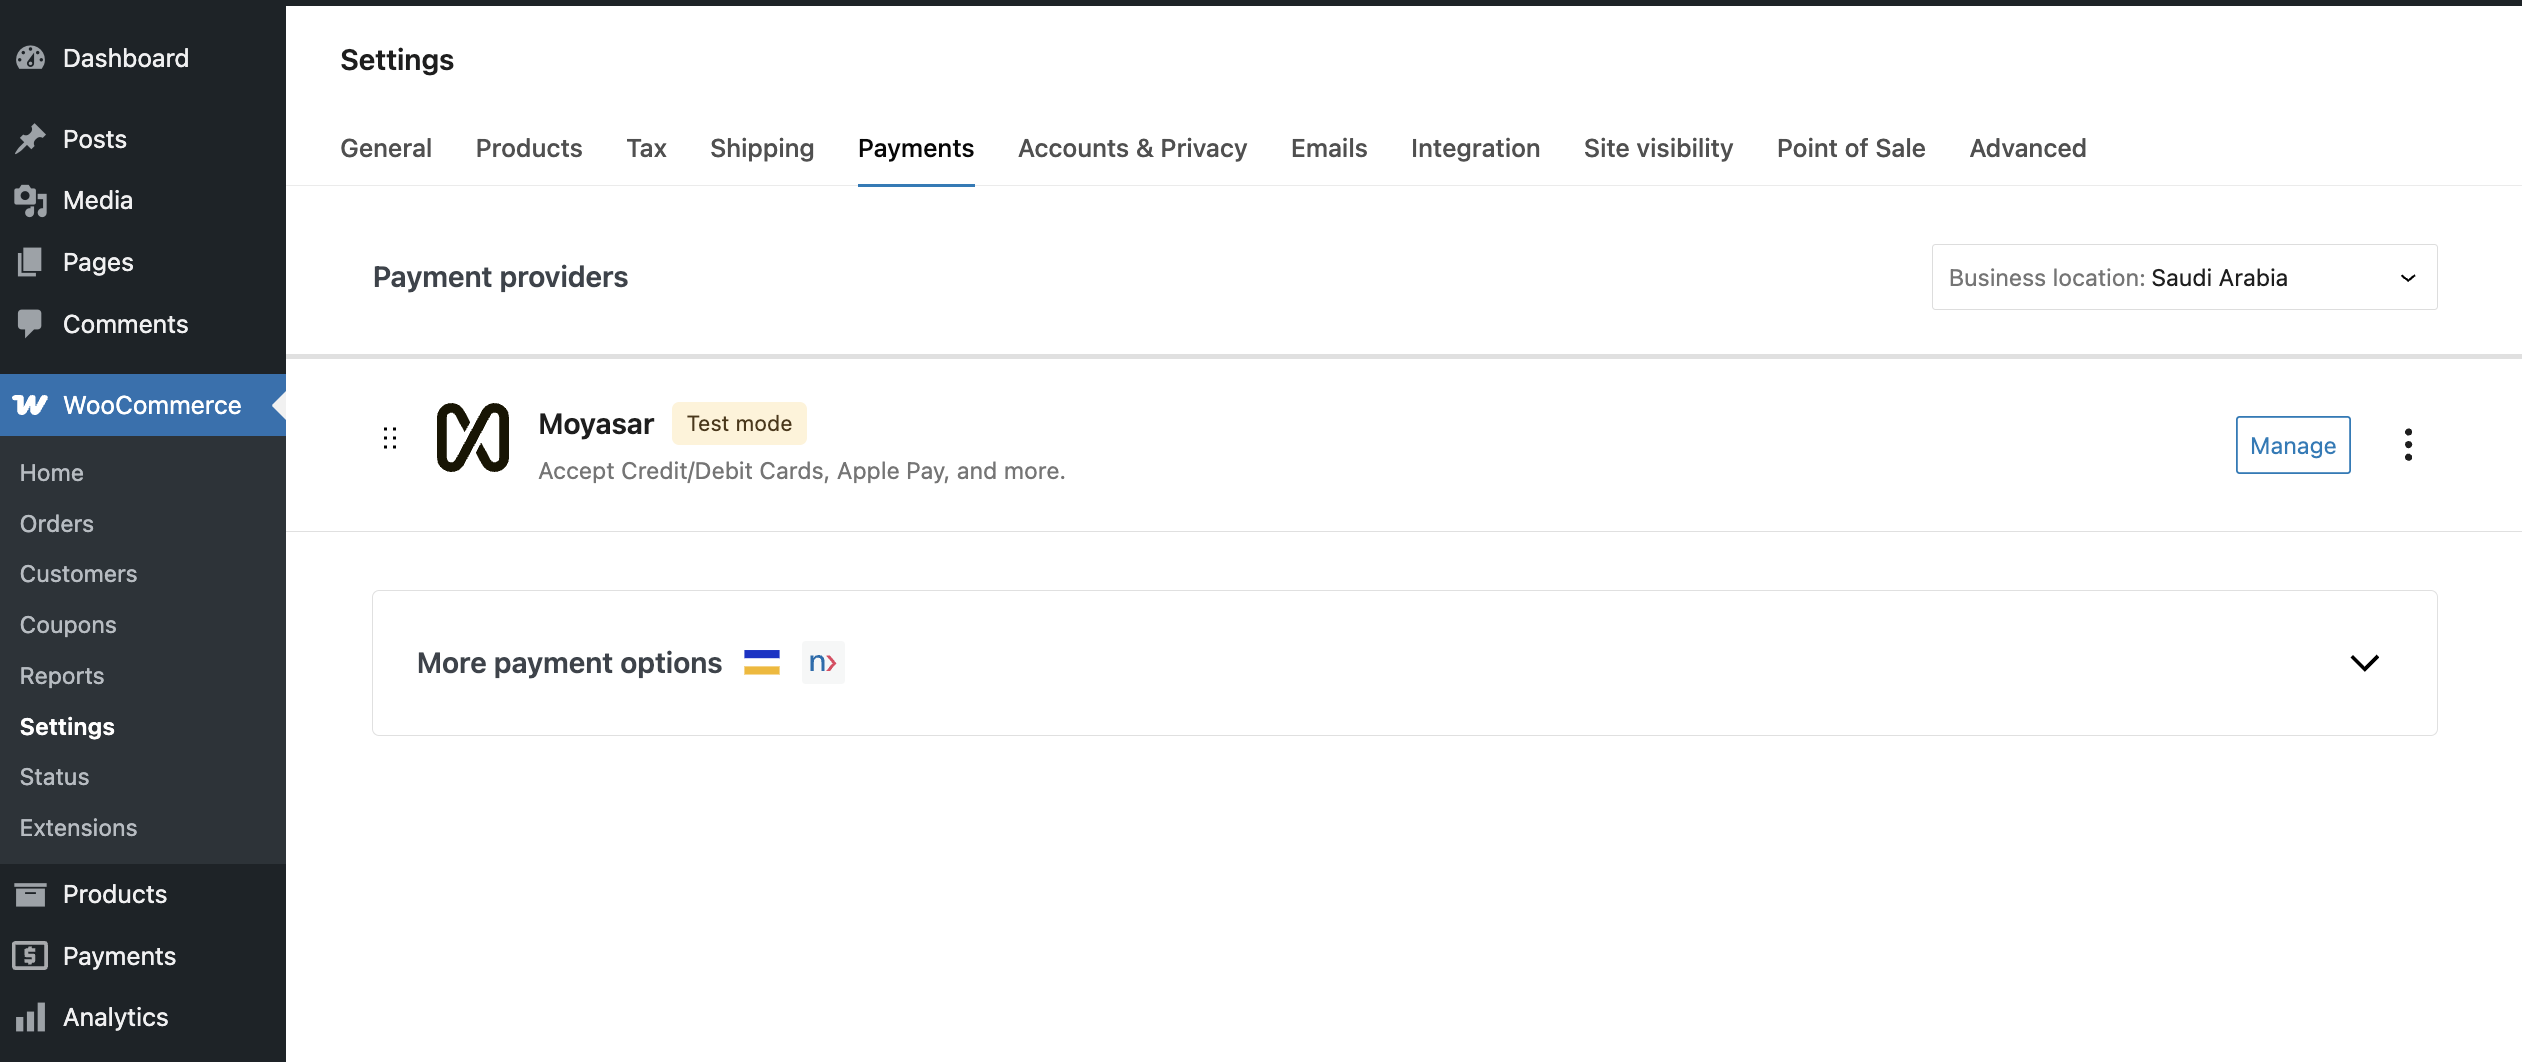
---
## API Keys
You need to enter your API keys to authenticate with Moyasar.
1. Log in to your **[Moyasar Dashboard](https://dashboard.moyasar.com/)**.
2. Go to **Settings** -> **API Keys**.
3. Copy your **Publishable Key** and **Secret Key**.
4. In WooCommerce:
- **Test Mode**: Enable this checkbox to use the Test Environment.
- **Test Secret Key**: Paste your `sk_test_...` key.
- **Test Publishable Key**: Paste your `pk_test_...` key.
- **Live Secret Key**: Paste your `sk_live_...` key.
- **Live Publishable Key**: Paste your `pk_live_...` key.
5. Click **Save changes**.
>
>
> 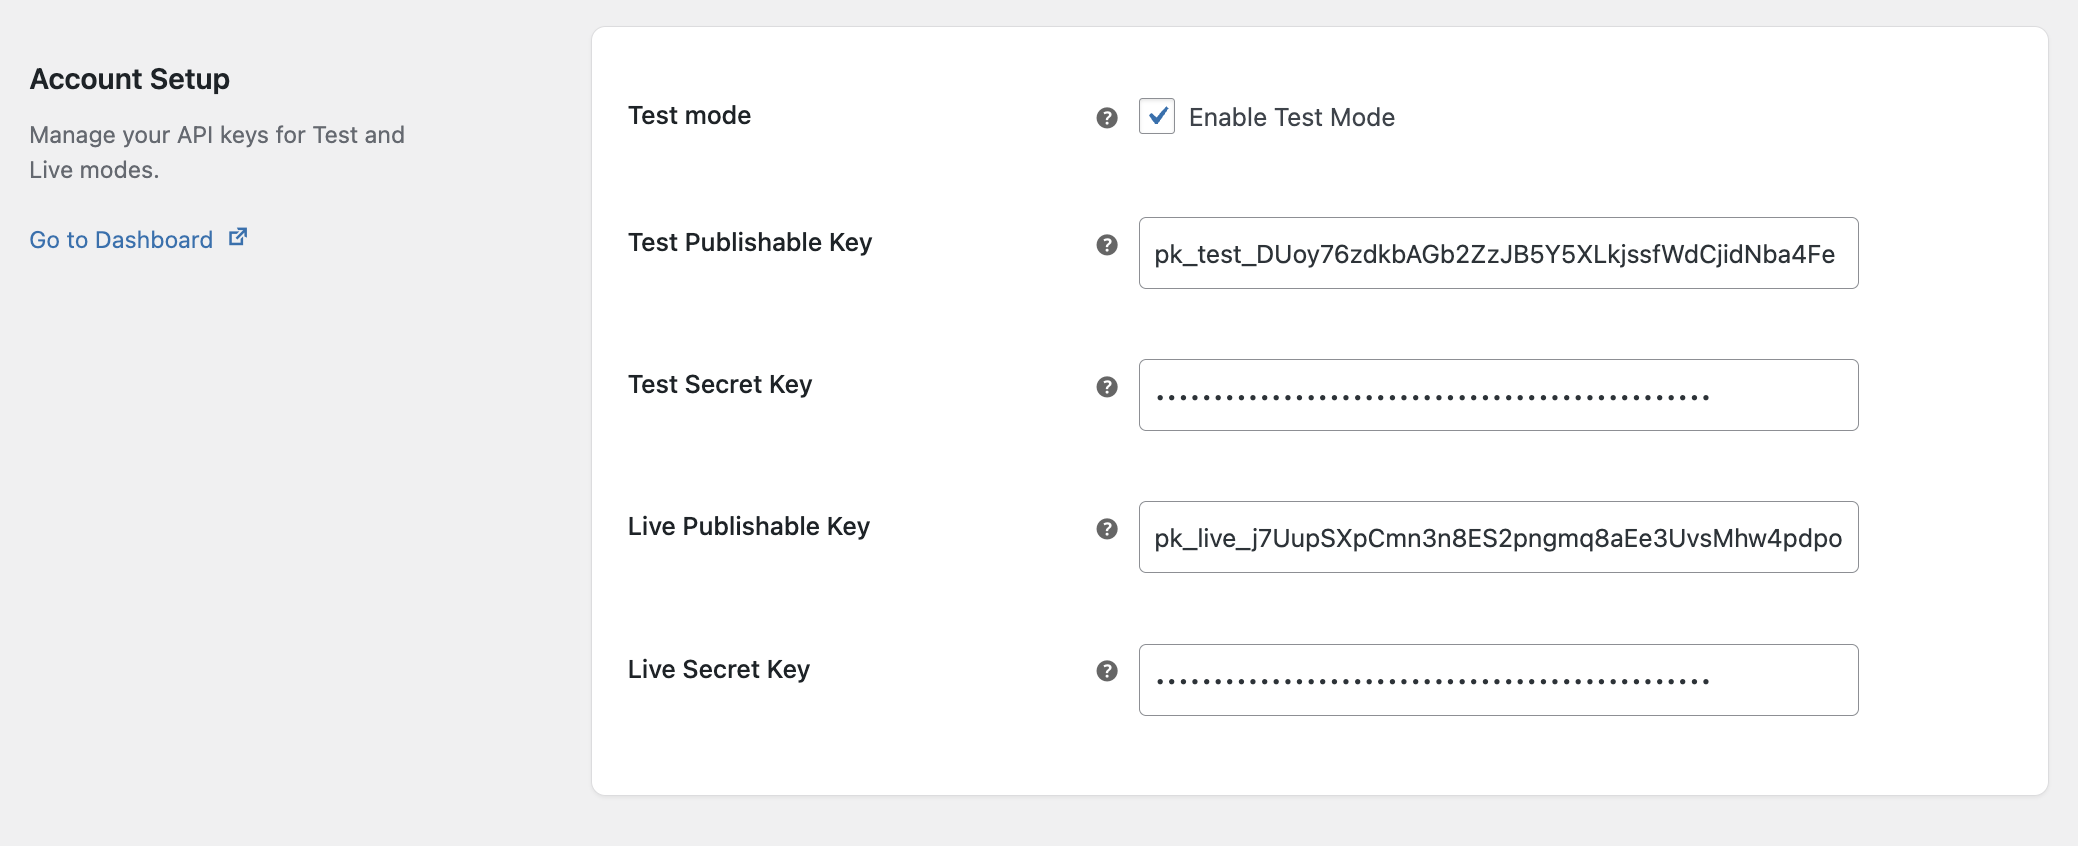
---
## Webhooks
Webhooks are crucial for receiving payment updates (e.g., successful payments, refunds) asynchronously. This ensures order statuses are updated even if the user closes their browser early.
1. Log in to your **[Moyasar Dashboard](https://dashboard.moyasar.com/)**.
2. Go to **Settings** -> **Webhooks**.
3. Click **Add Webhook**.
4. **Webhook Endpoint**: Copy the "Webhook URL" and "Secret" displayed in your WooCommerce Moyasar settings.
- It looks like: `https://your-store.com?wc-api=moyasar_webhook`
5. **Events**: Select All Events & Post Request.
6. Click **Save**.
>
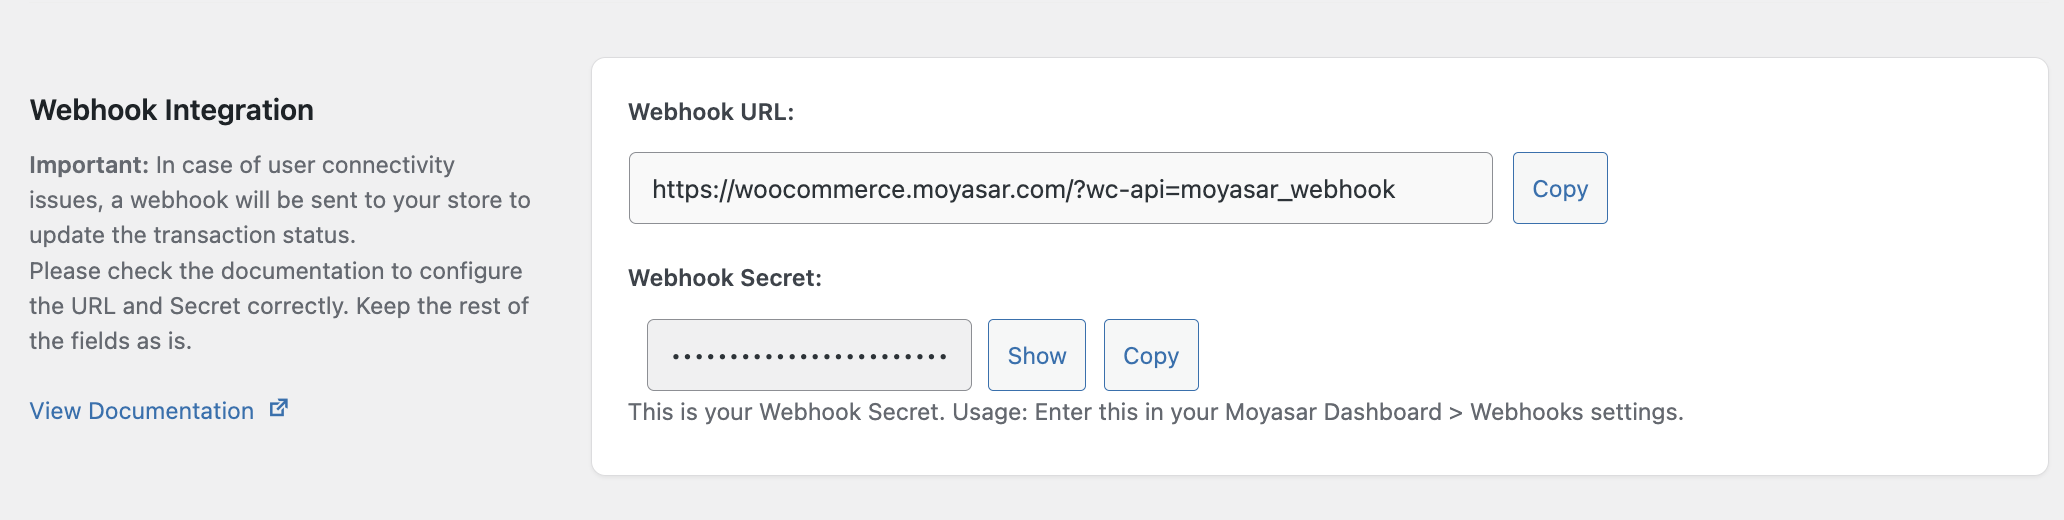
---
## Order Status Configuration
You can customize how WooCommerce tracks orders based on payment events. This allows you to match your store's fulfillment workflow.
**Options:**
- **Success Status**: The status to apply when a payment is successful (Default: **Processing**).
- **Failed Status**: The status to apply when a payment fails (Default: **Failed**).
- **Refund Status**: The status to apply when a refund is processed via Moyasar (Default: **Refunded**).
- **Void Status**: The status to apply when an authorization is voided (Default: **Cancelled**).
---
## Features
Moyasar's WooCommerce plugin comes with powerful features to enhance the checkout experience.
---
## Instant Checkout (Quick Buy)
Instant Checkout allows customers to purchase a product directly from the product page or cart without navigating through the entire checkout process. It leverages saved payment methods and digital wallets for a faster, frictionless experience.
### Supported Methods
- **Credit Card** (using saved cards)
- **Apple Pay**
### How it Works
When enabled, buttons like "Buy with Credit Card" or "Buy with Apple Pay" appear on supported product pages. Clicking the button initiates the payment immediately using a saved card or the digital wallet.
>
>
> 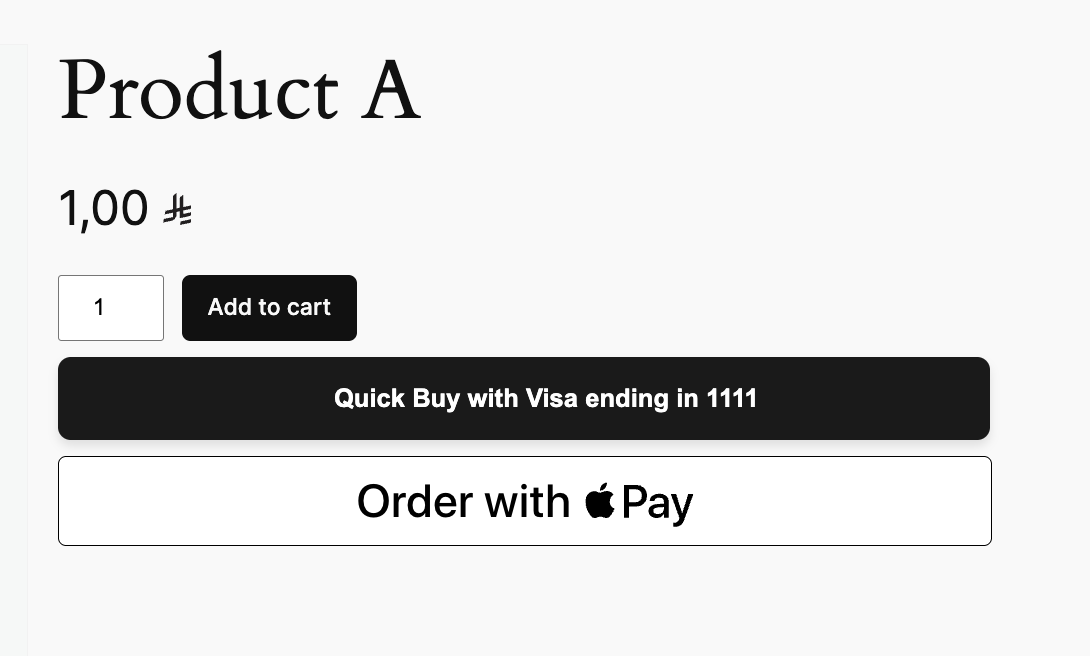
### Configuration
To enable Instant Checkout:
1. Go to **WooCommerce** -> **Settings** -> **Payments**.
2. Click **Manage** next to **Moyasar**.
3. Scroll down to the **Instant Checkout** section.
4. Enable the **Instant Checkout** option.
5. **Button Styling**:
- **Theme**: Light, Dark, or Light Outline.
- **Height**: Adjust the button height (Small, Medium, Large).
- **Label**: Choose the call to action (e.g., "Buy with Apple Pay", "Donate", "Book").
6. **Shipping Options**:
- Enable **Shipping for Quick Buy** to automatically apply a shipping method.
- Select the default **Shipping Method** for instant orders.
7. Click **Save changes**.
>
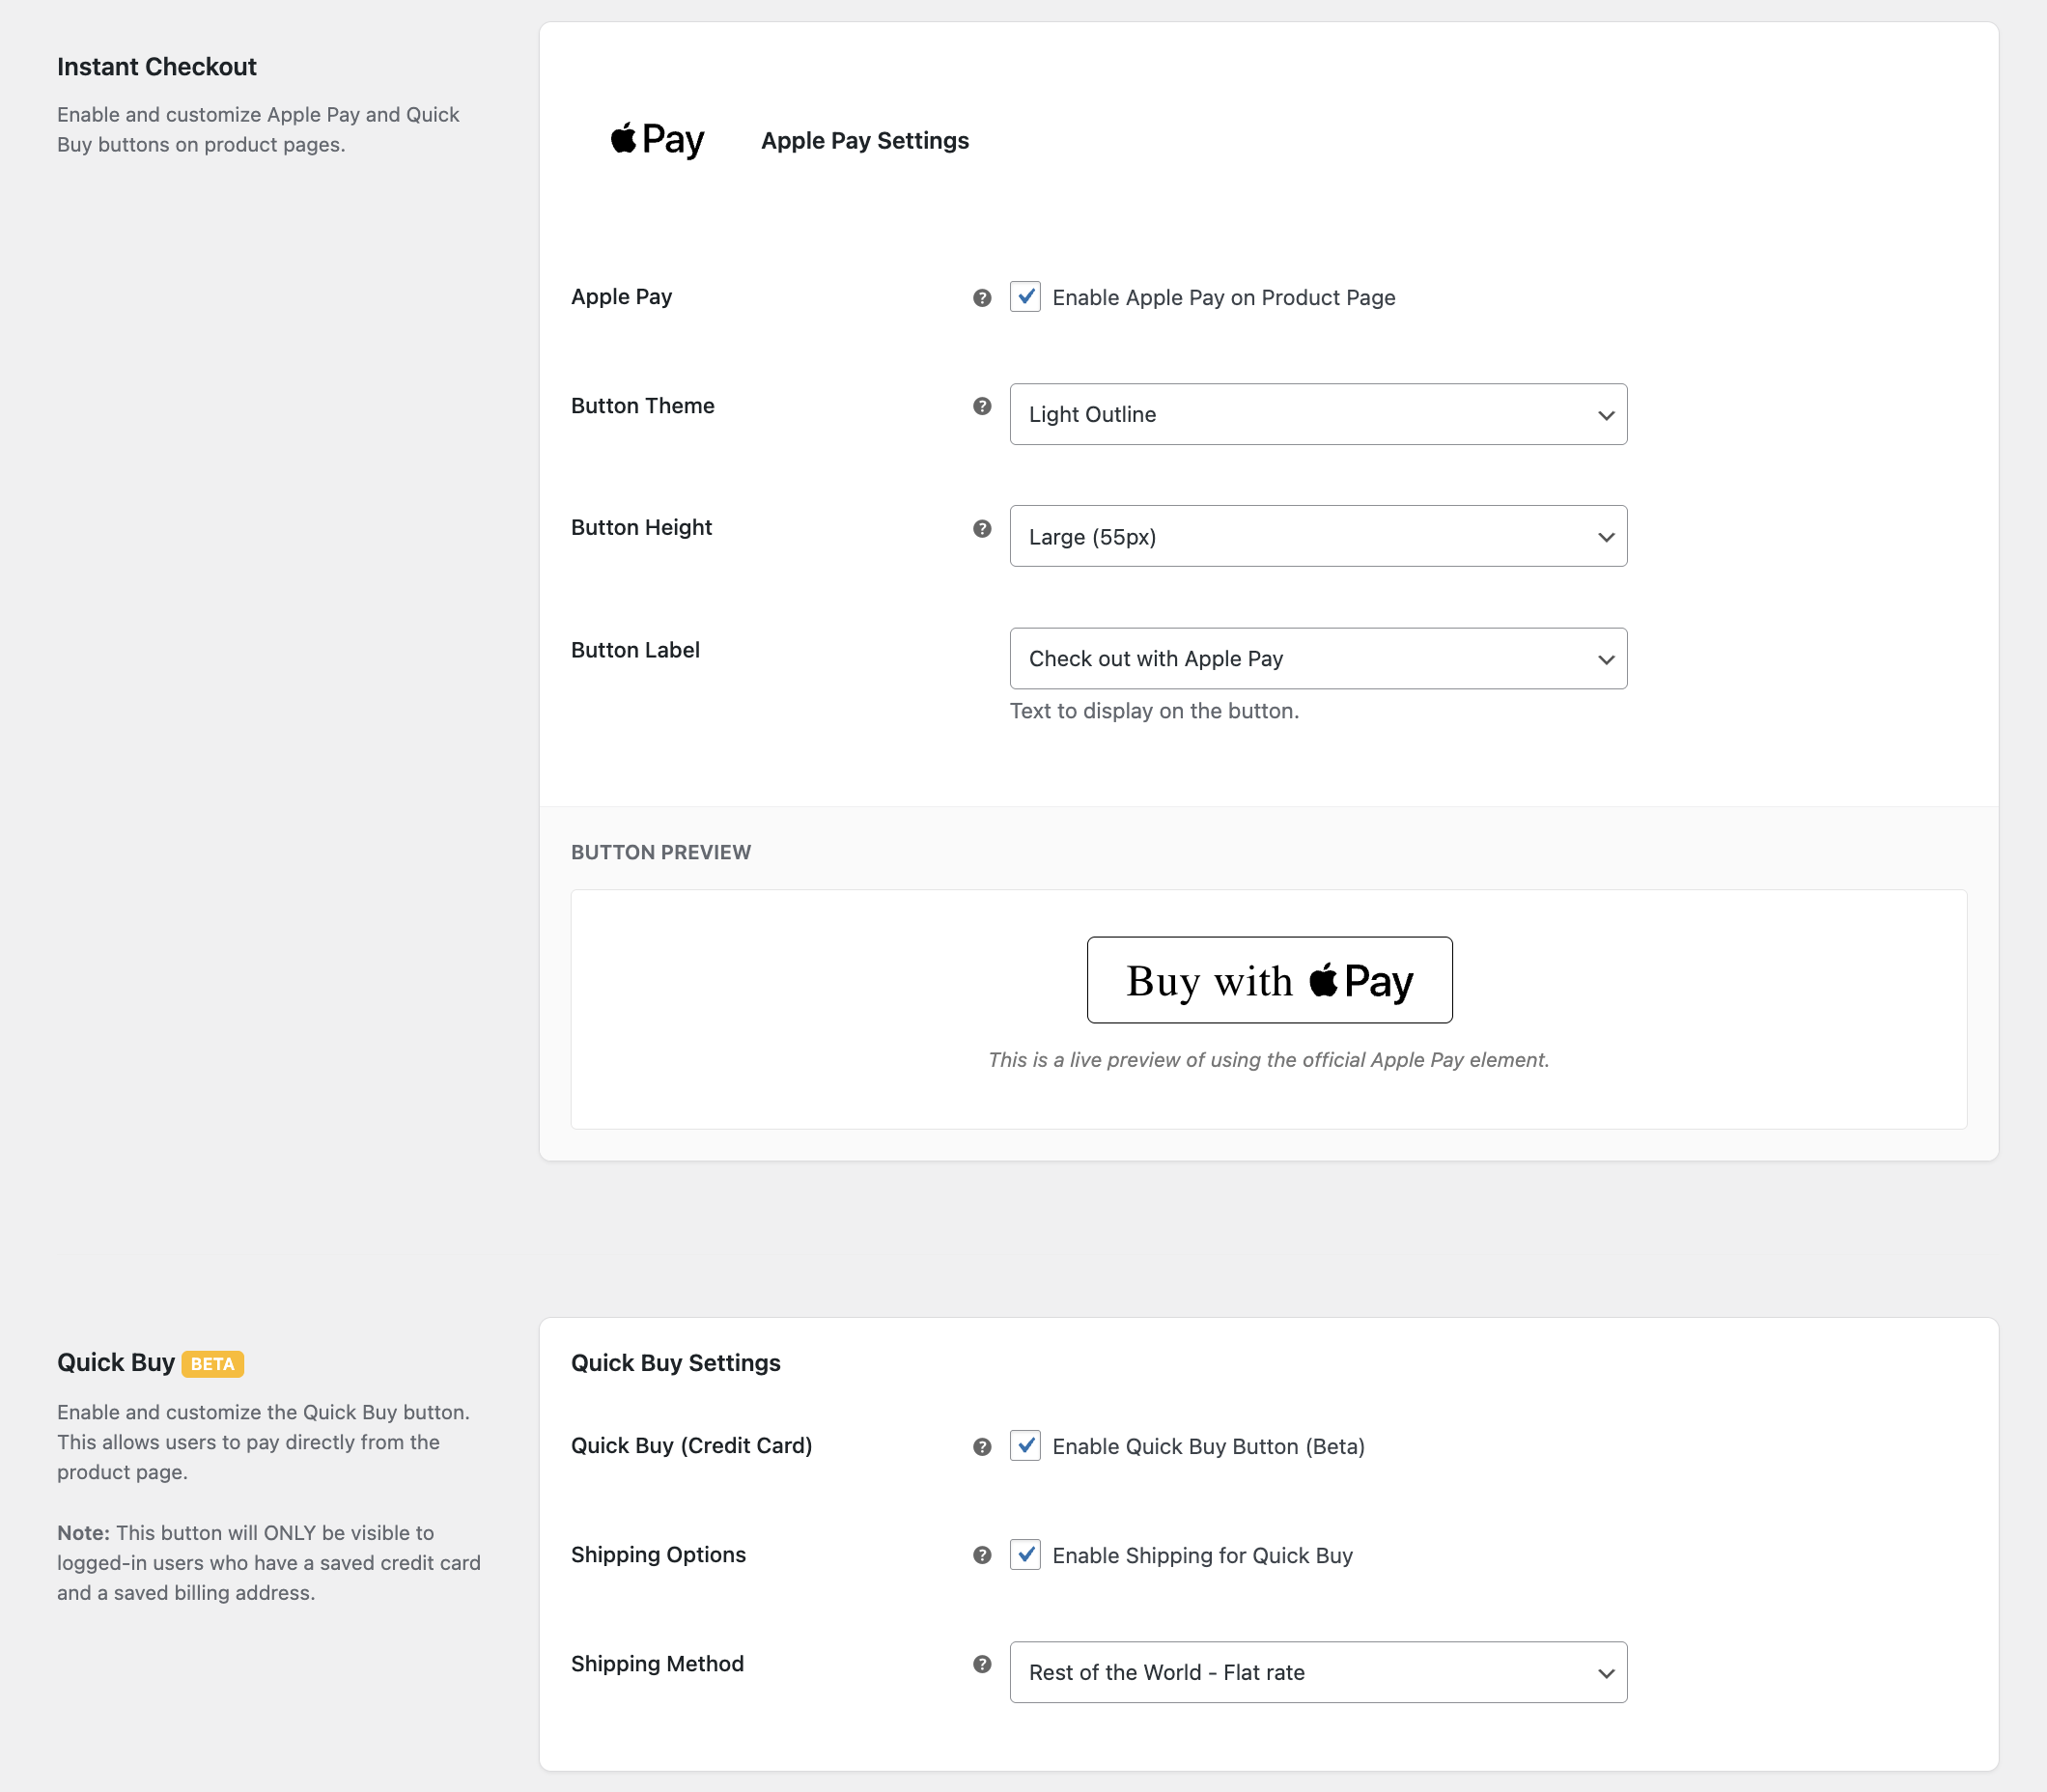
### Supported Pages
- **Product Page**: Allows customers to buy a single product instantly.
[//]: # '- **Cart Page**: Allows customers to checkout with their entire cart contents quickly.'
---
## Tokenization (Save Cards)
Allow your customers to save their credit card details securely for future purchases. This feature improves conversion rates by reducing checkout friction for returning customers.
### How it Works
- On the checkout page, a "Save this card for future use" checkbox appears.
- Card details are securely tokenized and stored by Moyasar (not on your server).
- Returning customers can simply select their saved card to pay.
>
---
## Installation(Woocommerce)
# WooCommerce
Use Moyasar's plugin for the **WooCommerce** store to accept e-payments.
---
## Requirements
Moyasar plugin needs the following requirements to run:
- **WordPress** v5.6.0 or higher.
- **PHP** v7.4 or higher
- **WooCommerce** v5.1.0 or higher
---
## Plugin Page
Visit the official **[Moyasar Plugin Page](https://wordpress.org/plugins/moyasar/)** for more details, updates, and support resources related to the plugin.
---
## Installation
You can install the plugin automatically via the WordPress Dashboard or manually by uploading the plugin file.
### Automatic Installation
1. **Log in to WordPress Admin Panel**
- Navigate to the WordPress Admin Dashboard.
2. **Go to the Plugins Section**
- Click on **Plugins** -> **Add New**.
3. **Search for the Plugin**
- In the search bar, type **Moyasar**.
>
>
> 
4. **Install the Plugin**
- Locate the plugin **Moyasar Payments** in the search results and click the **Install Now** button.
5. **Activate the Plugin**
- Once installed, click the **Activate** button to enable the plugin.
---
## Next Steps
Once installed, proceed to the [Configuration](configuration) section to set up your API keys and payment methods.
---
## Payment Methods
# methods
Moyasar's WooCommerce plugin supports multiple payment methods to cater to your customers' preferences. Each method can be enabled and customized individually.
To manage payment methods:
1. Go to **WooCommerce** -> **Settings** -> **Payments**.
2. Toggle the **Enabled** switch for the desired method.
3. Click **Manage** or **Set up** to configure specific settings.
>
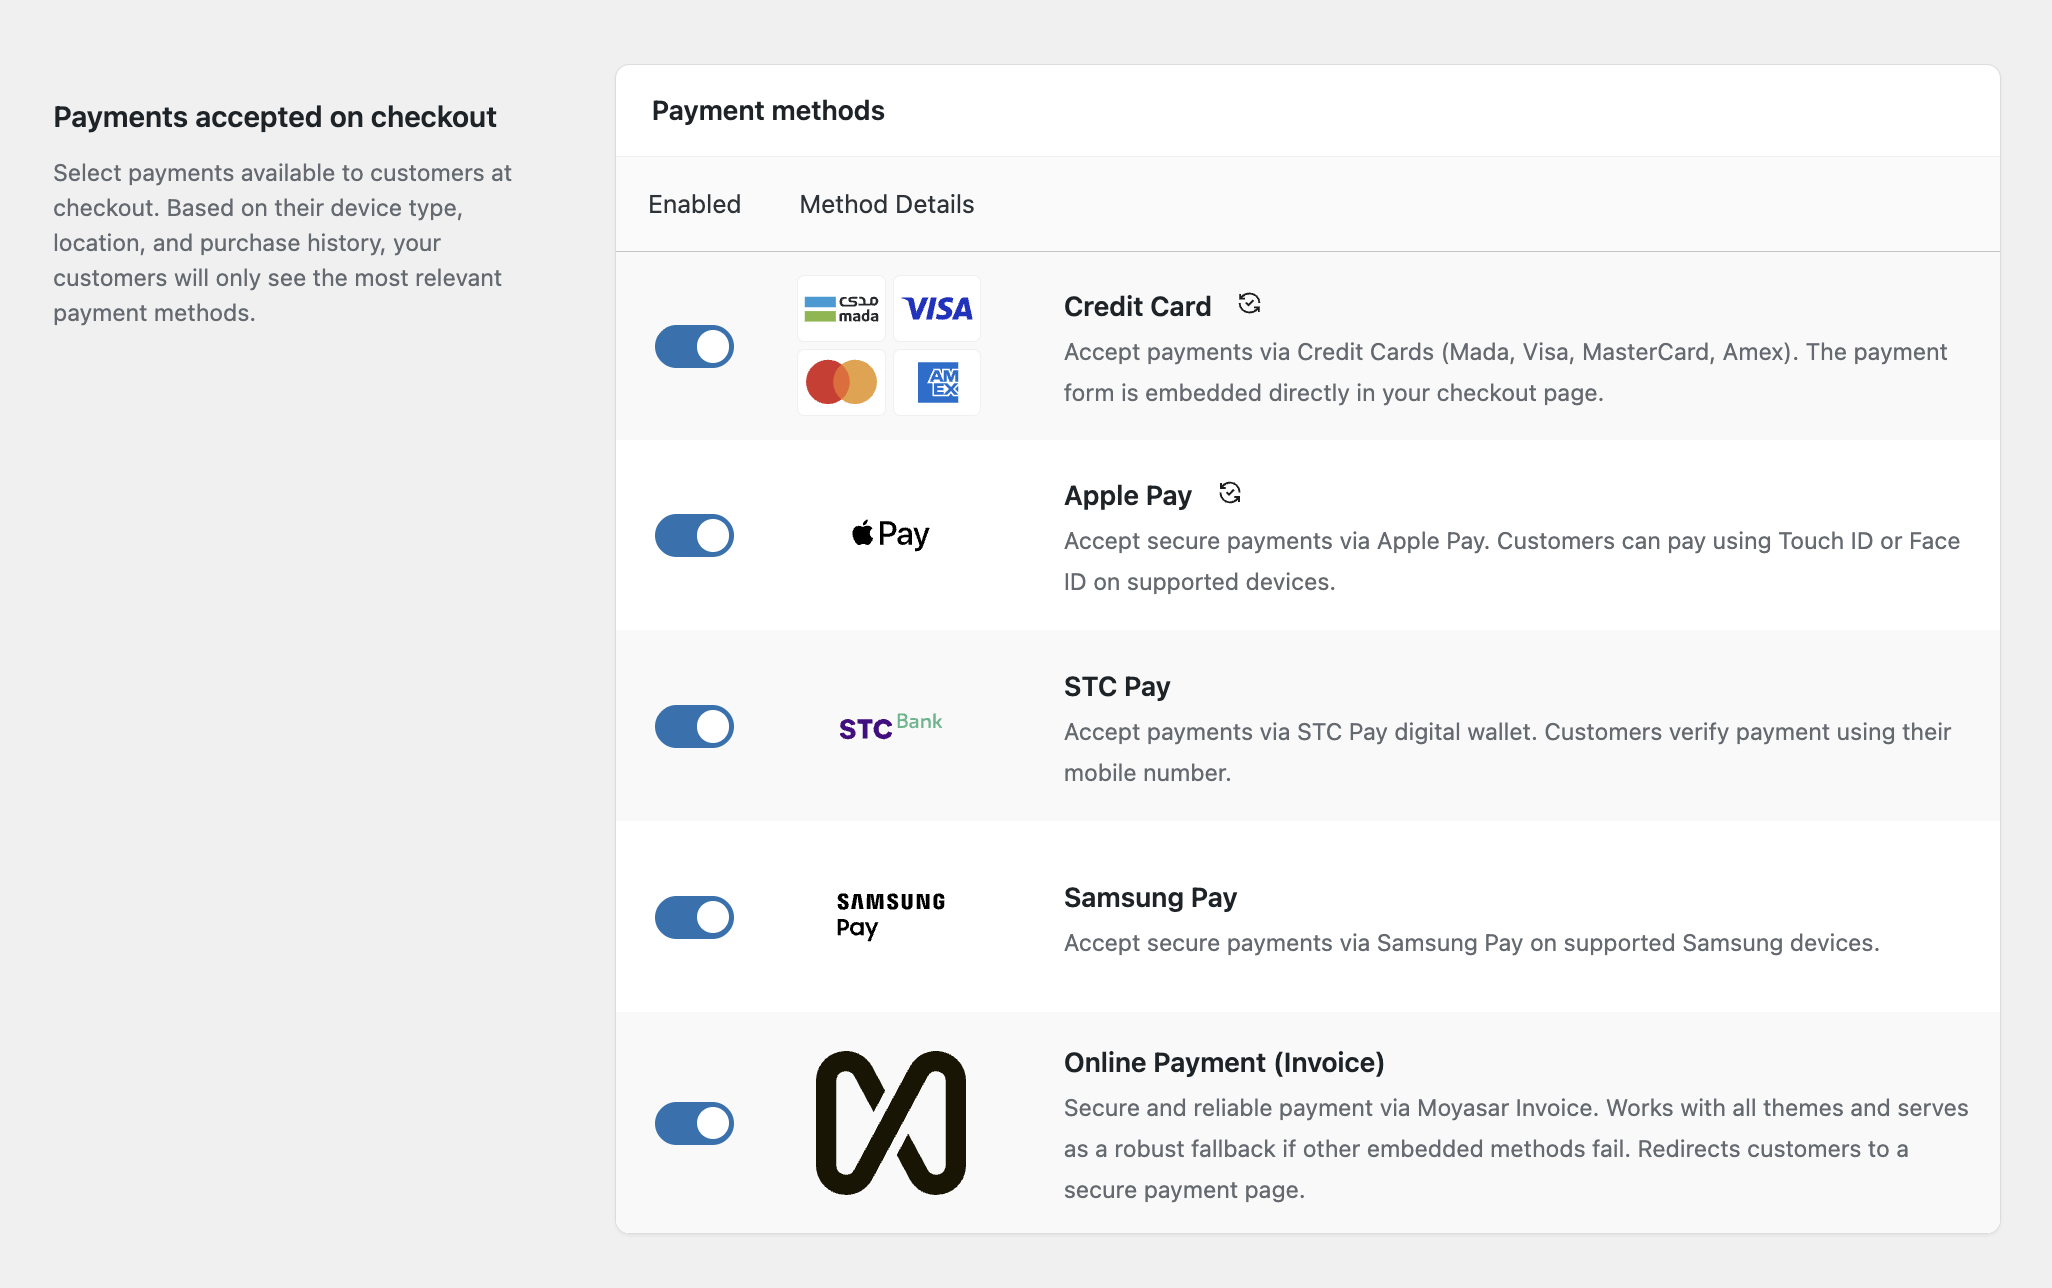
---
## Credit Card
Accept major credit and debit cards directly on your checkout page.
### Configuration
1. **Enable/Disable**: Toggle to show/hide this method.
2. **Allowed Brands**: Select which card brands to display icons for (Mada, Visa, MasterCard, Amex, UnionPay).
3. **Instant Checkout**: Enable "Quick Buy" buttons on product pages (see [Features](features) for details).
>
---
## Apple Pay
Accept secure payments via Apple Pay on supported devices (iPhone, iPad, Mac).
### Requirements
- Your site must be served over **HTTPS**.
- You must verify your domain with Apple.
### Configuration
1. **Enable/Disable**: Toggle to show/hide this method.
2. **Allowed Countries**: Restrict payment method availability to specific countries (optional).
3. **Domain Verification**:
- Download the domain association file.
- The plugin attempts to serve this file at `/.well-known/apple-developer-merchantid-domain-association`.
- Verify the status in the Apple Pay settings page. If validation fails, ensure the file is accessible.
>
>
> 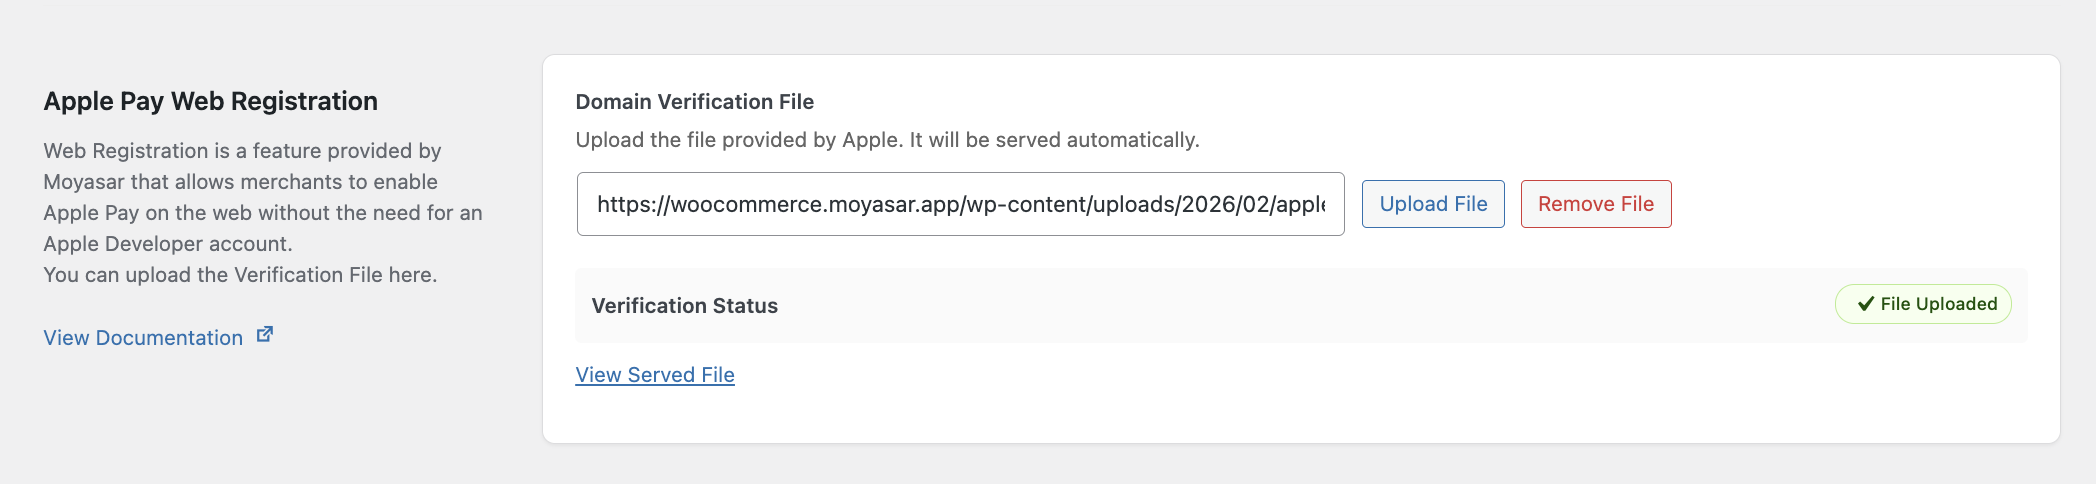
4. **Button Style**: Customize the Apple Pay button appearance (Black, White, White Outline).
---
## STC Pay
Accept payments via the STC Pay digital wallet. Customers verify payment using an OTP sent to their mobile number.
### Configuration
1. **Enable/Disable**: Toggle to show/hide this method.
>
---
## Samsung Pay
Accept secure payments via Samsung Pay on supported Samsung devices.
### Configuration
1. **Enable/Disable**: Toggle to show/hide this method.
2. **Service ID**: innovative service ID provided by Moyasar.
>
---
## Moyasar Invoice (Online Payment)
**The Universal Payment Method**
Moyasar Invoice (labeled as "Online Payment") is a highly compatible, redirect-based payment method. Instead of entering details directly on your checkout page, customers are redirected to a secure, hosted payment page managed by Moyasar.
### Why use it?
- **Maximum Compatibility**: Works with **Most** WordPress themes and plugins. If you face styling issues or conflicts with other methods, this is the ultimate solution.
- **All-in-One**: Supports **all** payment methods enabled in your Moyasar Dashboard (Card Payment, Apple Pay, STC Pay, etc.) in a single unified page.
### Configuration
1. **Enable/Disable**: Toggle to show/hide this method.
>
---
## Migration(Woocommerce)
# Migration Guide
Before upgrading to a major version, it is recommended to take a full backup of your website.
---
## Migrating from v7.x or older to v8.0.0
Version 8.0.0 introduces significant improvements, including a centralized settings area and general enhacments.
Please be aware that some legacy settings might not carry over automatically.
### Steps
1. **Backup Your Site**: Ensure you have a recent backup.
2. **Deactivate Old Plugin**: Go to **Plugins** and deactivate your current version.
3. **Delete Old Plugin**: Delete the deactivated plugin.
4. **Install v8.0.0**: Install the new version as described in the [Installation](installation) guide.
5. **Re-Save Settings**:
- Go to **WooCommerce** -> **Settings** -> **Payments**.
- Click **Manage** next to **Moyasar**.
- Verify your API Keys and click **Save changes**.
:::warning[Important]
> If you encounter issues with payments not marked as "Paid", please verify your **Webhook** settings in the [Moyasar Dashboard](https://dashboard.moyasar.com/).
:::
>
---
## Need Help?
If specifically upgrading causes issues, you can temporarily downgrade to [v6.1.6](troubleshooting) while contacting support.
---
## Subscriptions
Moyasar’s WooCommerce plugin supports integration with **WooCommerce Subscriptions**, enabling recurring billing capabilities for your store.
> Currently, **Credit Card** and **Apple Pay** payments are supported for subscriptions.
## Requirements
To use subscriptions with Moyasar, ensure the following:
- **WooCommerce Subscriptions** plugin is installed and active.
- **Moyasar WooCommerce** plugin **v8.0.0** or higher.
- Your store is configured to use Moyasar as the payment gateway.
## Supported Features
- Recurring payments using saved credit card tokens.
- Automatic renewal handling.
- Subscription status updates (e.g., cancellation, expiration).
- Manual renewals and payment retries.
## Installation & Setup
1. **Install WooCommerce Subscriptions Plugin**
Make sure the official [WooCommerce Subscriptions](https://woocommerce.com/products/woocommerce-subscriptions/) plugin is installed and activated.
> 💡 Note: Only the official WooCommerce Subscriptions plugin is officially tested and supported.
2. **Enable Moyasar Gateway for Subscriptions**
- Navigate to **WooCommerce** -> **Settings** -> **Payments** -> **Moyasar**.
- Enable **Moyasar Credit Card** and/or **Moyasar Apple Pay**.
- Ensure you have configured the API keys in the settings.
- Save changes.
3. **Create a Subscription Product**
- Go to **Products** -> **Add New**.
- Set the product type to **Simple Subscription** or **Variable Subscription**.
- Enter the subscription details (billing interval, trial period, etc.).
- Publish the product.
## Troubleshooting
If subscriptions are not working as expected:
- Ensure the customer used a supported payment method (Credit Card or Apple Pay).
- Check Moyasar logs in **WooCommerce** -> **Status** -> **Logs**.
- Confirm that the **Webhooks** are configured properly in the Moyasar Dashboard.
---
## Troubleshooting
If you encounter issues while using the Moyasar plugin, please review the common solutions below.
---
## Fallback Version (v6.1.6)
If you experience critical issues with **version 8.0.0**, you can download the last stable version (**6.1.6**).
:::warning[Important]
> Please contact our support team before downgrading so we can assist you in resolving the issue.
:::
> [Download Moyasar Payment v6.1.6](https://moyasarfin-my.sharepoint.com/:u:/g/personal/a_dakheel_moyasar_com/IQDk-C6njSg3R7H0gfjUVUTfAeu4b98-qybHETZTMA9pNBI?e=nE9MBZ)
---
## Common Issues
### Payment Failing with "Invalid API Key"
- Ensure you have copied the correct keys from the [Moyasar Dashboard](https://dashboard.moyasar.com/).
- Verify that **Test Mode** is enabled if using Test Keys (`pk_test_...`), and disabled if using Live Keys (`pk_live_...`).
### Order Status Not Updating
- This usually indicates a Webhook issue.
- Verify that your **Webhook URL** in the Moyasar Dashboard matches the one in your WooCommerce settings.
- Ensure the **Webhook Secret** is copied correctly.
- Check if your server firewall is blocking requests from Moyasar.
### cURL Error 28 / Connection Timed Out
- This indicates your server cannot connect to Moyasar's API.
- Contact your hosting provider to ensure outgoing connections to `api.moyasar.com` are allowed.
### 404 Error on Apple Pay Verification File
- Ensure your site is using HTTPS.
- Go to **Settings** -> **Permalinks** and click "Save Changes" to flush rewrite rules.
- Verify the file exists at `https://your-domain.com/.well-known/apple-developer-merchantid-domain-association`.
---
## Debug Logging
To help us assist you better, please enable debug logging:
1. Go to **WooCommerce** -> **Settings** -> **Payments**.
2. Click **Manage** next to **Moyasar Credit Card**.
3. Check the **Debug Log** box.
4. Save changes.
5. Attempt a payment again.
6. Check the logs at **WooCommerce** -> **Status** -> **Logs**.
---
## Support
If the issue persists, please reach out to our support team:
- **Email**: support@moyasar.com
- **Website**: [moyasar.com](https://moyasar.com)
---
## API Introduction
Moyasar provides a **REST API** that uses **HTTP methods** for the requests, authenticates via **HTTP Basic Auth**, and returns responses in **JSON format**.
Moyasar API is available in two modes: live mode and test mode. Using test mode does not impact your **live data** or **interact with banking networks**. The mode for the request is determined by the API Key used for authentication.
## Base URL
All API requests must be made to the following base URL:
`https://api.moyasar.com/v1`
## Postman Collection
You can download a Postman collection for the API from here:
- API Collection
- Test Environment
- Live Environment
### Setting Up Postman
1. Import the Collection and Environments into Postman.
2. Configure Variables: `merchant_base_url`, `publishable_api_key`, and `secret_key`.
3. Choose the appropriate environment (Test or Live) from the environment dropdown
:::info
**Important**: Always use an environment in Postman to manage your API keys securely. Never hardcode credentials directly in requests.
:::
:::tip
**Testing Best Practices**:
- Start with the Test environment to verify your integration
- Use test card numbers provided in the documentation
- Switch to Live environment only after thorough testing
:::
---
## Authentication(Api)
## Introduction
Moyasar's API uses [API Keys](../guides/dashboard/get-your-api-keys.md) to authenticate requests.
You can view and manage your API keys in the [Moyasar Dashboard.](https://dashboard.moyasar.com)
## Publishable Key
Sending cardholder data to the merchant backend is prohibited and will result in canceling the agreement between Moyasar and the merchant in addition to the immediate termination of the service.
To address this issue, Moyasar has implemented a publishable API key, enabling merchants to initiate payments directly from the frontend or to tokenize card payments for later use in the merchant's backend.
The publishable API key is restricted to a single operation only:
- Create Payment
With this restriction, this API key is safe to be shipped into client code like browsers and mobile apps.
## Secret Key
The secret API key allows you to perform all operations related to your account.
Unlike the publishable API key, the secret API key must be secret and only used from the merchant backend code.
If for any reason this key is leaked, the merchant is advised to immediately regenerate their API keys through the `settings` page in Moyasar Dashboard.
:::info
For improved security, secret keys are now only partially visible in the dashboard. If you lose a key, you’ll need to regenerate it and store it securely. New keys are shown only once. Only secret key ID (which starts with `sk_test_` or `sk_live_`) will remain visible and copyable.
:::
# Sandbox Environment
Moyasar provides a sandbox environment for testing purposes. Using the test mode doesn't affect your **live data** or **interact with the banking networks.** This allows you to test your integration and ensure everything is working correctly before going live with actual payments.
Test API keys are prefixed with the following keywords:
- pk_test\_
- sk_test\_
Live API keys on the other hand are prefixed with the following keywords:
- pk_live\_
- sk_live\_
# Basic Auth
Authentication to the API is performed via [HTTP Basic Auth](http://en.wikipedia.org/wiki/Basic_access_authentication).
You should send the Basic authentication scheme with the following fields:
- Username: \
- Password: \
:::warning[Important]
The password must be kept empty
:::
## HTTPS
All API calls must be made over HTTPS; any API call made over HTTP will be rejected.
## Example
Here is an example of the [List Payments](payments/01-create-payment.api.mdx) endpoint in different programming languages
```php
require 'vendor/autoload.php'; // Make sure Guzzle is installed via Composer
use GuzzleHttp\Client;
$client = new Client();
$response = $client->get('https://api.moyasar.com/v1/payments', [
'auth' => ['sk_test_123', ''],
]);
echo $response->getBody()->getContents();
```
```ruby
# frozen_string_literal: true
require 'http'
HTTP.basic_auth(user: 'sk_test_123', pass: '')
.get('https://api.moyasar.com/v1/payments')
```
```java
String url = "https://api.moyasar.com/v1/payments";
String username = "sk_test_123";
String password = "";
String credentials = username + ":" + password;
String encodedCredentials = java.util.Base64.getEncoder().encodeToString(credentials.getBytes());
HttpClient client = HttpClient.newHttpClient();
HttpRequest request = HttpRequest.newBuilder()
.uri(URI.create(url))
.header("Authorization", "Basic " + encodedCredentials)
.build();
HttpResponse response = client.send(request, HttpResponse.BodyHandlers.ofString());
System.out.println(response.body());
```
```python
url = 'https://api.moyasar.com/v1/payments'
response = requests.get(url, auth=('sk_test_123', ''))
print(response.text)
```
```js
const axios = require('axios');
let config = {
method: 'get',
url: 'https://api.moyasar.com/v1/payments',
auth: {
username: "sk_test_123",
password: ""
}
};
axios.request(config)
.then((response) => {
console.log(response.data);
})
.catch((error) => {
console.log(error);
});
```
```shell
curl https://api.moyasar.com/v1/payments -u sk_test_123:
```
```csharp
using (var client = new HttpClient())
{
string url = "https://api.moyasar.com/v1/payments";
string username = "sk_test_123";
string password = "";
var byteArray = Encoding.ASCII.GetBytes($"{username}:{password}");
client.DefaultRequestHeaders.Authorization = new System.Net.Http.Headers.AuthenticationHeaderValue("Basic", Convert.ToBase64String(byteArray));
var response = await client.GetStringAsync(url);
Console.WriteLine(response);
}
```
:::tip
You must replace `sk_test_123` with your API key.
:::
---
## Errors
Moyasar uses conventional HTTP response codes to indicate the success or failure of an API request.
:::tip
In general, codes in the 2xx range indicate success, codes in the 4xx range indicate an error that failed because of the information provided (e.g., a required parameter was omitted, a charge failed, etc.), and codes in the 5xx range indicate an error with Moyasar’s servers (these should be rare).
:::
Not all errors map cleanly onto HTTP response codes, however. When a request is valid but does not complete successfully (e.g., a credit card is declined by the bank), we return the normal 201 success code with a response message detailing the error.
# HTTP status code
The Moyasar API uses the following error codes:
| Error Code | Meaning |
| ---------- | ----------------------------------------------------------------------------------------- |
| 200 | OK – Everything worked as expected |
| 400 | Bad Request – The request was unacceptable, often due to missing a required parameter |
| 401 | Unauthorized – No valid API key was provided |
| 403 | Forbidden – credentials not enough to access resources |
| 404 | Not Found – The requested resource doesn’t exist |
| 405 | Method Not Allowed – Entity not activated to use live account |
| 429 | Too Many Requests – Too many requests hit the API too quickly. |
| 500 | Internal Server Error – We had a problem with our server. Try again later. |
| 503 | Service Unavailable – We are temporarily offline for maintenance. Please try again later. |
# Moyasar Errors
## Invalid API Key Authentication Error
```json
HTTP/1.1 401
Unauthorized
{ "type": "authentication_error",
"message": "Invalid authorization credentials",
"errors": null
}
```
## Credit Card Payment Validation Error
You will receive an error response from API in case something went wrong.
```json
HTTP/1.1 400
Bad Request
{
"type": "invalid_request_error",
"message": "Validation Failed",
"errors": { "amount" : ["must be an integer"] }
}
```
Each error response will contain a message attribute describing the reason shortly. For some error types, there might be a detailed errors attribute that lists and details more information.
The following table summarizes each error type returned from API:
| Type | Meaning |
| ------------------------ | -------------------------------------------------------------------------------------------------------- |
| `invalid_request_error` | The request included invalid parameters. |
| `authentication_error` | You didn't authenticate yourself correctly, check our guide on [Authentication](./authentication.mdx) |
| `rate_limit_error` | Too many requests hit the API too quickly. |
| `api_connection_error` | Failure to connect to Moyasar’s API. |
| `account_inactive_error` | Your Account hasn't been activated to accept real payments, contact our sales team for more information. |
| `api_error` | API errors cover any other type of problem (e.g. resource is not found). API errors should be rare. |
| `3ds_auth_error` | The credit card payment transaction failed due unauthorized attempt by the cardholder. |
---
## Idempotency
## Introduction
Idempotency is a concept that means performing an action multiple times has the same effect as performing it once. In other words, no matter how many times the operation is repeated, the outcome remains unchanged after the first execution.
It is crucial for building reliable and robust systems, especially in distributed environments where requests might be retried automatically due to timeouts or failures.
Moyasar provides a simple solution that you can adapt to ensure your payment creation requests are idempotent. Therefore, in the case of network issues, you can safely retry creating payments without the risk of duplicate charges to your customers.
## Common Scenario - No Idempotency
In the case where idempotency is not supported, suppose you are sending the following payment creation request:
```json
{
"amount": 100,
"callback_url": "http://payments.local",
"description": "card",
"source": {
"type": "creditcard",
"number": "4111111111111111",
"name": "John Doe",
"cvc": "113",
"month": "3",
"year": "2035"
}
}
```
You should receive either:
- a `201` response to indicate that the payment has been processed (either `initiated`, `failed`, or `paid`)
- a `4xx` response to indicate a client-side error.
- a `5xx` response to indicate that something somewhere went wrong.
The first two responses convey what happened to the payment request. You can decide what to do next.
However, the third one doesn't exactly tell what happened. There are multiple scenarios associated with the payment:
- **Processed**: The amount has been deducted from the customer. If you retry again, the customer will be double charged.
- **Not Processed**: The amount has not been deducted from the customer. If you retry again, the customer will not "feel" the service disturbance.
Overall, you will never know the conclusion in a timely manner to decide what to do next.
## Common Scenario - With Idempotency
Moyasar supports payment creation idempotency by allowing you to provide a `given_id` key with a value of a `uuid` (v4 is recommended) in the payment creation request. You will need to generate it from your side.
**Request**
```json
{
"given_id": "a1168bd1-47a4-4b97-8a50-dd5caaccacf2",
"amount": 100,
"callback_url": "http://payments.local",
"description": "card",
"source": {
"type": "creditcard",
"number": "4111111111111111",
"name": "John Doe",
"cvc": "113",
"month": "3",
"year": "2035"
}
}
```
**Response**
```json
{
"id": "a1168bd1-47a4-4b97-8a50-dd5caaccacf2",
"status": "initiated",
"amount": 100,
...
"source": {
...
}
}
```
The ID of the created payment will be the same one you have provided in the `given_id`.
This simple yet powerful feature enables you to safely retry creating the payment for multiple times if you get a `5xx` response.
- If the payment is already processed by the first request, you will get the same successful response you should have gotten before.
- If the payment wasn't processed yet, it will be processed as if it has been received for the first time.
Therefore, your customers are shielded from any potential networks issues - No duplicate charges with multiple retries.
:::info
If you ever send the same `give_id` value for different payments, you will receive a `400` response with the error message `Payment is already created.`
:::
## When To Retry Payment Creation
You should retry creating the payment in the following cases:
- When you receive a `5xx` response when creating a new payment.
- When you have a network error.
- When you get a timeout error (open, read, or write).
---
## Metadata
## Introduction
Metadata is a key/value object that can be attached to **Payments**, **Invoices**, **Payouts**, and **Tokens**.
You can specify up to **30 keys**, with key names up to **40 characters long** and values up to **500 characters long.**
## Use cases
Metadata is useful for storing additional, structured information on an object. For example, you could store your user’s **full name**, **email**, and **internal order id**.
:::warning[Important]
Do not store any sensitive information (bank account numbers, card details, etc.) as metadata.
:::
Moyasar doesn't use metadata to authorize or decline a charge—but you can use our [list payment](payments/03-list-payments.api.mdx) and [list invoices](invoices/03-list-invoice.api.mdx). endpoints to filter by metadata.
```shell title='Curl Request'
curl https://api.moyasar.com/v1/payments \
-u sk_test_5cD409HqwpoOIDjqOPJPd: \
-d "metadata[order_id]"=1000
```
```json title='Success Response'
{
"id": "760878ec-d1d3-5f72-9056-191683f55872",
"status": "paid",
"amount": 60000,
"fee": 1580,
"currency": "SAR",
"refunded": 0,
"refunded_at": null,
"captured": 0,
"captured_at": null,
"voided_at": null,
"description": null,
"amount_format": "600 SAR",
"fee_format": "15.80 SAR",
"refunded_format": "0.00 SAR",
"captured_format": "0.00 SAR",
"invoice_id": "9785ba96-a1be-5b13-a281-b27a4a6dad39",
"ip": null,
"callback_url": null,
"created_at": "2016-05-11T17:04:17.000Z",
"updated_at": "2016-05-12T17:04:19.633Z",
"metadata": {
"order_id": 1000,
"full_name": "Saleh Mohammed Ali"
},
"source": {
"type": "creditcard",
"company": "visa",
"name": "Saleh Ali",
"number": "XXXX-XXXX-XXXX-1111",
"message": null,
"transaction_url": null,
"gateway_id": "moyasar_cc_ce1iUidxhxhdbz74257S891wvW",
"reference_number": "125478454231"
}
}
```
## Unsetting Keys
Individual keys can be unset by sending them an empty value. All keys can be unset by sending an empty value to metadata.
---
## Request Apple Pay Session
This section describes API endpoints related to the Apple Pay Web Merchant Registration feature which allows you to use Apple Pay without an Apple Developer account, to learn more please visit [Apple Pay Web Merchant Registration.](../../../guides/apple-pay/web-registration.mdx)
To learn more about the field `validation_url` you can check this link [here.](../../../guides/apple-pay/apple-pay-web.md)
```shell
curl --location --request GET 'https://api.moyasar.com/v1/applepay/initiate' \
--header 'Accept: application/json' \
--data-raw
'{"validation_url":"string","display_name":"string","domain_name":"string","publishable_api_key":"string"}'
```
```js
var request = require('request');
var options = {
method: 'GET',
url: 'https://api.moyasar.com/v1/applepay/initiate',
headers: {
Accept: 'application/json',
},
body: '{"validation_url":"string","display_name":"string","domain_name":"string","publishable_api_key":"string"}',
};
request(options, function (error, response) {
if (error) throw new Error(error);
console.log(response.body);
});
```
```javascript
var myHeaders = new Headers();
myHeaders.append('Accept', 'application/json');
var raw =
'{"validation_url":"string","display_name":"string","domain_name":"string","publishable_api_key":"string"}';
var requestOptions = {
method: 'GET',
headers: myHeaders,
body: raw,
redirect: 'follow',
};
fetch('https://api.moyasar.com/v1/applepay/initiate', requestOptions)
.then((response) => response.text())
.then((result) => console.log(result))
.catch((error) => console.log('error', error));
```
```python
url = "https://api.moyasar.com/v1/applepay/initiate"
payload =
"{\"validation_url\":\"string\",\"display_name\":\"string\",\"domain_name\":\"string\",\"publishable_api_key\":\"string\"}"
headers = {
'Accept': 'application/json'}
response = requests.request("GET", url, headers=headers, data=payload)
print(response.text)
```
```ruby
require "uri"
require "net/http"
url = URI("https://api.moyasar.com/v1/applepay/initiate")
https = Net::HTTP.new(url.host, url.port)
https.use_ssl = true
request = Net::HTTP::Get.new(url)
request["Accept"] = "application/json"
request.body = "{\"validation_url\":\"string\",\"display_name\":\"string\",\"domain_name\":\"string\",\"publishable_api_key\":\"string\"}"
response = https.request(request)
puts response.read_body
```
### Responses
```json
{
"epochTimestamp": 1644243430675,
"expiresAt": 1644247030675,
"merchantSessionIdentifier": "EF334EB8210299B3CD81C0AE7D6FEEDE2B0_3FD2C4951CBFE075F51A23BB5B0CB45AB0A31BC6E594A65D61763016E5C0EE85",
"nonce": "56a10696",
"merchantIdentifier": "7D7A4951B6E30E2FF0629B0ED9A875CE9BC72FD37F960AC231965050F9CB1AB0",
"domainName": "example.com",
"displayName": "example.com",
"signature": "094a9f8aa94e8a9ad788a6fa6c5e96744dc23ebb29b6699c9f2b974d9387989991df73bc8e97c2874450d3daa251b30fec499fcb671d63f6784ee58d2e0038446aedf06ea3cfb62f33b82f69ca21430a951da78f90d5721ee5bc8c8f62ff4c24a8ff72340ce501a24d9b6fd8fb086cb85d9f4137dee93f32fa5c208dceb97cb4af48196245cc39a69c4fefa5c3d83b42be0ef1ce3259813bea17fa643d481dfc28aefe4f698ae74410d7bd941a9239d348e5e486406d0a09c7744e5a51d5114c72b65dde23d6b8a4bebe07c4d5c24590fd8f92e58b27827a4ee148d46ab60fecd14e4e2dd955f79187609779ba65c018683f1fd0ec127062deb76c47306a5f02ed2239f49a56e89552e279399c6705c6b7d3ca5763551475a7814ebda80bc98f344ad71680299d01f6f5d354f92dd526167bedf80d1d823c139b556386d647c4164b697cb9d1d3b3a2b9110e5b3ede120d70d980eadcebd357589deb738c4ab3249ad5a5e3771666236d014ca7d2bc9e0ef28f191e500e44a45eb8b5a3a05636a814a4ffa49b0b2ae593e53226c5fff70c0ba3e7312e561a00907702cc1997ea5e7479c16c46610f1e78ed5047037841198eb94d0cfc82ad3ef04c18467e188251523e45a506e15a7c15ee3ac1862c6beee4020bb418b136df243af69f8bd6e72b9e880a3f0de28a6ddb292abcf941048c82d84807d4ef17ba404424ddaf6e45ba9e293c8e4622f8a160877a9905bcc68c694aa6631e9b4c7f0d769ad836c2134fe43811c149aa397c29ad49b42eb1ba11f388e78706b940c1bed035f3f1f2b2d9fe0519b1a7bb48019d49e42c452eb23727d7a0f085f411589e28f9cd060923d472bff02f251dba44e2d949c2b27541f276fe412809f1a04bd34c9422fa1c7143be9fc1ca6241727e96b8d2e0521c851fa58d97d14db6469411f9006e07a2cc0cd1537cf403ad6f93b782a56f90689759addb48d644d40cb5674e75555b959ee5bae8c97b3b101e85651325bb63ba7ab236ced1571fa659d59f485f6fe2250ee85e4516663f08ee9e6a48dc949f375e82a36eebdb759211dcb6a8c5aa21797afeba230c66d037a381d7918d8cf8a153f19be6317edbafd5eb3d730fdadbe6560e99be3693824f307aef2f2ff4917a71cdbeba6f9ce1e443c216705939f97244108af5c3cd07e528670fde030e8beda7a2f859cd252efac90140f3ac812ac4703cdcbdfd41d150f7fd250f89bd3a9c7bf56e98b03b3b51f3f92284698ad9cc88d4f8d0f81cb2b74e12b1e34716f26cb8ed0009a4d6ac04acebbc8c7b6a89472bc753c66ab8e63d39da63f4b36e77e96fa4049137a3bf904a65177e55564231df514261d56c6fc1aa63a673e7821c49c5675944303f92c982c0dfbc79633eeb84ff48235050f513df1949ddad4a2b4592d5b43ed617e3e59ef408d0b1d7974d6966bc90a2c8810c52cddb7f685a34f2c78e9781270f50684b6f3faeb85deb56878893912579e085d545c602cdc4e77d7b64f652c84520f62028d2e29b4d3d229d22c80609451690ffd4e2e47fe4d894f4ec4bf16ceb41d36cf0a4d205a7a42c11bb7b7488c28f333044c13d5dbd55d1b63fcc01d85f37803a922fe8c7aeae4fdfc61fcb097b18d97c2541eb0ed6ffb1c83a69b152f0f778ab134690382ac152f1c01226dd9f697fa99ce6c06245b1b60c348e619736251aad59b85b13cbef5b8195b3cc7e5d5d7e23ab4dd901c7246946b207ea4423b7c8fe87f99303cbf37873c829d8e0e131bd85ab9bb30763f2ade9b2bc1f20bc2c921885d7d79c7477278bc65c8bbc1738b4fcdd68da28f5f5fefadd5aaf39f493306b3893766331c54cd4509107641ec183f6bc255a0c230106f07e56f1bb5828f941e4491f16379bc12145a5be5349c0fa98dd59e5dde057c5b7c91c3700afa875b23d724c5b7948949c9bc7e577db66ed65e54920d4428e576942c2acf1406f1a3e9c559a61389cefe5cfc3107dc95fd23c5d3d3b6c276f23b2150a3aa16f14e9f1f13a5766d245c7b9e9c5ef5e84d9889a6cfc075ae70bc76f8b15c794ae00125c5f3f00827f8749ec4c4c093595c84ed57a3462aa0c60d9269726fda8d702bb8c2ed7a2c0b231c22bea5cd86370432b5c721474576034d340c01083fc2a0b5e54c3b3ba7b90c799323d604327d86c0863d4fa4a13308fff73cae96705e5724f892c44457861bd39da2b9936ff0765f0d5da63fb2c2dae8752b252f9dc3821bb911caf996082a9a790126025fa520f9aba5cbd4be8043d6771d077fdce566ba4aff34fca240eaf21f8d8bc4e2bb87dfa22af4ef414d4dd09c1617f4e60c928ed795723f413be2ef31f9cd816c3bf34eba87a819b46f2fe4cdcca3fe7b5d3d6fb1138c03e63ffc7b8f9e8492cad3a1302f2ac9d766d75e446f5e6276172aed681603b57fd15963f311a9cf538eb9cff8f93ab026fb15a398e5e0cb06cbcf9c494f5a7c0a0d8bc2b52b74766444eb882980cc6d8b3fd4232aa4fbc4156f86344ff0689a048760e0a52ade31b177f5aeeec825d6a4eaa86bf85a62d4bf0ce56c3b7c890d2d44af386e1539cf7c5c6b960a39246e3e0a025be12ca63c6ea069ae618934c16ebebfe934312a4052742e88152839df715673101df7977c0033d3ce0f71ac8d388f8a26edcfdc9d4c1137f757a7b2031f8c55725c0b442d781a8c0e6f22c4c988d59bcf3bf47dfaa4fb4879bc12c8cbc5696c102aeaf081e9df51e9469d04f5b2f44e8d7b2fbb839753df52264a0a57557a332180079dd6a4b67a397f1842782d89e3309acaacedcd3c9ccf9a888532e461221e1e2b2af370c1f502aed2ffee561beaf36b443bfe00db368b2330bc933f7f435a020fed0172f3fd85780bacb4143157d120c66027e205d7adf81a31c77b7659c1ccfbf302cb6994872544cbebc6ff23524ab0307c8c41fafebb0f54df9c5d9ac3a85bf83420362a0fd8b4d34fc8a7ba2229e7b466f8c4ba2579330d383f54a893b3807b49334862d3ee2629028dc0fa6a6d1577cff85c1e16b7a5824f3b100fdcf461304f142c07a85a9e3ec8bb93a7a3a05a3c11abe9a4fe9989f0cc3325df662816e77dccad76e1f40414952be0dfd9f9c623a90ca596b5329",
"operationalAnalyticsIdentifier": "example.com:A696778BCC669B5DFCFF16ABAC506C8817D3FA841C7CCA6793A69E31C54DEF21",
"retries": 0
}
```
```json
// Domain registration file is missing at the path:
// https://yourdomain.com.well-known/apple-developer-merchantid-domain-association
{
"type": "invalid_request_error",
"message": "Validation Failed",
"errors": {
"Server responded with status 404"
}
}
```
---
## Create Token(Tokens)
Generate a token for a given Mada or credit card, this request should be done from your frontend directly to Moyasar.
### Code examples
```shell title='Curl Request'
curl -X POST https://api.moyasar.com/v1/tokens \
-u pk_test_MrtwozLJAuFmLKWWSaRaoaLX: \
-d name="Mohammed Ali" \
-d number="4111111111111111" \
-d month="09" \
-d year="27" \
-d cvc="911" \
-d callback_url="https://mystore.com/thanks" \
```
### Responses
```json
{
"id": "token_x6okRgkZJrhgDHyqJ9zztW2X1k",
"status": "initiated",
"brand": "visa",
"funding": "credit",
"country": "US",
"month": "09",
"year": "2027",
"name": "Mohammed Ali",
"last_four": "1111",
"metadata": null,
"message": null,
"verification_url": "VERIFICATION_URL",
"created_at": "2023-08-23T12:12:55.857Z",
"updated_at": "2023-08-23T12:12:55.857Z"
}
```
```json
{
"message": "Ain't no cake like that."
}
```
---
## Delete Token
To Delete an individual token, you only need to provide the token’s unique ID.
```shell title='Curl Request'
curl -X "DELETE" \
-u sk_test_MrtwozLJAuFmLKWWSaRaoaLX: \
"https://api.moyasar.com/v1/tokens/token_x6okRgkZJrhgDHyqJ9zztW2X1k"
```
### Responses
```json title='Error Response'
{
"type": "api_error",
"message": "Object not found",
"errors": null
}
```
---
## Fetch Token
To fetch an individual token, you only need to provide the token’s unique ID.
```shell title='Curl Request'
curl -X GET \
-u sk_test_MrtwozLJAuFmLKWWSaRaoaLX: \
"https://api.moyasar.com/v1/tokens/token_x6okRgkZJrhgDHyqJ9zztW2X1k"
```
### Responses
```json
{
"id": "token_x6okRgkZJrhgDHyqJ9zztW2X1k",
"status": "initiated",
"brand": "visa",
"funding": "credit",
"country": "US",
"month": "09",
"year": "2027",
"name": "Mohammed Ali",
"last_four": "1111",
"metadata": null,
"message": null,
"verification_url": null,
"created_at": "2023-08-23T12:12:55.857Z",
"updated_at": "2023-08-23T12:12:55.857Z"
}
```
```json
{
"type": "api_error",
"message": "Object not found",
"errors": null
}
```
---
## Token Object
| Attribute | Type | Description |
| ---------------- | ------ | ------------------------------------------ |
| id | string | token’s unique ID. |
| status | string | token status. (default: initiated) |
| brand | string | card’s brand. \[visa, master, mada, amex, unionpay] |
| funding | string | card’s funding type. \[credit, debit] |
| country | string | card’s issuing country |
| month | string | card’s expiration month |
| year | string | card’s expiration year |
| name | string | cardholder name |
| last_four | string | card’s last 4 digits |
| verification_url | string | 3D secure verification proccess URL. |
| metadata | object | metadata object (default: null) |
| created_at | string | creation timestamp in ISO 8601 format. |
| updated_at | string | modification timestamp in ISO 8601 format. |
---
## Token Status Reference
| Status | Description |
| --------- | -------------------------------------------------------------------------------------------------------------------- |
| initiated | First status of a token. It indicates that the token has been created but the cardholder didn't verify his card yet. |
| active | The token reaches this status when the cardholder verifies the card by completing the verification process. |
| inactive | The token reaches this status when card verification failed or when the card expires. |
---
## List Transfer Lines
This API enables you to list all lines for a given transfer (settlement) that has been performed for your account.
:::tip
This API is only available for Moyasar **aggregation** merchants.
:::
## Authentication
This API requires your secret API key in order to be used, learn more here [Authentication](../../authentication.mdx).
## Pagination
This API supports pagination. It only returns `40` items at a time.
To list the second page of payouts, please use the `page` query parameters to specify the page number.
### List all lines for a given transfer
```shell title='Request'
curl https://apimig.moyasar.com/v1/transfers/3a6dcbc4-f93e-5b22-86ff-a40b11a207ea/lines \
--header 'Authorization: Basic c2tfdGVzdF8xMjM6'
```
```php
request('GET', 'https://apimig.moyasar.com/v1/transfers/3a6dcbc4-f93e-5b22-86ff-a40b11a207ea/lines', [
'auth' => ['sk_test_123', ''], // Replace 'sk_test_123' with your actual username
]);
echo $response->getBody();
```
```ruby
require 'http'
response = HTTP
.basic_auth(user: 'sk_test_123', pass: '')
.get('https://apimig.moyasar.com/v1/transfers/3a6dcbc4-f93e-5b22-86ff-a40b11a207ea/lines')
puts response.body
```
```python
url = 'https://apimig.moyasar.com/v1/transfers/3a6dcbc4-f93e-5b22-86ff-a40b11a207ea/lines'
auth = ('sk_test_123', '') # Replace 'sk_test_123' with your actual username and leave the second parameter as an empty string
response = requests.get(url, auth=auth)
print(response.text)
```
```csharp
string url = "https://apimig.moyasar.com/v1/transfers/3a6dcbc4-f93e-5b22-86ff-a40b11a207ea/lines";
string username = "sk_test_123"; // Replace 'sk_test_123' with your actual username
string password = "";
using (HttpClient client = new HttpClient())
{
client.DefaultRequestHeaders.Authorization = new AuthenticationHeaderValue("Basic", Convert.ToBase64String(Encoding.ASCII.GetBytes($"{username}:{password}")));
HttpResponseMessage response = client.GetAsync(url).Result;
if (response.IsSuccessStatusCode)
{
string result = response.Content.ReadAsStringAsync().Result;
Console.WriteLine(result);
}
else
{
Console.WriteLine("Error: " + response.StatusCode);
}
}
```
```java
String url = "https://apimig.moyasar.com/v1/transfers/3a6dcbc4-f93e-5b22-86ff-a40b11a207ea/lines";
String username = "sk_test_123"; // Replace 'sk_test_123' with your actual username
String password = "";
String encodedCredentials = Base64.getEncoder().encodeToString((username + ":" + password).getBytes(StandardCharsets.UTF_8));
HttpClient httpClient = HttpClient.newHttpClient();
HttpRequest request = HttpRequest.newBuilder()
.uri(URI.create(url))
.header("Authorization", "Basic " + encodedCredentials)
.GET()
.build();
HttpResponse response = httpClient.send(request, HttpResponse.BodyHandlers.ofString());
if (response.statusCode() == 200) {
System.out.println(response.body());
} else {
System.out.println("Error: " + response.statusCode());
}
```
```javascript
const axios = require('axios');
const url = 'https://apimig.moyasar.com/v1/transfers/3a6dcbc4-f93e-5b22-86ff-a40b11a207ea/lines';
const username = 'sk_test_123'; // Replace 'sk_test_123' with your actual username
const password = '';
const encodedCredentials = Buffer.from(`${username}:${password}`, 'utf-8').toString('base64');
axios
.get(url, {
headers: {
Authorization: `Basic ${encodedCredentials}`,
},
})
.then((response) => {
console.log(response.data);
})
.catch((error) => {
console.error('Error:', error.response.status);
});
```
```javascript
const url = 'https://apimig.moyasar.com/v1/transfers/3a6dcbc4-f93e-5b22-86ff-a40b11a207ea/lines';
const username = 'sk_test_123'; // Replace 'sk_test_123' with your actual username
const password = '';
const encodedCredentials = btoa(`${username}:${password}`);
fetch(url, {
method: 'GET',
headers: {
Authorization: `Basic ${encodedCredentials}`,
},
})
.then((response) => {
if (!response.ok) {
throw new Error(`Error: ${response.status}`);
}
return response.json();
})
.then((data) => {
console.log(data);
})
.catch((error) => {
console.error(error.message);
});
```
### Responses
```json
{
"lines": [
{
"payment_id": "53e1ddbc-8280-51aa-9077-918dd3dff0bc",
"type": "payment",
"amount": 10000,
"fee": 0,
"tax": 0
},
{
"payment_id": "3d4ac4ca-b601-5e38-a625-eb921cc8f5a3",
"type": "payment",
"amount": 10000,
"fee": 0,
"tax": 0
},
{
"payment_id": "b7220786-23e1-5f9e-a763-219fbed8bda4",
"type": "payment",
"amount": 10000,
"fee": 0,
"tax": 0
},
{
"payment_id": "1cc483de-7a05-55fa-8772-b8b864a031bf",
"type": "payment",
"amount": 10000,
"fee": 0,
"tax": 0
}
],
"meta": {
"current_page": 1,
"next_page": 2,
"prev_page": null,
"total_pages": 3,
"total_count": 100
}
}
```
```json
{
"type": "authentication_error",
"message": "Invalid authorization credentials",
"errors": null
}
```
---
## List Transfers
This API gives you the ability to list all transfers (settlements) that have been performed for your account.
:::tip
This API is only available for Moyasar aggregation merchants.
:::
## Authentication
This API requires your secret API key in order to be used, learn more here [Authentication](../../authentication.mdx).
## Pagination
This API supports pagination. It only returns `40` items at a time.
To list the second page of payouts, please use the `page` query parameters to specify the page number.
## List Transfers
```shell
curl https://apimig.moyasar.com/v1/transfers \
--header 'Authorization: Basic c2tfdGVzdF8xMjM6'
```
```php
request('GET', 'https://apimig.moyasar.com/v1/transfers', [
'auth' => ['sk_test_123', ''], // Replace 'sk_test_123' with your actual username
]);
echo $response->getBody();
```
```ruby
require 'http'
response = HTTP
.basic_auth(user: 'sk_test_123', pass: '')
.get('https://apimig.moyasar.com/v1/transfers')
puts response.body
```
```Python
url = 'https://apimig.moyasar.com/v1/transfers'
auth = ('sk_test_123', '') # Replace 'sk_test_123' with your actual username and leave the second parameter as an empty string
response = requests.get(url, auth=auth)
print(response.text)
```
```csharp
string url = "https://apimig.moyasar.com/v1/transfers";
string username = "sk_test_123"; // Replace 'sk_test_123' with your actual username
string password = "";
using (HttpClient client = new HttpClient())
{
client.DefaultRequestHeaders.Authorization = new AuthenticationHeaderValue("Basic", Convert.ToBase64String(Encoding.ASCII.GetBytes($"{username}:{password}")));
HttpResponseMessage response = client.GetAsync(url).Result;
if (response.IsSuccessStatusCode)
{
string result = response.Content.ReadAsStringAsync().Result;
Console.WriteLine(result);
}
else
{
Console.WriteLine("Error: " + response.StatusCode);
}
}
```
```java
String url = "https://apimig.moyasar.com/v1/transfers";
String username = "sk_test_123"; // Replace 'sk_test_123' with your actual username
String password = "";
String encodedCredentials = Base64.getEncoder().encodeToString((username + ":" + password).getBytes(StandardCharsets.UTF_8));
HttpClient httpClient = HttpClient.newHttpClient();
HttpRequest request = HttpRequest.newBuilder()
.uri(URI.create(url))
.header("Authorization", "Basic " + encodedCredentials)
.GET()
.build();
HttpResponse response = httpClient.send(request, HttpResponse.BodyHandlers.ofString());
if (response.statusCode() == 200) {
System.out.println(response.body());
} else {
System.out.println("Error: " + response.statusCode());
}
```
```js
const axios = require('axios');
const url = 'https://apimig.moyasar.com/v1/transfers';
const username = 'sk_test_123'; // Replace 'sk_test_123' with your actual username
const password = '';
const encodedCredentials = Buffer.from(`${username}:${password}`, 'utf-8').toString('base64');
axios
.get(url, {
headers: {
Authorization: `Basic ${encodedCredentials}`,
},
})
.then((response) => {
console.log(response.data);
})
.catch((error) => {
console.error('Error:', error.response.status);
});
```
```js
const url = 'https://apimig.moyasar.com/v1/transfers';
const username = 'sk_test_123'; // Replace 'sk_test_123' with your actual username
const password = '';
const encodedCredentials = btoa(`${username}:${password}`);
fetch(url, {
method: 'GET',
headers: {
Authorization: `Basic ${encodedCredentials}`,
},
})
.then((response) => {
if (!response.ok) {
throw new Error(`Error: ${response.status}`);
}
return response.json();
})
.then((data) => {
console.log(data);
})
.catch((error) => {
console.error(error.message);
});
```
### Responses
```json
{
"transfers": [
{
"id": "22745f84-c648-5d39-b81a-66066c293d54",
"recipient_type": "Entity",
"recipient_id": "3a83ae78-bcd9-51fe-bd23-69cdbc8b212f",
"currency": "SAR",
"amount": 120000,
"fee": 0,
"tax": 0,
"reference": "bank_ref_789",
"transaction_count": 0,
"created_at": "2023-02-11T08:06:54.000Z"
},
{
"id": "3a6dcbc4-f93e-5b22-86ff-a40b11a207ea",
"recipient_type": "Entity",
"recipient_id": "3a83ae78-bcd9-51fe-bd23-69cdbc8b212f",
"currency": "SAR",
"amount": 100000,
"fee": 0,
"tax": 0,
"reference": "bank_ref_123",
"transaction_count": 4,
"created_at": "2023-02-11T07:56:54.000Z"
}
],
"meta": {
"current_page": 1,
"next_page": null,
"prev_page": null,
"total_pages": 1,
"total_count": 2
}
}
```
```json
{
"type": "authentication_error",
"message": "Invalid authorization credentials",
"errors": null
}
```
---
## Show Transfer
Show Transfer API give you the ability fetch a single transfer (settlement) that has been made for your account.
:::tip
This API is only available for Moyasar aggregation merchants.
:::
## Authentication
This API requries your secret API key in order to be used, learn more here [Authentication](../../authentication.mdx).
## Fetch a Transfer
```shell
curl https://apimig.moyasar.com/v1/transfers/22745f84-c648-5d39-b81a-66066c293d54 \
--header 'Authorization: Basic c2tfdGVzdF8xMjM6'
```
```php
request('GET', 'https://apimig.moyasar.com/v1/transfers/22745f84-c648-5d39-b81a-66066c293d54', [
'auth' => ['sk_test_123', ''], // Replace 'sk_test_123' with your actual username
]);
echo $response->getBody();
```
```ruby
require 'http'
response = HTTP
.basic_auth(user: 'sk_test_123', pass: '')
.get('https://apimig.moyasar.com/v1/transfers/22745f84-c648-5d39-b81a-66066c293d54')
puts response.body
```
```python
url = 'https://apimig.moyasar.com/v1/transfers/22745f84-c648-5d39-b81a-66066c293d54'
auth = ('sk_test_123', '') # Replace 'sk_test_123' with your actual username and leave the second parameter as an empty string
response = requests.get(url, auth=auth)
print(response.text)
```
```csharp
string url = "https://apimig.moyasar.com/v1/transfers/22745f84-c648-5d39-b81a-66066c293d54";
string username = "sk_test_123"; // Replace 'sk_test_123' with your actual username
string password = "";
using (HttpClient client = new HttpClient())
{
client.DefaultRequestHeaders.Authorization = new System.Net.Http.Headers.AuthenticationHeaderValue("Basic", Convert.ToBase64String(Encoding.ASCII.GetBytes($"{username}:{password}")));
HttpResponseMessage response = client.GetAsync(url).Result;
if (response.IsSuccessStatusCode)
{
string result = response.Content.ReadAsStringAsync().Result;
Console.WriteLine(result);
}
else
{
Console.WriteLine("Error: " + response.StatusCode);
}
}
```
```java
String url = "https://apimig.moyasar.com/v1/transfers/22745f84-c648-5d39-b81a-66066c293d54";
String username = "sk_test_123"; // Replace 'sk_test_123' with your actual username
String password = "";
String encodedCredentials = Base64.getEncoder().encodeToString((username + ":" + password).getBytes(StandardCharsets.UTF_8));
HttpClient httpClient = HttpClient.newHttpClient();
HttpRequest request = HttpRequest.newBuilder()
.uri(URI.create(url))
.header("Authorization", "Basic " + encodedCredentials)
.GET()
.build();
HttpResponse response = httpClient.send(request, HttpResponse.BodyHandlers.ofString());
if (response.statusCode() == 200) {
System.out.println(response.body());
} else {
System.out.println("Error: " + response.statusCode());
}
```
```js
const url = 'https://apimig.moyasar.com/v1/transfers/22745f84-c648-5d39-b81a-66066c293d54';
const username = 'sk_test_123'; // Replace 'sk_test_123' with your actual username
const password = '';
fetch(url, {
method: 'GET',
headers: {
'Authorization': 'Basic ' + btoa(`${username}:${password}`)
},
})
.then(response => {
if (!response.ok) {
throw new Error(`Error: ${response.status}`);
}
return response.json();
})
.then(data => {
console.log(data);
})
.catch(error => {
console.error(error.message);
});
```
### Responses
```json
{
"id": "22745f84-c648-5d39-b81a-66066c293d54",
"recipient_type": "Entity",
"recipient_id": "3a83ae78-bcd9-51fe-bd23-69cdbc8b212f",
"currency": "SAR",
"amount": 120000,
"fee": 0,
"tax": 0,
"reference": "bank_ref_789",
"transaction_count": 0,
"created_at": "2023-02-11T08:06:54.000Z"
}
```
```json
{
"type": "authentication_error",
"message": "Invalid authorization credentials",
"errors": null
}
```
---
## Fetch a Webhook Attempt
# Fetch a webhook attempt
```shell title='Curl Request'
curl "https://api.moyasar.com/v1/webhooks/attempts/:id" -u "sk_123:"
```
### Responses
```json title='Success Response'
{
"id": "29b479db-e72f-585c-b372-71879fcd413c",
"webhook_id": "0f952ef4-f796-5bf3-be44-1c617b40c793",
"event_id": "65a2b41b-b644-4792-a45d-f1c6f67846fe",
"event_type": "payment_paid",
"retry_number": 1,
"result": "success",
"message": "Webhook message was delivered successfully",
"response_code": 200,
"response_headers": "{h_foo:\"h_bar\"}",
"response_body": "{foo:\"bar\"}",
"created_at": "2022-12-24T10:34:00.005Z"
}
```
---
## List all Webhook Attempts
# List all Webhook attempts
```shell title='Curl Request'
curl "https://api.moyasar.com/v1/webhooks/attempts" -u "sk_123:"
```
### Responses
```json title='Success Response'
{
"webhook_attempts": [
{
"id": "29b479db-e72f-585c-b372-71879fcd413c",
"webhook_id": "0f952ef4-f796-5bf3-be44-1c617b40c793",
"event_id": "65a2b41b-b644-4792-a45d-f1c6f67846fe",
"event_type": "payment_paid",
"retry_number": 1,
"result": "success",
"message": "Webhook message was delivered successfully",
"response_code": 200,
"response_headers": "{h_foo:\"h_bar\"}",
"response_body": "{foo:\"bar\"}",
"created_at": "2022-12-24T10:34:00.005Z"
}
],
"meta": {
"current_page": 1,
"next_page": null,
"prev_page": null,
"total_pages": 1,
"total_count": 1
}
}
```
---
## Available Webhooks
### List Available Webhooks
List all of the available webhook events.
```shell title='Curl Request'
curl "https://api.moyasar.com/v1/webhooks/available_events" -u "sk_123:"
```
### Responses
```json title='Success Response'
{
"events": [
"payment_paid",
"payment_failed",
"payment_voided",
"payment_authorized",
"payment_captured",
"payment_refunded",
"payment_abandoned",
"payment_verified",
"card_auth_authenticated",
"card_auth_failed"
]
}
```
:::note
Standalone 3D Secure is enabled only for selected merchants.
:::
---
## Create Webhook
This API endpoint enables you register webhooks and the events you would like to listen to. You can create a global event listener by omitting the event key, this will enable you listen to all of the currently available events and all the events to be added in the future.
```shell title='Curl Request'
curl -X POST https://api.moyasar.com/v1/webhooks \
-u sk_yourkey: \
-H 'Content-Type: application/json'
-d '{
"http_method": "post",
"url": "https://example.com/updatepayments",
"shared_secret": "123"
"events": [
"payment_paid",
"payment_failed"
]
}'
```
### Responses
```json title='Success Response'
{
"id": "c4bc247d-5288-4673-9b40-39c082ac7fbb",
"http_method": "post",
"url": "https://example.com/updatepayments",
"created_at": "2022-12-07T08:24:23.097Z",
"events": ["payment_paid", "payment_failed"]
}
```
---
## Delete Webhook
Get a webhook by its ID
```shell title='Curl Request'
curl -X DELETE https://api.moyasar.com/v1/webhooks/:id -u "sk_123:"
```
### Responses
```json title='Success Response'
{
"message": "Webhook was deleted successfully"
}
```
---
## Fetch Webhook
Get a webhook by its ID
```shell title='Curl Request'
curl "https://api.moyasar.com/v1/webhooks/:id" -u "sk_123:"
```
### Responses
```json title='Success Response'
{
"id": "c1307778-f112-4720-96c6-9e38fda601a2",
"http_method": "post",
"url": "https://example.com",
"created_at": "2022-12-07T08:22:25.487Z",
"events": [
"payment_paid",
"payment_failed",
"payment_voided",
"payment_authorized",
"payment_captured",
"payment_refunded",
"payment_abandoned",
"payment_verified"
]
}
```
---
## List Webhooks
# List webhooks
List all registered webhooks
```shell title='Curl Request'
curl "https://api.moyasar.com/v1/webhooks" -u "sk_123:"
```
### Responses
```json title='Success Response'
{
"webhooks": [
{
"id": "4f4ad1f3-720a-4fb5-9f2d-5eb0ea670450",
"http_method": "post",
"url": "https://example.com/alpha",
"created_at": "2022-12-07T08:23:18.087Z",
"events": [
"payment_paid",
"payment_failed",
"payment_voided",
"payment_authorized",
"payment_captured",
"payment_refunded",
"payment_abandoned",
"payment_verified"
]
},
{
"id": "c4bc247d-5288-4673-9b40-39c082ac7fbb",
"http_method": "post",
"url": "https://example.com/alpha",
"created_at": "2022-12-07T08:24:23.097Z",
"events": ["payment_paid", "payment_failed"]
}
]
}
```
---
## Webhook Reference
## Introduction
With Moyasar's webhooks, you can stay in the know about payment events in real time. Set up webhooks by specifying a notification URL. Choose the specific events you want to be alerted about, such as successful payments or refunds. Then, handle these events in your application to stay updated on payment activity. It's that easy!
## Payment Events
Payment events provide valuable information about the status and progress of your payments. By utilizing webhooks for these events, you can ensure **real-time** updates and effective management of your payment processes.
| Payment Event | Description |
| -------------------- | ----------------------------------------------------------------------------------------------------------------- |
| `payment_paid` | Get notified when a payment is successfully processed, indicating that the transaction is complete. |
| `payment_faild` | Receive alerts when a payment attempt fails, indicating the transaction was unsuccessful. |
| `payment_refunded` | Stay updated when a payment is refunded, indicating that the funds have been returned to the customer. |
| `payment_voided` | Be notified when a payment is voided, indicating that the transaction has been canceled or invalidated. |
| `payment_authorized` | Get notified when a payment is authorized, indicating that the funds have been reserved for the transaction. |
| `payment_captured` | Receive alerts when a payment is captured, indicating that the authorized funds have been successfully collected. |
| `payment_verified` | Stay updated when payment is verified, indicating that the payment details have been successfully validated. |
## Card Authentication Events
Card authentication events report the outcome of a standalone 3D Secure
authentication (`card_auth`). See the [3D Secure guide](../../../guides/3d-secure/standalone-authentication.mdx)
and the [Card Authentication API](../../card_auths/01-create-card-auth.api.mdx).
:::note
Standalone 3D Secure is enabled only for selected merchants.
:::
| Card Authentication Event | Description |
| ------------------------- | ------------------------------------------------------------------------------------------------------------ |
| `card_auth_authenticated` | Fired when a standalone authentication completes successfully. The `data` payload is the card authentication object. |
| `card_auth_failed` | Fired when a standalone authentication fails or expires. The `data` payload is the card authentication object. |
## Configure webhooks on your account
To register a webhook on your account follow this [guide](../../../guides/dashboard/setting-up-webhooks.md)
## Handling webhook request
### Return a 2xx response
Your endpoint must quickly return a successful status code (2xx) before any complex logic that could cause a timeout. For example, you must return a `2xx` response before updating a customer's invoice as paid in your accounting system.
### Retry Strategy
If the webhook recipient does not return a `2xx` HTTP code we will retry to send the webhook 5 more times and then drop the message.
| Attempt Number | Send Time | Time to wait when delivery fails |
| -------------- | ---------- | -------------------------------- |
| 1 | Immediate | 1 minute |
| 2 | 1 minute | 10 minutes |
| 3 | 10 minutes | 30 minutes |
| 4 | 30 minutes | 1 hour |
| 5 | 1 hour | 2 hours |
| 6 | 2 hours | Message is dropped |
## The Webhook Object
| Attribute | Type | Description |
| -------------- | ------- | ------------------------------------------------------------------------ |
| `id` | string | The event's unique ID. |
| `type` | string | The type of the event (payment_paid,...). |
| `created_at` | string | The time the webhook object was created. |
| `secret_token` | string | The endpoint's secret is assigned by the consumer to secure the webhook. |
| `account_name` | string | The name of the account in which the event occurred. |
| `live` | boolean | True if the payment is in live mode or false if it is in test mode. |
| `data` | object | The payload associated with the event — a payment for `payment_*` events, or a card authentication for `card_auth_*` events. |
## Example: `card_auth_authenticated`
The `data` payload matches the [Fetch Card Authentication](../../card_auths/02-fetch-card-auth.api.mdx) response. A `card_auth_failed` event carries the same shape, with `status` set to `failed`.
```json title="card_auth_authenticated webhook"
{
"id": "8f2c1d4e-7a3b-4c9d-8e1f-2a3b4c5d6e7f",
"type": "card_auth_authenticated",
"created_at": "2026-05-20T10:00:00Z",
"secret_token": "your-webhook-secret",
"account_name": "My Store",
"live": true,
"data": {
"id": "ca_2a1b...",
"status": "authenticated",
"amount": 10000,
"currency": "SAR",
"callback_url": "https://merchant.example/3ds/return",
"transaction_url": null,
"card": { "company": "visa", "last_digits": "1111" },
"result": {
"eci": "05",
"authentication_value": "AAICCGhVkQAAACcQaCFSdYh0YUg=",
"ds_transaction_id": "f8c3a0d2-7e76-4df1-8ba4-f457386d14bf",
"version": "2.2.0",
"transaction_status": "Y",
"auth_scheme": "visa",
"is_frictionless": false
},
"created_at": "2026-05-20T10:00:00Z"
}
}
```
---
## Pagination
All top-level API resources have support for bulk fetches via "**list**" API methods. For instance, you can [list payment](payments/03-list-payments.api.mdx) and [list invoices](invoices/03-list-invoice.api.mdx).
The response of a list API method represents a single page in a reverse chronological stream of objects. If you do not specify the `page`, you will receive the first page of this stream, containing the newest objects.
The stream of objects will return **40 objects** for the requested resource by default and an object containing meta-information about the list. here is an example of the `meta` object:
```json
{
"invoices":[...],
"meta": {
"current_page": 1,
"next_page": null,
"prev_page": null,
"total_pages": 1,
"total_count": 5
}
}
```
| Key | Description |
| -------------- | --------------------------------------------------- |
| `current_page` | The current page of the resource list. |
| `next_page` | The next page number if any, otherwise `null` |
| `prev_page` | The previous page number if any, otherwise `null` |
| `total_pages` | The total number of pages for the list of resources |
| `total_count` | The total number of invoices in the list |
---
## Payment Status Reference
| Status | Description |
| ---------- | ----------------------------------------------------------------------------------------------------------------------------------------------------------------------------------------- |
| initiated | First status of a payment. It indicates that the payment has been created but the cardholder **did not** pay yet. |
| paid | Payment reaches this status when the cardholder pays successfully. |
| failed | Payment reaches this status when the cardholder or merchant has a certain error that caused the payment to fail (errors are attached to the **message** attribute). |
| authorized | Payment reaches this status when the merchant authorizes it to be manually **captured** anytime later— the cardholder is not charged yet. |
| captured | Payment reaches this status when the cardholder of an **authorized** payment is charged successfully. |
| refunded | Payment reaches this status when the merchant refunds a **paid** or **captured** payment successfully. |
| voided | Payment reaches this status when the merchant cancels a **paid**, **authorized**, or **captured** payment. It works only if the amount is not settled yet in the merchant’s bank account. |
| verified | Payment reaches this status when the cardholder verifies his card in the tokenization process |
---
## Docs Hierarchy
This page illustrates the **Developer Documentation** sections and their pages/sub-pages.
## Guides
```bash
.
└── ● Guides
├── ◆ Payments
│ ├── credit_card
│ ├── apple_pay
│ ├── stc_pay
│ ├── tokenization
│ ├── payment_errors
│ ├── ➤ Form Configuration
│ │ └── translations
│ └── gateway_response_codes
├── ◆ Custom Payments
│ ├── credit_cards
│ ├── stc_pay
│ ├── apple_pay_on_websites
│ ├── apple_pay_on_apps
│ └── tokenized_cards
├── ◆ Invoices
│ └── creating_invoices
├── ◆ Payouts
│ ├── payout_introduction
│ ├── single_payout
│ ├── bulk_payouts
│ └── testing_payouts
├── ◆ E-Commerce Plugins
│ ├── woo_commerce
│ ├── presta_shop
│ ├── nop_commerce
│ ├── open_cart
│ └── magento_2
├── ◆ Coupons
│ └── coupons
├── ◆ Testing
│ ├── testing_cards
│ └── apple_pay_testing
├── ◆ Settlements
│ ├── settlement_introduction
│ ├── file_format
│ ├── using_api
│ ├── settlement_notification
│ └── facilitation_merchants
└── ◆ Dashboard
├── apple_pay_using_developer_account
├── apple_pay_using_web_registration
├── get_your_api_keys
├── setting_up_your_ip_whitelist
└── setting_up_webhooks
```
## APIs
```bash
.
└── ● APIs
├── api_intoduction
├── authentication
├── pagination
├── metadata
├── ◆ Payments
│ ├── ➤ Create Payment
│ │ ├── card_payment
│ │ ├── apple_pay_payment
│ │ ├── stc_pay_payment
│ │ ├── token_payment
│ │ └── payment_validations
│ ├── payment_object
│ ├── payment_status_reference
│ ├── credit_card_source
│ ├── apple_pay_source
│ ├── stc_pay_source
│ ├── update_payment
│ ├── fetch_payment
│ ├── list_payments
│ ├── void_payment
│ ├── refund_payment
│ ├── capture_payment
│ ├── manual_payments
│ └── 3d_secure
├── ◆ Payouts
│ ├── ➤ Payouts Accounts
│ │ ├── create_account
│ │ ├── fetch_account
│ │ └── list_accounts
│ ├── create_payout
│ ├── create_bulk_payout
│ ├── fetch_payout
│ ├── list_payout
│ └── payout_reference
├── ◆ Invoices
│ ├── invoice_status_reference
│ ├── create_invoice
│ ├── list_invoices
│ ├── fetch_invoice
│ ├── update_invoice
│ ├── cancel_invoice
│ ├── create_bulk_invoices
│ └── invoice_notifications
├── ◆ Tokens
│ ├── token_object
│ ├── token_status_reference
│ ├── create_token
│ ├── fetch_token
│ └── delete_token
├── ◆ Apple_pay
│ └── request_apple_pay_session
├── ◆ Webhooks
│ ├── ➤ Attempts
│ │ ├── fetch_webhook_attempt
│ │ └── list_attempts
│ ├── create_webhook
│ ├── fetch_webhook
│ ├── list_webhooks
│ ├── available_webhooks
│ ├── delete_webhook
│ └── webhook_reference
├── ◆ Transfers
│ ├── list_transfers
│ ├── show_transfer
│ └── list_transfer_lines
└── ◆ Errors
```
## SDKs
```bash
.
└── ● SDKs
├── ◆ iOS
│ ├── installation
│ ├── basic_integration
│ ├── apple_pay_payments_integration
│ ├── customizing_credit_card_view
│ └── testing
├── ◆ Android
│ ├── installation
│ ├── basic_integration
│ ├── android_compose
│ └── testing
├── ◆ Flutter
│ ├── installation
│ ├── basic_integration
│ └── ➤ Upgrading
│ └── 1.0 => 2.0
└── ◆ React Native
├── installation
├── basic_integration
├── testing
└── changelog
```
## eCommerce Plugins
```bash
.
└── ● eCommerce Plugins
├── Introduction
├── ◆ Magento2
│ ├── installation
│ ├── methods
│ └─ migration
├── ◆ WooCommerce
│ ├── installation
│ ├── methods
│ └─ migration
├── ◆ OpenCart
│ └─ installation
├── ◆ NopCommerce
│ └─ installation
├── ◆ PrestaShop
│ └─ installation
└── Support
```
---
## Developer Documentation Overview
# Moyasar Docs
Welcome to Moyasar Developer Documentation!
We will guide you through the process of integration and providing payments within your web or mobile application. Follow
these steps to get started.
:::info
Click [here](docs-hierarchy) if you would like an overview of the Developer Docs tree structure.
:::
## Create An Account
If you haven't created an account yet, please do so by visiting the sign up page then continue with the next step [Sign Up Here](https://dashboard.moyasar.com/register/new).
:::tip
Moyasar offers a **free** account for you to try the service in a sandbox environment. The sandbox environment will simulate
responses from the payment network to help you complete the full payment cycle before going live.
:::
## Prepare Your API Keys
After signing into your new account, you should be able to get your [API Keys](./guides/dashboard/get-your-api-keys.md)
from the settings page. API keys are used to authenticate all requests made to Moyasar API.
Learn more about authentication here: [Authentication](./api/authentication.mdx).
## Start Integration
It is time for you now to integrate the different payment methods within your application, Moyasar offers a set of tools
and libraries that will help you do this.
Web Payments
Accept mada, Visa, Mastercard, UnionPay, and Apple Pay on your web application.
Learn more: Basic Integration Guide
Mobile SDKs
Integrate payments within your iOS and Android applications.
Learn more: SDK Documentation
E-Commerce Plugins
Accept payments on major open-source e-commerce platforms.
Learn more: E-Commerce Integration
## Supported Platforms
Moyasar supports the following platforms:
- **Web (JavaScript Form):** [Card payments](./guides/card-payments/basic-integration.mdx), [Apple Pay](./guides/apple-pay/basic-integration.mdx), [STC Pay](./guides/stc-pay/basic-integration.mdx), [Google Pay](./guides/google-pay/google-pay-web.mdx)
- **Mobile SDKs:** [iOS](./sdk/ios/installation.mdx), [Android](./sdk/android/installation.mdx), [Flutter](./sdk/flutter/installation.mdx), [React Native](./sdk/react-native/installation.mdx)
- **E-Commerce Plugins:** [Supported plugins](./ecommerce/support.mdx)
- **API-first integration:** [Payments API](./api/payments/01-create-payment.api.mdx), [Invoices API](./api/invoices/01-create-invoice.api.mdx), [Payouts API](./api/payouts/01-create-payout-account.api.mdx)
## Verify Your Integration
Now, you need to verify your integration by making a test API request to ensure it is functioning correctly using the [testing cards](./guides/card-payments/test-cards.md).
## Contact Support
Feel free to contact us at our support email support@moyasar.com
## Helpdesk
Checkout our [helpdesk](https://help.moyasar.com/en/) for FAQs or Live Chat.